Table of Contents
Marshmallow Brownies with Swirled Fluff: The Ultimate Chocolate Indulgence
Growing up in my mother’s bustling kitchen in Marrakech, the air was always thick with the aroma of spices and sweet delights. We didn’t have precisely “brownies” in the American sense, but the concept of a rich, chocolatey treat was a staple. This marshmallow brownies recipe takes that deep, Moroccan chocolate love and gives it a modern, irresistible twist with the classic gooey marshmallow fluff. It’s a bit of Paris patisserie, a dash of New York City’s inventive spirit, and a whole lot of love from my heritage. I can’t wait for you to experience this chocolatey bliss, a true testament to how flavors can travel and transform, bringing comfort and joy across continents.
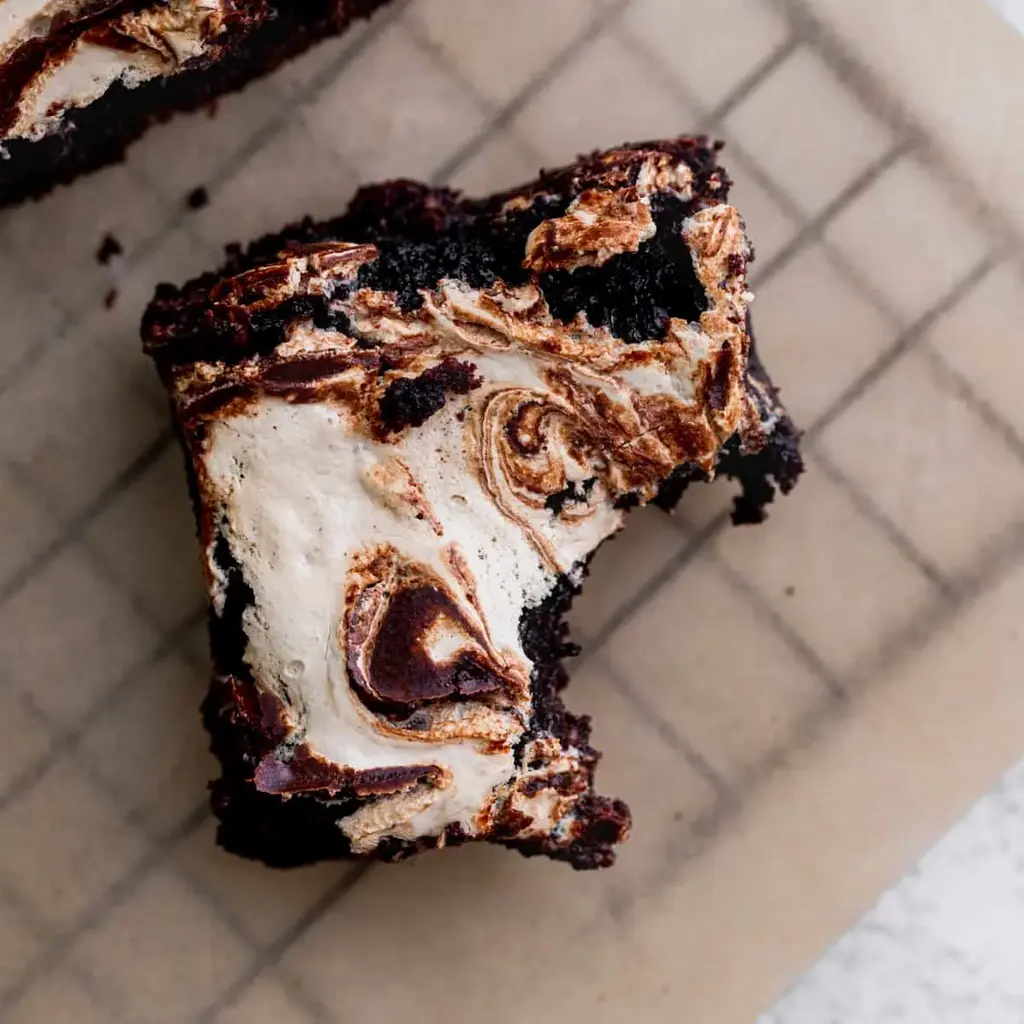
Imagine biting into a dense, incredibly fudgy brownie, the kind that coats your tongue in pure chocolate luxury. Then, you hit pockets of warm, melted marshmallow that are impossibly gooey, stretching with every bite. This isn’t just any brownie; it’s an experience. The deep cocoa flavor, enhanced by a hint of cocoa powder from my French training, is perfectly balanced by the sweet, ethereal marshmallow swirl. It’s a contrast that delights the senses. I developed this recipe with a focus on achieving that perfect, decadent texture, a technique I learned from whisking eggs and sugar in Paris to achieve maximum volume and lightness even in such a rich treat.
What sets this marshmallow brownies recipe apart is the balance of richness and perfect texture, all while remaining surprisingly easy to make. I’ve incorporated a tiny secret ingredient and a specific method for swirling the marshmallow to ensure it stays on top, creating that signature marbled effect. You’ll find tips and tricks throughout this guide to help you achieve bakery-quality results right in your own home. We’ll also cover a common pitfall that can lead to sunken marshmallows, ensuring your brownies are as beautiful as they are delicious. Get ready for a truly exceptional dessert!
Why This Marshmallow Brownies Recipe Is the Best
The secret to the incredible depth of flavor in these marshmallow brownies lies in the quality of the cocoa powder and a touch of oil alongside the butter. My culinary training in Paris emphasized the importance of layering flavors, and for chocolate desserts, that means using both unsweetened cocoa powder for intensity and melted chocolate for richness. Here, I use Dutch-processed cocoa for its smoother, less acidic profile, and I’ve found that a neutral oil like canola or vegetable oil contributes to an unparalleled fudginess that butter alone can’t achieve. It’s this thoughtful combination, drawing from my North African love for bold flavors and French patisserie precision, that makes these brownies truly special.
Achieving that perfect brownie texture is an art, and for these marshmallow brownies, it’s all about the careful balance of wet and dry ingredients and the mixing technique. I learned in pastry school that overmixing can lead to tough brownies, so I emphasize mixing the dry ingredients into the wet *just* until combined. For the marshmallow swirl, simply microwaving it briefly makes it pliable enough to dollop and swirl without sinking completely. This gentle handling ensures a dense, fudgy interior with distinct pockets of chewy marshmallow, a texture that’s utterly addictive and hard to resist.
Despite the sophisticated flavor and texture, this marshmallow brownies recipe is wonderfully forgiving and straightforward. The steps are clear, and each one builds upon the last to guarantee success, even if you’re new to baking. The preheating, the simple mixing process, and the straightforward bake time mean you can whip these up for a last-minute craving or a special occasion with confidence. It’s a recipe that proves you don’t need to be a pastry chef to create show-stopping desserts that are both elegant and incredibly delicious, perfect for any home baker in NYC or beyond.
Marshmallow Brownies Ingredients
When I’m back in New York, I love sourcing my ingredients from the Union Square Greenmarket, especially the fresh eggs and butter. For the best cocoa, I usually head to a specialty baking store in SoHo. But for everyday pantry staples, any good quality supermarket will do. This recipe calls for ingredients that are readily available, so you can make these marshmallow brownies anytime the craving strikes! If you’re in Paris, you’d find these at any local ‘épicerie’!
Ingredients List
- 2 cups White granulated sugar
- 3 Large eggs
- 1 Egg yolk
- 1/2 cup Unsalted butter, melted
- 2 tsp Pure vanilla extract
- 1/2 cup Oil (canola or vegetable)
- 3/4 cup All-purpose flour
- 1 cup Unsweetened cocoa powder (Use Dutch-process cocoa powder for best results)
- 1 1/2 TBSP Cornstarch
- 1/2 tsp Salt
- 1 cup Semi-sweet chocolate chips
- 1 cup Marshmallow creme
Ingredient Spotlight
Unsweetened Cocoa Powder: This is the heart of our brownie’s chocolate flavor. I highly recommend Dutch-process cocoa powder, which has been treated with an alkalizing agent to neutralize its acidity. This results in a smoother, richer, and less bitter chocolate taste, perfect for that deep, fudgy brownie experience. You can find it in most well-stocked grocery stores. If you only have natural unsweetened cocoa, you can use it, but the flavor will be slightly more acidic and less intense.
Marshmallow Creme: This is what gives our brownies their signature gooey, stretchy texture. It’s essentially a pre-whipped marshmallow spread, making it incredibly easy to work with. Most supermarkets carry it in the baking aisle. If you can’t find marshmallow creme, you can make your own marshmallow fluff, or as a last resort, use mini marshmallows, though they may melt and spread more unevenly, and be careful not to let them burn!
Eggs and Egg Yolk: The combination of whole eggs and an extra egg yolk is key to the richness and fudgy texture of these brownies. The yolks add extra fat and emulsifiers, contributing to a smoother, denser crumb. When whisked properly with sugar, they also create a beautiful, glossy sheen on the finished brownie. Ensure your eggs are at room temperature for the best volume when whisking.
| Original Ingredient | Best Substitution | Flavor / Texture Impact |
|---|---|---|
| Dutch-Process Cocoa Powder | Natural Unsweetened Cocoa Powder | Slightly more acidic, less intense chocolate flavor. May require a touch less leavening if using a recipe with baking soda. |
| Marshmallow Creme | Mini Marshmallows (toasted slightly) or Homemade Marshmallow Fluff | Mini marshmallows might melt and spread more, requiring careful dolloping. Homemade fluff might have a softer texture. |
| 1/2 cup Oil | 1/2 cup Melted Butter (total 1 cup butter) | Brownies will be slightly less moist and a bit more cake-like; the fudgy texture will be reduced. |
| Semi-Sweet Chocolate Chips | Dark Chocolate Chunks or Milk Chocolate Chips | Dark chocolate will deepen the flavor, while milk chocolate will add sweetness. Texture of chunks might be more pronounced. |
How to Make Marshmallow Brownies — Step-by-Step
Creating these decadent marshmallow brownies is a straightforward process, I promise! Just follow these simple steps from my kitchen to yours.
Step 1: Preparation and Preheating
First, preheat your oven to 325°F (160°C). It’s crucial for even baking. Then, prepare your 9×9-inch baking pan by spraying it generously with non-stick baking spray. Line the bottom and two opposite sides of the pan with parchment paper. This creates a handy “sling” that allows you to lift the brownies out easily later. Spray the parchment paper again for good measure, ensuring no sticking.
💡 mia’s Pro Tip: Using parchment paper that extends slightly over the sides of the pan makes removing the baked brownies a breeze. It’s a simple trick that saves so much frustration when cutting!
Step 2: Mixing the Dry Ingredients
In a medium bowl, whisk together your flour, unsweetened cocoa powder, and cornstarch. Sifting these ingredients ensures no lumps and promotes aeration for a lighter texture. Add the salt to this dry mixture and give it a quick whisk to combine everything evenly. Set this bowl aside for now; we’ll add it to our wet ingredients shortly.
Step 3: Whisking the Wet Ingredients
In a separate, larger bowl, combine the granulated sugar, large eggs, and the extra egg yolk. Using an electric mixer fitted with a whisk attachment, beat these on high speed for about 5 minutes. You’re looking for the mixture to become pale, thick, and significantly increased in volume—this process incorporates air, which is vital for the brownie’s delicate crumb. While the mixer is working, melt your butter in the microwave and allow it to cool slightly so it doesn’t cook the eggs.
💡 mia’s Pro Tip: Whisking the sugar and eggs for a full 5 minutes may seem like a lot, but it’s essential for creating that signature rich, dense, yet tender brownie texture. Don’t skimp on this step!
Step 4: Combining Wet and Dry
Turn your mixer to low speed. Add the oil, slightly cooled melted butter, and pure vanilla extract to the egg mixture. Mix just until these are incorporated. Now, gradually add the reserved dry ingredients to the wet mixture, mixing on low speed only until *just* combined. Be careful not to overmix at this stage. Pour in your semi-sweet chocolate chips and use a rubber spatula to gently fold them into the batter, distributing them evenly.
⚠️ Common Mistake to Avoid: Overmixing the batter after adding the dry ingredients is a common pitfall. Mix only until no streaks of flour remain. Overmixing develops gluten, which can make your brownies tough and cakey instead of chewy and fudgy.
Step 5: Adding the Marshmallow Swirl
Pour the thick brownie batter evenly into your prepared baking pan. Now, for the magic! Place the marshmallow creme in a microwave-safe bowl and heat it for about 20-30 seconds, just until it’s warm and easier to stir. Mix it briefly. Using a teaspoon, dollop spoonfuls of the warmed marshmallow creme over the surface of the brownie batter. Don’t worry about perfection here. Then, take a butter knife or a small offset spatula and gently swirl the marshmallow into the batter, creating beautiful marbled patterns. Aim for light, artistic swirls, not a complete blend.
Step 6: Baking the Brownies
Place the pan in the preheated oven and bake for 45 to 55 minutes. The brownies are done when a toothpick inserted into the center comes out with moist crumbs attached. If you see a lot of wet batter, bake for another 5 minutes and test again. The marshmallow topping will be slightly golden and bubbly.
⚠️ Common Mistake to Avoid: Over-baking is the enemy of moist brownies! It’s better to slightly underbake than overbake. The residual heat will continue to cook the brownies as they cool. Look for those moist crumbs on the toothpick; a few wet streaks are fine, especially if using chocolate chips.
Step 7: Cooling and Serving
Once baked, carefully remove the pan from the oven and place it on a wire cooling rack. It is absolutely essential to let these brownies cool completely in the pan before attempting to cut them. This allows them to set properly, preventing them from falling apart. Patience is key here; at least 2-3 hours, or even overnight, will yield the best results for clean cuts and perfect texture.
| Step | Action | Duration | Key Visual Cue |
|---|---|---|---|
| 1 | Prep & Preheat | 10 mins | Oven at 325°F, pan lined |
| 2 | Mix Dry Ingredients | 3 mins | Lump-free mixture |
| 3 | Whisk Wet Ingredients | 5 mins | Pale yellow, voluminous mixture |
| 4 | Combine Wet & Dry | 3 mins | Just combined, no dry streaks |
| 5 | Add Marshmallow Swirl | 5 mins | Marbled effect on top |
| 6 | Bake | 45-55 mins | Moist crumbs on toothpick |
| 7 | Cool | 2-3 hours+ | Completely set |
Serving & Presentation
These marshmallow brownies are absolutely divine served slightly warm or at room temperature. When I’m serving them at a gathering in my NYC apartment, I like to cut them into generous squares and arrange them on a simple white platter. A light dusting of cocoa powder or confectioners’ sugar can add a touch of elegance, reminiscent of the delicate pastries I encountered in Paris. For an extra special touch, a small dollop of whipped cream or a scoop of high-quality vanilla bean ice cream alongside the brownie is simply heavenly.
The beauty of a rich chocolate brownie is that it pairs wonderfully with a variety of flavors and textures. Consider serving these alongside a glass of cold milk, a robust coffee, or even a sweet dessert wine. In Morocco, we often enjoy sweet treats with mint tea, which would provide a refreshing contrast to the brownie’s richness. The swirl of marshmallow and the dense, fudgy interior offer a complex mouthfeel that is satisfying on its own, but can also be enhanced by complementary additions.
| Pairing Type | Suggestions | Why It Works |
|---|---|---|
| Side Dish | Fresh Raspberries or Strawberries | The tartness of the berries cuts through the richness of the chocolate and marshmallow, creating a balanced flavor profile. |
| Sauce / Dip | Raspberry Coulis or Salted Caramel Sauce | A fruity coulis adds brightness, while a rich caramel complements the deep chocolate notes beautifully. |
| Beverage | Espresso or Hot Chocolate | The bitterness of espresso enhances the chocolate flavor, while hot chocolate doubles down on the indulgence. Mint tea offers a refreshing Moroccan contrast. |
| Garnish | Whipped Cream & a sprig of Mint | Light, airy whipped cream provides a cooling contrast to the dense brownie, and mint adds a fresh aroma and visual appeal. |
Make-Ahead, Storage & Reheating
I often bake these marshmallow brownies a day in advance, especially when I know I’ll be busy with recipe testing or a photoshoot for my blog right here in NYC. They actually improve in texture overnight as they fully set. For the best results and easiest transport, I let them cool completely in the pan, then cover it tightly with plastic wrap. This keeps them perfectly moist and ready to be cut and enjoyed whenever the mood strikes.
| Method | Container | Duration | Reheating Tip |
|---|---|---|---|
| Refrigerator | Airtight container or wrapped pan | Up to 5 days | Briefly warm in the microwave (10-15 seconds) for a gooey center. |
| Freezer | Airtight container or freezer bag with parchment separator | Up to 3 months | Thaw overnight in the refrigerator. Warm gently if desired. |
| Make-Ahead | Leave whole in the pan, well-wrapped | Up to 2 days | Cool completely, then wrap tightly. Cut just before serving. |
To reheat, I like to warm individual brownies in the microwave for about 10-15 seconds. This just takes the chill off and makes the marshmallow swirl extra gooey again. For a slightly crisper edge, you could gently warm them in a toaster oven at a low temperature. And if you’re reheating from frozen, give them ample time to thaw in the refrigerator first for the best texture. These brownies are truly forgiving, making them perfect for busy cooks!
Variations & Easy Swaps
| Variation | Key Change | Best For | Difficulty Impact |
|---|---|---|---|
| Chocolate Chip Cookie Dough Swirl | Dollop raw, edible cookie dough instead of marshmallow creme. | Cookie and brownie lovers. | Easy |
| Gluten-Free, Dairy-Free | Use GF flour blend; dairy-free butter/oil, DF chocolate chips, and DF marshmallow. | Dietary restrictions. | Easy |
| Spiced Orange Marshmallow Swirl | Zest an orange into the batter and swirl orange-flavored marshmallow creme. | A more complex flavor profile. | Easy |
Chocolate Chip Cookie Dough Swirl
For a truly decadent experience, try swirling in dollops of edible chocolate chip cookie dough instead of marshmallow creme. This takes the brownie to a whole new level of sweet indulgence. Ensure your cookie dough is safe to eat raw (use heat-treated flour and no eggs, or just ensure you’re using a designated edible dough). The cookie dough will bake into gooey pockets, complementing the rich brownie base for a hybrid dessert that’s simply irresistible.
Gluten-Free, Dairy-Free Marshmallow Brownies
Making these gluten-free and dairy-free is surprisingly straightforward. For gluten-free, use a good quality 1-to-1 gluten-free baking flour blend. For dairy-free, ensure you use vegetable oil and dairy-free butter or a dairy-free alternative for the melted butter. Swap the semi-sweet chocolate chips for dairy-free chocolate chips. Many brands now offer dairy-free marshmallow creme as well. The texture will remain wonderfully fudgy and delicious, proving that dietary needs don’t mean sacrificing flavor!
Spiced Orange Marshmallow Swirl
Inspired by the warming spices of my Moroccan childhood, try adding the zest of one orange to the brownie batter. For the swirl, you can often find orange-flavored marshmallow creme, or simply add a touch of orange extract to your warmed marshmallow creme. This adds a bright, zesty citrus note that beautifully balances the deep chocolate flavor, giving the brownies a nuanced, sophisticated profile that’s perfect for a cozy afternoon tea. It’s a seasonal twist I love making in the fall!
Can I use store-bought brownie mix to make marshmallow brownies?
Absolutely! If you’re short on time or want an even simpler shortcut, starting with a good quality store-bought brownie mix is a fantastic option. Prepare the brownie mix according to the package directions. Once the batter is ready, proceed with Step 5 of this recipe: pour the batter into the prepared pan, then dollop and swirl the warmed marshmallow creme on top before baking. Keep in mind that the texture of a boxed mix might be slightly different – often a bit more cake-like – but the addition of the gooey marshmallow swirl will still make for a delightful treat!
How do you keep the marshmallows from sinking to the bottom of the brownie batter?
The key to preventing marshmallows from sinking is how you introduce them and the consistency of your batter. First, always add the marshmallow swirl *after* the brownie batter is in the pan. Second, warming the marshmallow creme slightly (as described in Step 5) makes it pliable enough to swirl gently on top without needing to work it too deeply into the batter. My recipe uses a dense, fudgy batter which is less likely to cause sinking than a very thin or cakey batter. Avoid over-mixing the batter, as this can thin it out and encourage sinking. The goal is to create ribbons of marshmallow on top, not to fully incorporate them.
Should I add the marshmallows before or after baking the brownies?
You should definitely add the marshmallows *before* baking, but in a specific way. The recipe calls for swirling the marshmallow creme on top of the brownie batter just before it goes into the oven. This allows the marshmallow to warm and slightly melt, creating those delicious pockets and marbled effect during the baking process. Adding marshmallows *after* baking would result in them simply melting into a sticky mess on the surface, rather than integrating as a chewy swirl within the brownie structure. The goal is to bake them *with* the brownies.
What can I use instead of marshmallows in marshmallow brownies?
If marshmallows aren’t your favorite or you have an allergy, there are several wonderful substitutes you can use to achieve a similar gooey or sweet element. As mentioned in the variations, edible chocolate chip cookie dough is a fantastic alternative that adds a different kind of sweetness and chew. You could also try swirling in a caramel sauce (ensure it’s a thick one, or it might make the brownies too wet), or even a swirl of cream cheese frosting for a tangy contrast. For something truly unique, consider a swirl of dulce de leche, which is popular in many Latin American cuisines and offers a rich, caramelized sweetness.
How do you get brownies to be super fudgy?
To achieve super fudgy brownies, there are a few key techniques. Firstly, use a recipe that has a higher fat-to-flour ratio, and often includes oil in addition to butter, like this one. Secondly, don’t over-bake! Over-baking dries out the brownies and makes them cakey. You want to pull them out when a few moist crumbs still cling to a toothpick. Thirdly, the amount of cocoa powder and sugar plays a role; more cocoa and sugar contribute to a denser, fudgy texture. Finally, ensuring the eggs and sugar are properly whisked for volume, followed by minimal mixing of the dry ingredients, creates that perfect chewy, dense crumb.
Can I use milk chocolate chips instead of semi-sweet?
Yes, you absolutely can use milk chocolate chips instead of semi-sweet! It will change the overall sweetness and chocolate flavor profile of the brownies. Milk chocolate has a higher sugar content and contains milk solids, which results in a sweeter, creamier, and less intensely chocolatey flavor compared to semi-sweet. If you opt for milk chocolate, your brownies will be sweeter overall, and the marshmallow swirl will combine with that milk chocolate sweetness. It’s a delicious option if you prefer a milder chocolate taste.
What is the best way to cut brownies cleanly?
The trick to clean brownie cuts, especially with gooey ones like these, is all about patience and the right tools. First and foremost, ensure your brownies are *completely cooled*. This is the most crucial step. Once cooled, use a large, sharp knife. For the cleanest cuts, dip the knife in hot water and wipe it dry between each cut. This removes any melted marshmallow or chocolate residue that could otherwise drag and smudge your edges. If you cut them while warm, they will likely squish and tear, making a mess. For perfect squares, consider using a ruler to guide your cuts.
Can I add nuts to these marshmallow brownies?
Adding nuts to your marshmallow brownies is a fantastic idea, especially if you enjoy a bit of crunch to contrast the gooey marshmallow and fudgy chocolate. Walnuts and pecans are classic choices that pair wonderfully with chocolate. Simply fold about 1 cup of chopped nuts into the brownie batter along with the chocolate chips in Step 4. Ensure the nuts are evenly distributed for a good balance in every bite. The nuts will add a lovely texture and a slightly earthy flavor that complements the sweetness of the marshmallow.
Share Your Version!
I genuinely hope you adore making and devouring these marshmallow brownies as much as I do. When you try this recipe, please consider leaving a star rating and a comment below – your feedback is incredibly valuable to me and helps other home bakers find success! And if you snap a photo of your beautiful creation, I would be absolutely thrilled to see it. Share it on Instagram or Pinterest and tag me @exorecipe – I love seeing what you create!
I’m always curious about how my recipes travel. Did you try any of the variations, or perhaps add your own unique twist to the marshmallow swirl? Let me know in the comments below! I’m especially interested to hear if you experimented with different types of chocolate chips or added any spices. Your insights help me keep my recipes fresh and exciting, right here from my busy New York City kitchen.
From my NYC kitchen to yours — I hope this recipe brings as much warmth to your table as it does to mine. — mia 🧡
Love This Recipe? Save It to Pinterest!
If you enjoyed this Marshmallow Brownies recipe, don’t let it get lost in your browser tabs! 😄 Pin it now so you can find it again anytime — and explore hundreds more tried-and-tested recipes waiting for you on my Pinterest boards.
👉 Follow mia on Pinterest @chefrecipes2
📌 Pin this recipe · 🔁 Re-pin your favorites · 💬 Tag me when you make it — I love seeing your creations!

Marshmallow Brownies

These marshmallow brownies are super fudgy chocolate brownie with chocolate chips. It has marshmallow fluff swirled on top.
Ingredients
- 2 cups White granulated sugar
- 3 Large eggs
- 1 Egg yolk
- 1/2 cup Unsalted butter (melted)
- 2 tsp Pure vanilla extract
- 1/2 cup Oil (canola or vegetable)
- 3/4 cup All-purpose flour
- 1 cup Unsweetened cocoa powder (Use dutch process cocoa powder)
- 1 1/2 TBSP Cornstarch
- 1/2 tsp Salt
- 1 cup Semi-sweet chocolate chips
- 1 cup Marshmallow creme
Instructions
- Preheat the oven to 325°F. Spray a 9X9-inch baking pan with baking nonstick spray. Line the bottom and 2 sides of the pan with parchment paper and spray again.
- In a medium bowl, sift the flour, cocoa powder, and cornstarch together. Add in the salt and set aside.
- Using a mixer with a whisk attachment, beat the sugar, eggs, and egg yolk on high speed for 5 minutes. It will become pale in color. While that mixes, melt the butter in the microwave and let it cool.
- Add the oil, melted butter, and vanilla and mix on low until combined. Add in the dry ingredients and mix on low until just combined. Pour in the chocolate chips and use a rubber spatula to fold it in.
- Pour the brownie batter into the pan. Melt the marshmallow fluff in the microwave for 20-30 seconds and mix. Use a 1 teaspoon to dollop the marshmallow fluff on top of the brownie batter. Use a butter knife to very light swirl the marshmallow fluff.
- Bake for 45-55 minutes. It is done baking when you stick in a toothpick, and it is slightly wet. If a lot of batter comes out, then bake for another 5 minutes.
- Cool on a cooling rack completely before cutting into them and serving.
Nutrition
- Calories: 336 kcal
- Sugar: 34 g
- Fat: 18 g
- Carbohydrates: 46 g
- Protein: 2 g
Tried This Recipe? Leave a Comment!
Did you make this recipe? I’d love to hear how it turned out! Please leave a comment and a rating below. Your feedback helps other home cooks and supports cheerychop.com!
For more delicious inspiration, follow me on Pinterest!