Table of Contents
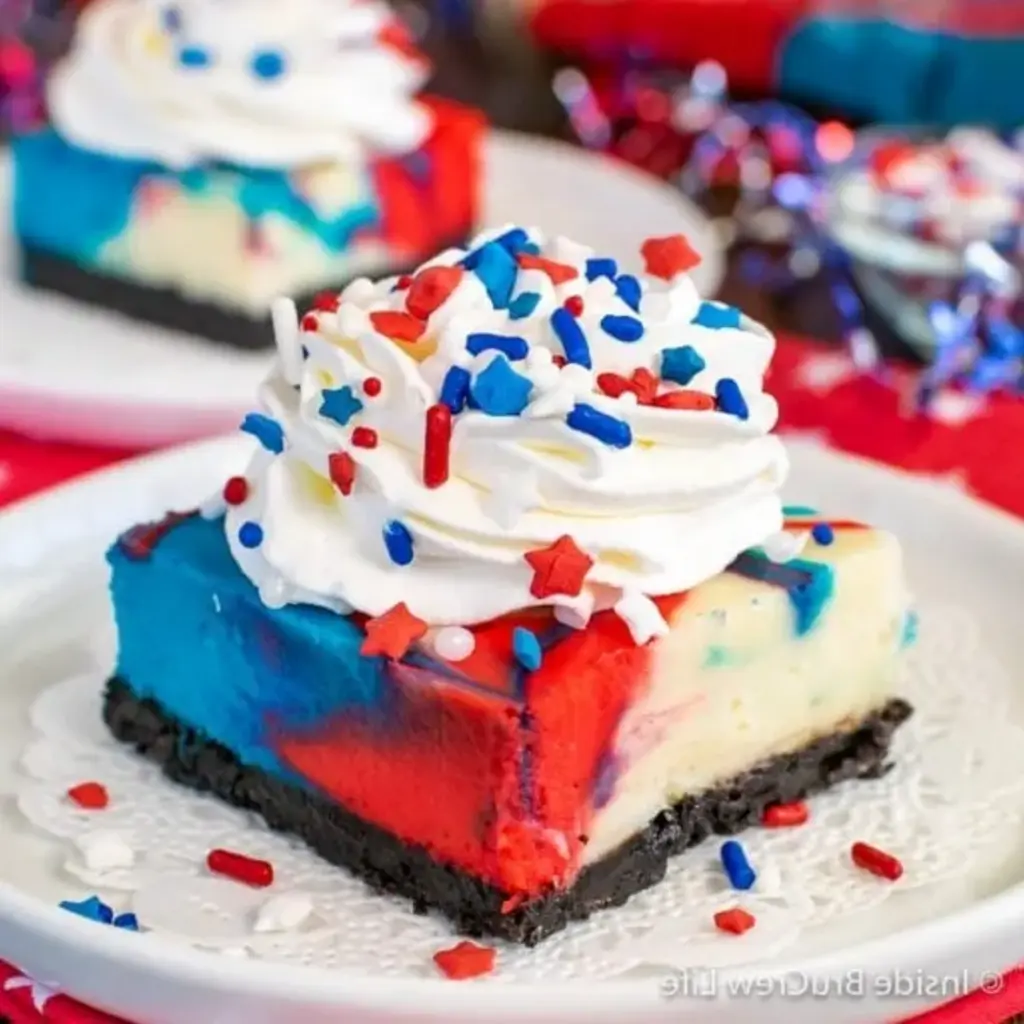
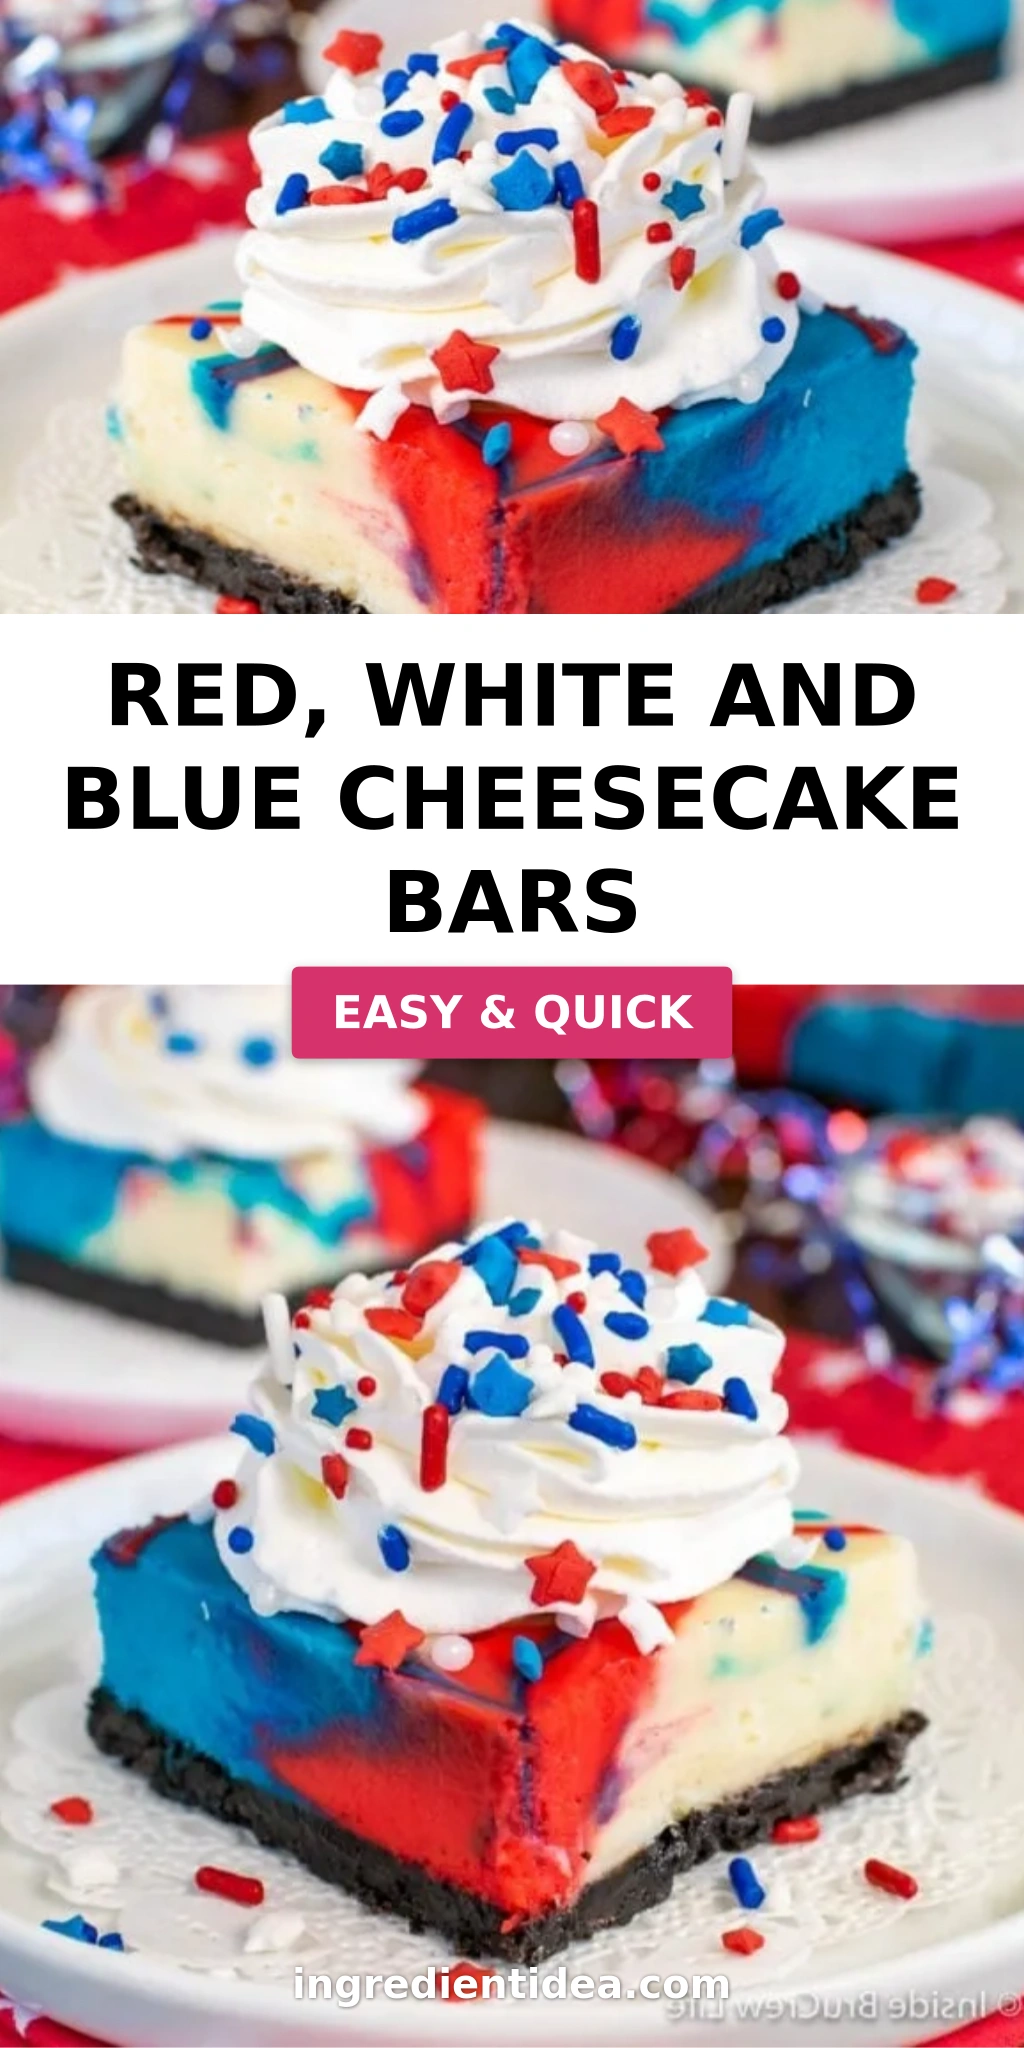
Red, White, and Blue Swirled Cheesecake Bars: Your Easy Patriotic Dessert
Growing up in my mother’s kitchen in Morocco, desserts were often simple, featuring rich dates, honey, and nuts. But when I came to culinary school in Paris, I fell head over heels for the elegance of European pastries, especially anything cream cheese-based! That love blossomed further when I moved to New York City, where cheesecake is practically a religion. These Red, White and Blue Cheesecake Bars are my ode to American summer holidays, combining that classic creamy texture I adore with a fun, patriotic flair. They’re a fantastic, easy cheesecake bars recipe that’s sure to be the star of your 4th of July picnic without all the fuss.
Imagine the velvety smooth, rich cheesecake batter, subtly flavored with vanilla, baked to perfection. Now, picture vibrant swirls of red and blue dancing through that creamy white, all set atop a perfectly crisp Oreo crust. Each bite of these patriotic dessert recipe bars offers a delightful contrast: the slight crunch and chocolatey depth of the crust against the cool, tangy creaminess of the filling. It’s a dessert that not only tastes incredible but looks absolutely stunning on any holiday table, a true feast for the eyes and the palate, reminiscent of the vibrant colors you might find at an NYC street fair.
My version of these Red, White and Blue Cheesecake Bars simplifies the process without sacrificing flavor or that signature creamy texture. I’ve refined this easy cheesecake bars recipe over countless tests, ensuring a foolproof method for a perfectly baked, crack-free cheesecake every time. I’ll share a special technique I learned in Paris for achieving that silky smooth texture, and also highlight a common mistake when dealing with the colors to keep your swirls distinct and beautiful. Get ready to bake a showstopper!
Why This Red, White, and Blue Cheesecake Bars Recipe Is the Best
The secret to these fantastic Red, White and Blue Cheesecake Bars lies in a delicate balance. Inspired by both the richness of Moroccan dairy and the precision of French patisserie, I’ve perfected a cream cheese blend that’s incredibly smooth yet firm enough to hold those beautiful patriotic swirls. It’s a flavor profile that’s sweet but not cloying, with just the right amount of tang from the sour cream creating depth.
Achieving that perfected texture comes from a specific baking technique I adapted from my time in Paris: a gentle water bath and precise temperature control. This method prevents cracking and ensures the cheesecake cooks evenly, resulting in a custardy soft center that melts in your mouth. It’s a small extra step that makes a world of difference, moving these from good to absolutely divine.
What truly makes this recipe stand out is its foolproof nature, especially for such an impressive dessert. You don’t need to be a seasoned baker to pull off these Red, White and Blue Cheesecake Bars. The simple Oreo crust comes together quickly, and the batter is easy to handle. Even the swirling technique is surprisingly forgiving, making this patriotic dessert recipe accessible for beginners and a stress-free option for experienced cooks alike.
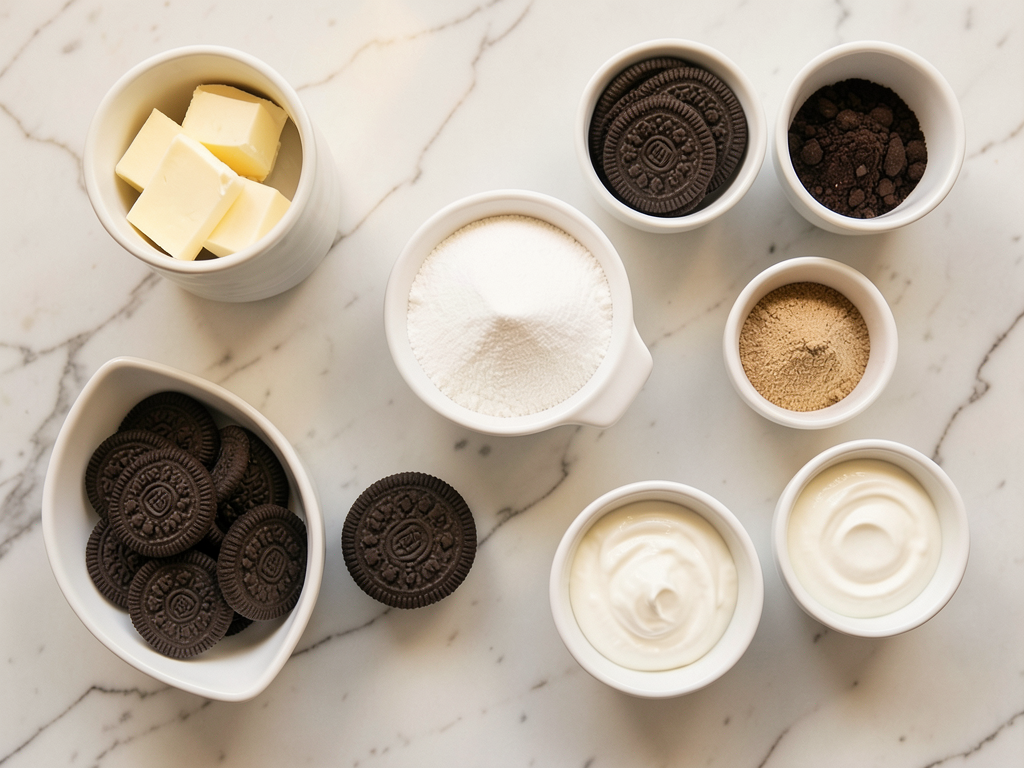
Red, White and Blue Cheesecake Bars Ingredients
Whenever I head to the farmers market here in NYC, I love picking out the freshest ingredients. For these cheesecake bars, while the core ingredients are pantry staples, choosing quality cream cheese and butter truly elevates the final result. My mother always said, “Good ingredients are the soul of good food.”
Ingredients List
- 30 Oreo cookies
- 4 Tablespoons unsalted butter, melted
- 3 – 8 ounce packages cream cheese, softened
- 1 1/2 cups granulated sugar
- 1/4 cup sour cream
- 2 teaspoons vanilla extract
- 1/4 cup all purpose flour
- 3 large eggs
- red & blue gel food colors
Ingredient Spotlight
Cream Cheese: This is the heart of your cheesecake, so choose full-fat cream cheese for the best texture and flavor. Softened cream cheese is crucial for a smooth batter without lumps. If you’re in a pinch, an equal amount of Neufchâtel cheese can work, but it will result in a slightly less rich and tangier cheesecake.
Oreo Cookies: The classic chocolate sandwich cookie creates a fantastic complementary crust. Use the original Oreos for their perfect blend of chocolate and cream. For a dairy-free option, many generic brand “chocolate sandwich cookies” are dairy-free, but check labels carefully. A good substitution if Oreos aren’t available would be graham crackers pulsed with a tablespoon of cocoa powder, though the flavor profile will shift slightly.
Unsalted Butter: Unsalted butter allows you to control the total sodium in your recipe. Melted butter is essential for binding the crust crumbs. If you only have salted butter, reduce any other added salt in the recipe (though there’s none in this one, so it’s a direct swap with a slight flavor change). Margarine can be used in a 1:1 ratio, but the crust won’t be as rich.
Sour Cream: This ingredient is key for that signature tangy flavor and ensures a super smooth, creamy texture. Full-fat sour cream is always my choice for cheesecake. Greek yogurt can be a good substitute if you need a lower-fat option, providing similar tang but potentially a slightly denser texture. My mother often used labneh (strained yogurt) in her Moroccan sweets, which would also lend a lovely tang here.
Gel Food Coloring: Gel food coloring provides vibrant colors without adding excess liquid, which could thin your cheesecake batter. Avoid liquid food coloring if possible, as it often results in muted colors and a slightly compromised texture. Look for concentrated gel colors in the baking aisle for the best results in these patriotic dessert bars.
| Original Ingredient | Best Substitution | Flavor / Texture Impact |
|---|---|---|
| Oreo cookies | Graham crackers + 1 tbsp cocoa | Less intense chocolate, slightly different crunch. |
| Unsalted butter | Salted butter | Very slight increase in saltiness; can also use vegan butter for dairy-free. |
| Cream cheese | Neufchâtel cheese | Slightly less rich, tangier, and marginally softer. |
| Sour cream | Full-fat plain Greek yogurt | Similar tang, potentially slightly denser texture. |
| Gel food colors | Liquid food colors | Lighter, less vibrant colors; can thin batter slightly. |
How to Make Red, White, and Blue Cheesecake Bars — Step-by-Step
Don’t let the beautiful swirls intimidate you; making these Red White and Blue Cheesecake Bars is truly simpler than it looks! Just follow these steps, and you’ll have a stunning dessert ready for your celebration.
Step 1: Prepare the Pan and Crust
Preheat your oven to 325°F (160°C). Line a 9×13 inch baking pan with foil, leaving an overhang on the sides – this will help you lift the bars out easily later. Place the Oreo cookies, cream filling included, into a food processor and pulse until finely ground into crumbs. Pour in the melted unsalted butter and pulse again until the crumbs are evenly moistened. Press this mixture firmly into the bottom of the prepared pan to form an even crust. Bake for 10 minutes, then remove from the oven and let it cool completely while you prepare the filling.
💡 mia’s Pro Tip: To ensure your crust is perfectly even and won’t crumble when cut, use the bottom of a flat glass or a measuring cup to press the crumbs down firmly and uniformly across the pan.
Step 2: Start the Water Bath
This step is crucial for creamy, crack-free cheesecake, a technique I honed in my Parisian pastry training. Place a large baking sheet on the bottom rack of your oven and fill it halfway with hot water. Let the oven preheat again to 325°F, allowing the water to heat up and create a humid environment. This gentle steam will help your cheesecake bake beautifully.
⚠️ Common Mistake to Avoid: Don’t let the water bath get too cool or too hot. Use hot tap water to start, and make sure the oven has truly come back to temperature to maintain consistent humidity.
Step 3: Make the Cheesecake Batter
In a large mixing bowl, beat your softened cream cheese and granulated sugar together until the mixture is light, creamy, and completely smooth, with no lumps remaining. Add the sour cream, vanilla extract, and all-purpose flour, and beat again until just combined. Finally, add the large eggs, one at a time, beating gently on low speed just until each egg is incorporated. Overmixing eggs can introduce too much air, leading to cracks later.
💡 mia’s Pro Tip: Make sure your cream cheese is at room temperature. Cold cream cheese will inevitably lead to lumpy batter, no matter how long you beat it. Take it out at least an hour before you plan to bake!
Step 4: Color and Swirl the Batter
Divide the cheesecake batter evenly into three separate bowls. Leave one portion white. Use the red gel food coloring to tint the second bowl until you achieve a vibrant red, and the blue gel food coloring for the third bowl to get a rich blue. Now, spoon alternating dollops of red, white, and blue batter evenly over your cooled Oreo crust. Once the batter is distributed, take a butter knife or a skewer and gently drag it through the batter, going up and down, then back and forth, to create a beautiful swirl pattern. Be careful not to overmix, or your colors will blend entirely!
⚠️ Common Mistake to Avoid: Over-swirling the batter is very easy to do! A few gentle passes are all you need to create distinct, lovely swirls. Too much mixing will result in murky, undefined colors.
Step 5: Bake and Cool
Carefully place your pan on the oven rack, directly above the water bath. Bake for 45-50 minutes, or until the edges are set but the center still has a slight jiggle. Immediately remove the cheesecake from the oven (and the water bath) and place it on a wire rack to cool on your counter for 1 hour. This slow cooling prevents drastic temperature changes that can cause cracks. After an hour, transfer the pan to the refrigerator and chill for a minimum of 4-6 hours, or ideally overnight, before cutting into squares. Serve chilled, perhaps with a dollop of whipped cream and a sprinkle of festive sprinkles, as I love to do for a touch of NYC flair!
💡 mia’s Pro Tip: Proper chilling is non-negotiable for cheesecake. It allows the flavors to meld and the texture to firm up beautifully, making for clean cuts and a truly satisfying dessert experience.
| Step | Action | Duration | Key Visual Cue |
|---|---|---|---|
| 1 | Prepare the Pan and Crust | 10 mins bake time | Crust is set, edges slightly browned. |
| 2 | Start the Water Bath | Ongoing preheat | Oven reaches 325°F, water warm. |
| 3 | Make the Cheesecake Batter | 5-7 mins mixing | Batter is smooth, no lumps, just combined. |
| 4 | Color and Swirl the Batter | 2-3 mins | Distinct red, white, and blue swirls visible. |
| 5 | Bake and Cool | 45-50 mins bake, 4-6 hours chill | Edges set, center slightly jiggles; then firm and cold. |
Serving & Presentation
Serving these Red, White and Blue Cheesecake Bars is where you really get to enjoy the “oohs” and “aahs” from your guests! After they’ve chilled sufficiently, carefully lift the foil out of the pan and place the entire cheesecake slab onto a cutting board. For clean, neat slices, use a sharp, thin knife, wiping it clean between each cut. I often warm my knife under hot water and dry it before slicing, a little trick from my pastry days in Paris that makes all the difference!
For a truly festive presentation, serve these easy cheesecake bars with a dollop of freshly whipped cream. You can make it extra special by adding a touch of lemon zest to the cream for a bright, refreshing counterpoint, much like we’d brighten a Moroccan sweet dish with orange blossom water. A sprinkle of fresh berries – think blueberries and sliced strawberries – across the top of each bar will enhance the patriotic theme and add a lovely burst of freshness.
These patriotic dessert recipe bars are wonderful on their own, but if you want to create a dessert spread, consider pairing them with light, crisp cookies or a simple fruit salad to balance the richness. For beverages, I find that a light sparkling wine or even a chilled Moroccan mint tea provides a delightful contrast. The cool, refreshing tea cuts through the sweetness of the cheesecake beautifully, making each bite even more enjoyable.
| Pairing Type | Suggestions | Why It Works |
|---|---|---|
| Side Dish | Fresh berry salad, light shortbread cookies | Adds freshness and textural contrast to the rich cheesecake. |
| Sauce / Dip | Raspberry coulis, simple lemon glaze | Introduces additional fruitiness or a bright, tangy element. |
| Beverage | Sparkling rosé, chilled Moroccan mint tea, iced coffee | Complements the richness or provides a refreshing palate cleanser. |
| Garnish | Whipped cream, fresh blueberries/strawberries, mint sprigs, patriotic sprinkles | Enhances visual appeal and adds a touch of fresh flavor. |
Make-Ahead, Storage & Reheating
As a busy cook in NYC, I’m always looking for recipes that can be prepared in advance, and these Red, White and Blue Cheesecake Bars are absolutely perfect for that! They actually taste even better the next day, which makes them an ideal make-ahead dessert for parties or holiday gatherings. It’s a lifesaver when I’m getting ready for a big family meal.
| Method | Container | Duration | Reheating Tip |
|---|---|---|---|
| Refrigerator | Airtight container or tightly covered with plastic wrap | Up to 5 days | Serve chilled directly from the fridge. |
| Freezer | Individually wrapped in plastic, then foil, in a freezer-safe container | Up to 1 month | Thaw overnight in the refrigerator before serving. |
| Make-Ahead | Prepared and chilled, uncovered in pan (before cutting) | 2-3 days in advance | Ensure it’s well-chilled before slicing for best results. |
For refrigeration, make sure your cheesecake bars are completely cooled before covering them tightly with plastic wrap or placing them in an airtight container. This prevents them from absorbing any unwanted fridge odors and keeps them fresh. They’ll maintain their amazing flavor and creamy texture for up to five days, which means you can bake them mid-week and still have a spectacular dessert for the weekend!
Freezing these bars is also a fantastic option. I recommend cutting them into individual servings first, then wrapping each bar tightly in plastic wrap, followed by a layer of aluminum foil. This double protection helps prevent freezer burn. They can be stored for up to a month. Thaw them overnight in the refrigerator, and they’ll be ready to enjoy as a delicious treat whenever a craving strikes!
Variations & Easy Swaps
Part of the joy of cooking, for me, is adapting and playing with flavors. Just like how my mother would add different spices to a tagine, or how we might twist a classic French pastry, these Red, White and Blue Cheesecake Bars are ripe for creative variations.
| Variation | Key Change | Best For | Difficulty Impact |
|---|---|---|---|
| Lemon-Kissed Patriotic Bars | Add lemon zest to batter, use lemon juice in place of an equal amount of vanilla extract. | Those who love bright citrus notes; ideal for summer. | Minimal – just adding zest/juice. |
| Gluten-Free Cheesecake Bars | Use gluten-free sandwich cookies for the crust. | Guests with gluten sensitivities. | None; direct swap. |
| Mint Chocolate Swirl | Swap food colors for drops of peppermint extract and melted chocolate swirls. | Dessert lovers seeking a refreshing twist or during the holidays. | Minimal – swirl melted chocolate instead of colored batter. |
Lemon-Kissed Patriotic Bars
For a brighter, zestier take on these easy cheesecake bars, try adding the zest of one lemon to your cream cheese batter. You can also replace a teaspoon of vanilla extract with fresh lemon juice. The subtle citrus note provides a wonderful counterpoint to the richness of the cheesecake, making it feel even more refreshing, especially on a warm summer day. It’s a little touch of brightness, much like how a squeeze of fresh orange brightens a sweet Moroccan pastry.
Gluten-Free Cheesecake Bars
Making these patriotic dessert bars gluten-free is quite simple! Just swap out the regular Oreo cookies for a gluten-free chocolate sandwich cookie alternative in the crust. Most major grocery stores in NYC now carry several excellent options that look and taste very similar to the original. The rest of the cheesecake batter is naturally gluten-free, so no other adjustments are needed. This ensures everyone can enjoy a slice!
Mint Chocolate Swirl
If you’re looking for a non-patriotic but equally stunning variation, consider a mint chocolate swirl. Leave half the batter white, tint a quarter with green food coloring and a few drops of peppermint extract, and swirl in a quarter with melted dark chocolate instead of blue. This creates a decadent, refreshing dessert that’s fantastic for any occasion. It’s like a sophisticated version of those small mint chocolates I adored as a student in Paris.
How do you keep the layers from mixing in red, white, and blue cheesecake bars?
Keeping the colors distinct in your Red, White and Blue Cheesecake Bars is all about technique and not overdoing it. First, use gel food coloring instead of liquid; gels produce much more vibrant colors with less liquid, which is crucial for maintaining batter consistency. When spooning the different colored batters onto the crust, do it in alternating dollops rather than pouring them. Then, use a butter knife or skewer for the swirling. Drag it through the batter gently, making S-shapes or figure-eights, just a few times. Overmixing is the enemy here; too many passes will blend the colors into a muddy mess. Remember, less is more for a beautiful, swirled effect.
Can I use frozen berries instead of fresh for these patriotic cheesecake bars?
While fresh berries are always my preference for garnish on these patriotic cheesecake bars, you can certainly use frozen berries if that’s what you have available. If you plan to use them as a full topping on the baked bars, I recommend thawing them first, draining any excess liquid to prevent a watery top, and then gently tossing them with a little sugar (or even a touch of lemon juice) before arranging. If you want to incorporate them *into* the batter, I’d suggest fully thawing and patting them very dry, or even gently folding in berry jam or compote to avoid adding too much moisture to the delicate cheesecake texture.
How long do red, white, and blue cheesecake bars need to chill before serving?
Proper chilling is absolutely critical for these Red, White and Blue Cheesecake Bars to set up correctly and for the flavors to fully develop. After baking and cooling on the counter for about an hour, you must refrigerate them for a minimum of 4-6 hours. However, based on my experience, I always recommend chilling them overnight, or at least 8 hours. This extensive cooling time ensures the cheesecake is firm, making it much easier to cut into clean, elegant bars, and allows the rich flavors to meld beautifully. Patience is a virtue when it comes to cheesecake!
What’s an easy crust alternative for red, white, and blue cheesecake bars?
If you’re out of Oreos or simply want a different crust for your red, white, and blue cheesecake bars, a basic graham cracker crust is an excellent and very easy alternative. Simply crush about 1 1/2 cups of graham cracker crumbs, mix them with 1/4 cup of melted unsalted butter and 2 tablespoons of granulated sugar, then press into your prepared pan. Bake for 8-10 minutes, then cool. You could also use shortbread cookies or even vanilla wafers for a slightly different flavor profile. The key is to find good quality crumbs and good melted butter, as my mother always emphasized quality ingredients.
Why is a water bath recommended for baking these easy cheesecake bars?
A water bath, or bain-marie as we called it in Paris, is my secret weapon for baking perfect cheesecakes, including these easy cheesecake bars. The gentle, humid environment created by the water bath ensures the cheesecake bakes slowly and evenly, preventing the edges from drying out and cracking while the center cooks through. It also contributes to that incredibly smooth, custardy texture that’s so desirable in cheesecake. Without it, you risk a drier, stiffer cheesecake with an elevated chance of surface cracks, especially with larger cakes. For bars, it’s still a wonderful way to achieve consistent creaminess.
Share Your Version!
I adore seeing your creations! If you whip up these stunning Red, White and Blue Cheesecake Bars, please come back and leave a star rating and a comment below. Your feedback truly brightens my day and helps other home cooks discover delicious recipes.
Even better, snap a photo and share it on Instagram or Pinterest! Tag @exorecipes so I can see your beautiful patriotic dessert and share it with my community. Did you try a fun variation, like adding a touch of orange blossom water to honor my Moroccan roots? I’d love to hear about it!
From my NYC kitchen to yours — I hope this recipe brings as much warmth to your table as it does to mine. — mia 🧡
Love This Recipe? Save It to Pinterest!
If you enjoyed this Red, White and Blue Cheesecake Bars recipe, don’t let it get lost in your browser tabs! 😄 Pin it now so you can find it again anytime — and explore hundreds more tried-and-tested recipes waiting for you on my Pinterest boards.
👉 Follow mia on Pinterest @exorecipe
📌 Pin this recipe · 🔁 Re-pin your favorites · 💬 Tag me when you make it — I love seeing your creations!
Red White and Blue Cheesecake Bars Recipe
Swirls of colors make these Red White and Blue Cheesecake Bars a fun dessert to share at holiday BBW’s. This super simple red, white, and blue dessert is sure to brighten your Memorial Day and 4th of July picnics.
Ingredients
- 30 Oreo cookies
- 4 Tablespoons unsalted butter, melted
- 3 – 8 ounce packages cream cheese, softened
- 1 1/2 cups granulated sugar
- 1/4 cup sour cream
- 2 teaspoons vanilla extract
- 1/4 cup all purpose flour
- 3 large eggs
- red & blue gel food colors
Instructions
- Preheat the oven to 325 degrees. Line a 9×13 pan with foil.
- Place the cookies (cream included) in a food processor. Pulse until the cookies become crumbs.
- Stir in the butter until mixed in. Press the mixture evenly in the bottom of the prepared pan. Bake for 10 minutes. Remove and cool.
- Place a large baking sheet on the bottom rack of the oven. Fill it halfway with water. Let the oven preheat again.
- Beat the cream cheese and sugar until creamy. Add the sour cream, vanilla, and flour and beat again.
- Add the eggs and beat gently just until they are mixed in.
- Divide the batter evenly into 3 bowls. Use the food coloring to tint two of the bowls red and blue.
- Spoon the mixture evenly over the crust, alternating the colors. Drag a butter knife through the batter going up and down and back and forth until you get a good swirl pattern. Do not over mix.
- Place the pan on the oven rack above the pan of water. Bake for 45-50 minutes. Remove from the oven immediately and place on a wire rack.
- Let the cheesecake cool on the counter for 1 hour, then refrigerate for 4-6 hours.
- Cut into squares and serve with whipped cream and sprinkles, if desired.
Nutrition
- Calories: 251 calories
- Sugar: 20 grams sugar
- Fat: 16 grams fat
- Carbohydrates: 26 grams carbohydrates
- Protein: 3 grams protein
Tried This Recipe? Leave a Comment!
Did you make this recipe? I’d love to hear how it turned out! Please leave a comment and a rating below. Your feedback helps other home cooks and supports cheerychop.com!
For more delicious inspiration, follow me on Pinterest!