Table of Contents
Lattice Apple Pie – The Only Recipe You’ll Ever Need
I still remember the first time I made a proper lattice apple pie. It was the fall of my first year in New York, and my mother had just shipped me a box of crisp, Honeycrisp apples from a farm upstate. Standing in my tiny Brooklyn kitchen, I felt a pang of homesickness—I missed the slow, fragrant afternoons in my mother’s kitchen in Morocco, where we’d make flaky pastries filled with almonds and honey. But that day, I decided to channel that love into an American classic. This is the best, 100% foolproof lattice apple pie recipe, and I’ve perfected every detail so you can absolutely nail it at home.
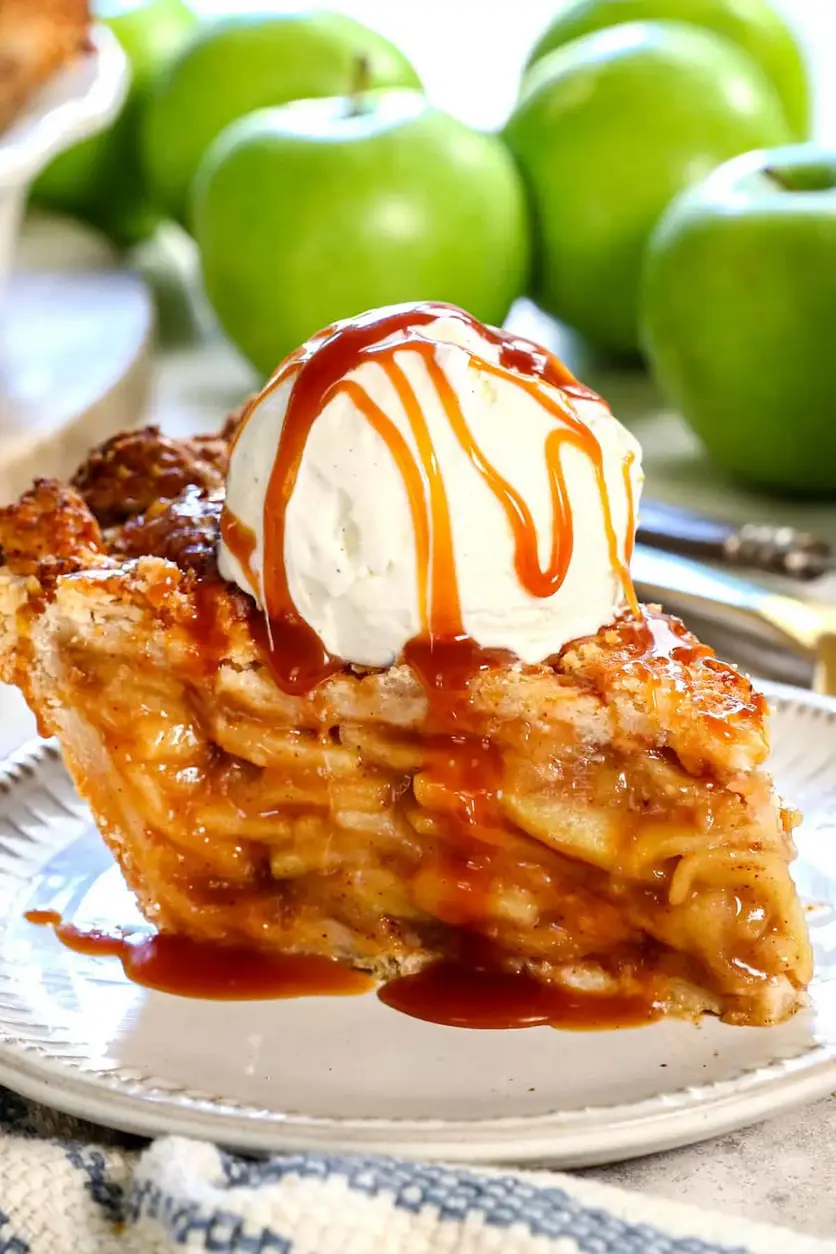
Picture this: a mountain of perfectly tender, juicy apples, each slice bathing in a caramel-like sauce that’s sweet, tart, and perfectly spiced. The crust is golden and flaky—never soggy—and the lattice top is so beautiful, it looks like you spent hours at a French pâtisserie. The aroma of cinnamon, ginger, and nutmeg will fill your kitchen, and when you cut into that first slice, the filling holds its shape, never running across the plate. Each bite is a symphony of textures and flavors that feels like a warm, cozy hug.
My version of this classic dessert stands apart because of one game-changing technique: I pre-cook the apple filling on the stove. This is a trick I learned in culinary school in Paris—by cooking the apples before they go into the pie, you control the tenderness and concentrate the flavors, ensuring a filling that’s never mushy or watery. I also use a combination of Honeycrisp and Granny Smith apples for the perfect balance of sweet and tart. In this post, I’ll share my pro tips for a never-soggy bottom crust, how to weave the lattice like a pro, and the one common mistake that leads to a runny pie—and exactly how to avoid it.
Why This Lattice Apple Pie Recipe Is the Best
The Flavor Secret: My lattice apple pie recipe uses a pre-cooked filling, which is a classic French technique. By gently cooking the apples in a blend of brown and granulated sugars with a touch of flour and warming spices, I create a filling that’s deeply caramelized and intensely flavorful. The lemon juice brightens the apples, and the vanilla adds a subtle warmth that reminds me of the vanilla beans my mother used to buy from the souk in Marrakech. This step eliminates any risk of a watery, bland filling.
Perfected Texture: The key to a tender, never-soggy crust is twofold: first, I brush the bottom crust with an egg wash before adding the filling, creating a seal that prevents the juices from soaking in. Second, I always chill the assembled pie for at least 30 minutes before baking. This sets the butter in the crust, ensuring it stays flaky and doesn’t shrink in the oven. The result is a crust that’s crisp and buttery, a perfect vessel for the luscious apple filling.
Foolproof & Fast: While a lattice top might look intimidating, I promise it’s easier than you think. I’ll walk you through a simple over-under weaving method that works every time, even if you’ve never braided a pie crust before. Plus, by pre-cooking the filling, you eliminate the biggest variable in apple pie—how long to bake it. This recipe is designed for beginners and seasoned bakers alike, giving you consistent, bakery-quality results every single time.
Lattice Apple Pie Ingredients
When I walk through the Union Square Greenmarket in the fall, I always head straight for the apple vendors. The variety is incredible—Honeycrisp, Granny Smith, and sometimes a new find like a SweetTango or an EverCrisp. For this lattice apple pie, I rely on a perfect blend of Honeycrisp for sweetness and Granny Smith for tang, ensuring a complex, balanced flavor. The rest of the ingredients are pantry staples, but quality matters. Here’s everything you’ll need.
Ingredients List
- 2 recipes Homemade Pie Crust (1 for bottom crust, 1 for lattice top)
- Egg wash: 1 egg beaten with 1 tablespoon heavy cream (may substitute milk)
- Optional: Coarse raw sugar for sprinkling on lattice topping
- 3 1/2 pounds Honeycrisp apples (about 5-6 large apples)
- 1 1/2 pounds Granny Smith apples (about 2-3 large apples)
- 2/3 cup packed light brown sugar
- 1/2 cup granulated sugar
- 1/3 cup + 1 tablespoon all-purpose flour
- 2 tablespoons lemon juice, divided
- 1 1/2 teaspoons ground cinnamon
- 1/2 teaspoon each: ground ginger, ground nutmeg, allspice
- 1/8 teaspoon salt
- 1 teaspoon vanilla extract
Ingredient Spotlight
Apples: The star of the show! Honeycrisp apples hold their shape beautifully when cooked and offer a natural sweetness. Granny Smith apples add a sharp, tart contrast that prevents the pie from being cloying. When shopping at your local grocery store, choose apples that are firm, heavy for their size, and free of bruises. Avoid Red Delicious or McIntosh, as they tend to turn mushy when baked.
Brown Sugar: Light brown sugar adds a subtle molasses flavor that enhances the caramel notes in the filling. Dark brown sugar can be used for a deeper, more robust flavor, but it will make the filling darker. I prefer light brown sugar for a classic apple pie taste.
Key Spices: The combination of cinnamon, ginger, nutmeg, and allspice is my signature blend. It’s inspired by the warm spices my mother used in her pastries in Morocco—cinnamon was a staple, and a touch of ginger and nutmeg adds depth. I grind whole spices when I can, but pre-ground is perfectly fine.
Plain Flour: This is my secret weapon for a thick, saucy filling. The flour absorbs the apple juices and creates a rich, caramel-like sauce as the fruit cooks. It’s the key to a never-runny pie. All-purpose flour works perfectly here—no need for a specialty flour.
| Original Ingredient | Best Substitution | Flavor / Texture Impact |
|---|---|---|
| Honeycrisp Apples | Gala or Fuji | Sweeter, slightly less firm; will break down a bit more during cooking. |
| Granny Smith Apples | Pink Lady or Braeburn | Still tart, but slightly less acidic; holds shape well. |
| Light Brown Sugar | Dark Brown Sugar | Deeper, more molasses-forward flavor; filling will be a bit darker. |
| All-Purpose Flour | Tapioca Starch | Creates a clearer, slightly more glossy filling; less thickening power, so use 2 tablespoons instead. |
| Ground Cinnamon | Ceylon Cinnamon | Milder, more floral flavor; lovely if you prefer a less intense spice kick. |
How to Make Lattice Apple Pie — Step-by-Step
Don’t be intimidated by the lattice! I’ll guide you through every step, from preparing the filling to weaving that gorgeous top. Follow along, and you’ll have a stunning, bakery-worthy pie in no time.
Step 1: Prepare the Pie Dough
Make two full recipes of your favorite homemade pie crust. Follow the first recipe through step 6 (chilling), then roll out the second recipe to an 11×11-inch rectangle on a floured piece of parchment paper. Place the rolled-out dough on a baking sheet and chill it in the freezer for 20-30 minutes. This step is crucial—it firms up the butter, ensuring you can cut clean, straight lattice strips without them sticking or tearing.
💡 mia’s Pro Tip: I like to use a pizza cutter or a pastry wheel for cutting the strips. A sharp knife works too, but the wheel gives a beautiful, decorative edge. Measure your strips exactly with a ruler for the most uniform lattice.
Step 2: Make the Lattice Strips
After the dough has chilled, use a ruler and a pizza cutter, pastry wheel, or sharp knife to cut the dough into 1-inch-wide strips. You should have about 10 strips total. Cover them loosely with plastic wrap and freeze for 30 minutes, or refrigerate for up to 24 hours. This makes the strips much easier to handle when weaving.
⚠️ Common Mistake to Avoid: Don’t skip the chilling step for the strips! If they are too warm, they’ll become sticky and stretch, making it nearly impossible to weave a clean lattice. Cold strips are your best friend here.
Step 3: Cook the Apple Filling
While the strips chill, prepare the filling. Peel and slice your Honeycrisp and Granny Smith apples into 1/8-inch-thick slices. In a large Dutch oven, combine the sliced apples with the brown sugar, granulated sugar, flour, 1 tablespoon of lemon juice, and all the spices. Stir to coat. Set the pot over medium heat, cover, and cook for 15-20 minutes, stirring every 2 minutes. The apples are done when they are fork-tender but still hold their shape. Stir in the remaining 1 tablespoon of lemon juice and the vanilla.
💡 mia’s Pro Tip: The apples will not become more tender in the oven, so cook them to your liking here. I like them just tender enough to pierce with a fork but still offering a little resistance. This gives a perfect bite in the finished pie.
Step 4: Cool the Filling
Transfer the cooked apple mixture and its caramel-like sauce to a parchment-lined baking sheet. Spread it out in an even layer and pop it in the refrigerator or freezer for about 25 minutes, until it has cooled to room temperature. You can do this while the lattice strips are chilling.
⚠️ Common Mistake to Avoid: Never add hot filling to a cold pie crust! The heat will melt the butter in the crust, leading to a tough, soggy bottom. Always cool the filling completely before assembling.
Step 5: Assemble the Pie
Brush the bottom and sides of your chilled pie shell (not the fluted edges) with the reserved egg wash. Pour the cooled apple filling and all its juices into the crust. Layer the apples horizontally, gently pressing them down to compact them. Now, it’s time to weave the lattice.
💡 mia’s Pro Tip: If the strips are too stiff after freezing, let them rest at room temperature for 5-10 minutes. They should be pliable, not ice-cold. Start by laying five horizontal strips evenly spaced over the pie. Fold back the 1st, 3rd, and 5th strips, lay a vertical strip, and then unfold the 1st, 3rd, and 5th strips. Then fold back the 2nd and 4th strips, add another vertical strip, and unfold. Repeat until all ten strips are woven.
Step 6: Bake the Pie
Once the lattice is woven, press the ends of the strips into the bottom crust edges to seal. Flute or crimp the edges as you like. Brush the entire lattice and the edges with the remaining egg wash, and sprinkle with coarse raw sugar (avoiding the edges). Place the pie in the refrigerator and chill for 30 minutes. Meanwhile, preheat your oven to 425°F with a baking sheet on the bottom rack. After chilling, place the pie on the hot baking sheet and bake for 25 minutes. Reduce the heat to 375°F and continue baking for 35-45 minutes, until the filling is bubbling around the edges. If the crust is browning too quickly, tent the edges with a pie shield or the top with foil.
⚠️ Common Mistake to Avoid: Don’t pull the pie out of the oven as soon as it’s golden brown. The filling must be actively bubbling around the edges to ensure it has thickened properly. If you don’t see bubbles, bake for 5-10 more minutes—otherwise, your filling will be runny after cooling.
Step 7: Cool and Serve
Transfer the baked pie to a cooling rack and let it cool completely, for at least 4 hours. This is essential for the filling to set. You can speed up the process by placing the pie in the refrigerator for 2 hours. Once cooled, you can serve the pie at room temperature or reheat it in a 350°F oven for 10 minutes before serving.
💡 mia’s Pro Tip: If you’re short on time, you can pop the pie in the freezer for an hour to speed up the cooling process. Just wrap it in plastic once it’s fully cold to prevent freezer burn. This little trick saved me before many a Thanksgiving dinner!
| Step | Action | Duration | Key Visual Cue |
|---|---|---|---|
| 1 | Prepare Dough | 20 mins | Dough is firm, not sticky |
| 2 | Cook Filling | 15-20 mins | Apples are fork-tender, not mushy |
| 3 | Assemble Pie | 15 mins | Lattice is woven, edges crimped |
| 4 | Bake | 60-70 mins | Filling bubbles; crust is golden brown |
| 5 | Cool | 4 hours | Pie is room temperature, filling is set |
Serving & Presentation
A lattice apple pie is a showstopper on any table. For a classic presentation, I love to serve it warm with a scoop of vanilla bean ice cream—a pairing that never fails. The cold, creamy ice cream contrasts beautifully with the warm, spiced apples and flaky crust. Another favorite is a dollop of freshly whipped cream, especially around the holidays when I add a touch of cinnamon to the cream.
When I host a dinner party in my New York apartment, I’ll often let the pie cool completely, then reheat it for 10 minutes in the oven before serving. This ensures the filling is perfectly warm and the crust stays crisp. I also like to dust the pie with a light sprinkle of cinnamon sugar right before serving—it adds a beautiful, sparkly touch and a little extra flavor. The lattice itself is beautiful enough that you don’t need much else, but a few fresh mint leaves or a drizzle of caramel sauce can elevate it to something truly special.
For a truly decadent experience, I’ll sometimes serve a slice with a side of salted caramel sauce—a nod to my time in Paris, where caramel was an art form. The combination of sweet, salty, and spiced is simply divine.
| Pairing Type | Suggestions | Why It Works |
|---|---|---|
| Side Dish | Vanilla ice cream, whipped cream, cheddar cheese | Creamy cold cuts the sweetness; sharp cheddar adds a savory contrast. |
| Sauce / Dip | Salted caramel, bourbon cream sauce | Enhances the caramel notes in the pie; adds extra richness and depth. |
| Beverage | Hot coffee, spiced apple cider, Chardonnay | Coffee balances sweetness; cider echoes apple flavors; Chardonnay’s fruitiness complements. |
| Garnish | Fresh mint leaves, cinnamon sticks, dusting of powdered sugar | Adds color, aroma, and a touch of elegance. |
Make-Ahead, Storage & Reheating
As a busy New Yorker, I live by make-ahead tips. This lattice apple pie is incredibly flexible—you can prep components days in advance, or freeze the whole pie for months. Here’s how I do it.
| Method | Container | Duration | Reheating Tip |
|---|---|---|---|
| Refrigerator | Covered pie plate | Up to 5 days | Reheat in 375°F oven for 10-15 minutes, tented with foil. |
| Freezer | Freezer-safe wrap + foil | Up to 3 months | Thaw overnight in fridge, then reheat as above. |
| Make-Ahead | Assemble unbaked pie, wrap | Up to 24 hours in fridge | Bake directly from fridge—add 5-10 minutes to baking time. |
For reheating, my favorite method is to tent the pie with foil and place it in a cold oven. Set the oven to 375°F, and when the preheat bell dings, leave the pie in for another 10-15 minutes. This revives the crust and warms the filling without drying it out. If you’re reheating a single slice, a quick 30-second zap in the microwave works, but for the best texture, the oven is unbeatable.
Variations & Easy Swaps
This lattice apple pie is a canvas for creativity. I’ve tested these variations in my own kitchen, and each one brings something unique to the table. Whether you’re avoiding gluten or just feeling adventurous, there’s a version here for you.
| Variation | Key Change | Best For | Difficulty Impact |
|---|---|---|---|
| Moroccan Spiced Apple Pie | Add 1 tsp rasp el hanout and ¼ cup chopped dates |