Table of Contents
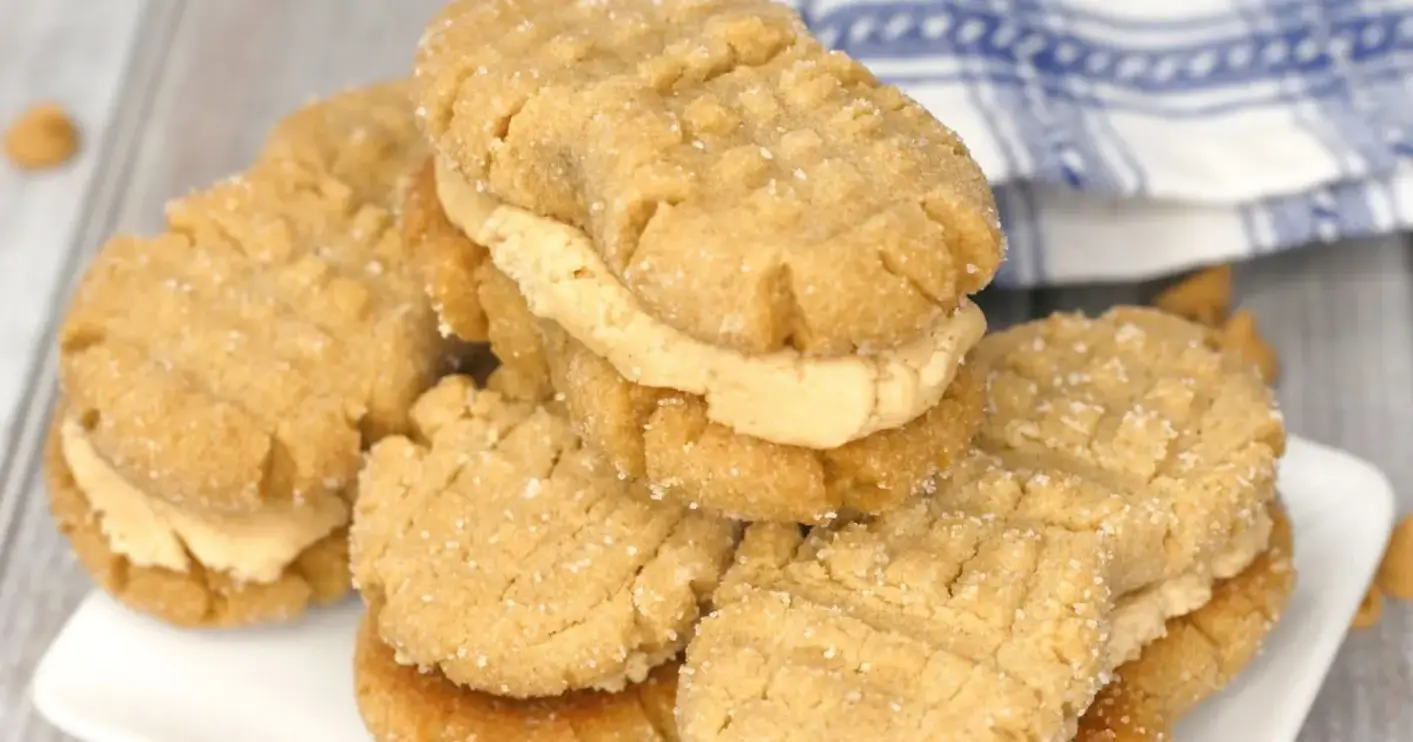
Homemade Nutter Butters – Soft Baked Peanut Butter Sandwich Cookies
I still remember the first time I bit into a Homemade Nutter Butter fresh from my own oven. It was a rainy afternoon in my tiny Manhattan apartment, and I had just returned from the Union Square farmers market with a jar of local peanut butter. Growing up in Morocco, my mother would make sesame-based cookies that were always a little too dry for my taste. Years later, studying pastry at Le Cordon Bleu in Paris, I learned the secret to a truly tender crumb. This copycat Nutter Butter recipe is my love letter to the classic peanut butter sandwich cookie — but with a soft, bakery-style texture that no store-bought version can touch. If you’ve been searching for the perfect homemade Nutter Butter cookies recipe, your search ends here.
Imagine pulling apart two golden, lightly crumbly cookies to reveal a cloud-like peanut butter filling. The first bite delivers a gentle crunch from the sugar coating, then gives way to a soft, almost creamy interior. The peanut flavor is deep and nutty, not at all cloying, with just the right hint of salt to balance the sweetness. The aroma alone — toasted peanuts, warm butter, and vanilla — will fill your kitchen with the kind of comfort that makes you feel like everything is right in the world. This easy peanut butter dessert is the kind of treat you’ll want to keep on your counter, though I promise it won’t last long.
What makes this recipe different from all the other no bake peanut butter cookies you’ve seen is the simple technique I use for the cookie itself. Instead of a dry, chalky crunch, I’ve engineered a dough that bakes up soft and tender, thanks to a touch more butter and a specific creaming method I learned in Paris. The filling is a French-style buttercream shortcut that’s impossibly light and stable. I’ll walk you through every step, including my signature crisscross pattern and a pro tip for shaping the perfect peanut-shaped cookie. One common mistake I see is overbaking — so I’ll tell you exactly when to pull them from the oven. Ready? Let’s bake.
Why This Homemade Nutter Butter Recipe Is the Best
The Flavor Secret — The key is using a high-quality creamy peanut butter with no added sugar. I use one from a small batch in Brooklyn that has just roasted peanuts and salt. This allows the natural nuttiness to shine through, backed by the deep flavor of light brown sugar. My Moroccan roots taught me that balance is everything — the salt in the dough and filling cuts the sweetness so each bite is layered and satisfying.
Perfected Texture — Most copycat Nutter Butter recipes give you a hard, crumbly cookie. I wanted something closer to a soft-baked sandwich cookie. By creaming the butter and brown sugar for a full three minutes, I incorporate air that makes the cookies light. The addition of an egg gives structure while keeping the interior tender. The result is a cookie that bends slightly before it breaks — just like your favorite bakery version.
Foolproof & Fast — This is truly one of the easiest peanut butter dessert recipes you’ll find. You don’t need a stand mixer — a hand mixer works perfectly. The dough comes together in minutes and doesn’t require chilling, so you can have cookies in the oven in under 20 minutes. Even if you’re new to sandwich cookies, my step-by-step guide will ensure you get picture-perfect results every time.
Homemade Nutter Butter Cookies Recipe Ingredients
I source most of my pantry staples from the Chelsea Market in New York, where I can find everything from European-style butter to artisanal peanut butter. But you can make these with everyday ingredients from your local grocery store. The magic is in the proportions, not the origin. This simple peanut butter sandwich cookies recipe uses ingredients you likely already have on hand.
Ingredients List
- 1 1/2 cups all purpose flour
- 1 teaspoon baking soda
- 1/4 teaspoon kosher salt
- 1/2 cup unsalted butter (softened)
- 1 cup light brown sugar
- 1 cup creamy peanut butter (divided — 1/2 cup for dough, 1/2 cup for filling)
- 1 large egg
- 1/2 teaspoon pure vanilla extract
- 1/2 cup sugar (for rolling the cookie dough)
- 1/4 cup unsalted butter (softened) (for filling)
- 1 1/2 cups powdered sugar
- 2 Tablespoons milk
- 1/4 teaspoon vanilla extract (for filling)
Ingredient Spotlight
Peanut Butter — This is the star. Use creamy peanut butter that is well stirred and at room temperature. Natural peanut butter (with oil separation) can work if you stir it thoroughly, but I prefer processed creamy peanut butter for the most stable texture. If using natural, the cookies may spread a bit more.
Butter — European-style unsalted butter (like Plugrà or Kerrygold) has a higher fat content and lower water content, which makes for a tender cookie and a smoother filling. It’s worth the splurge here. Let it soften completely before starting — a good test is that you should be able to press a finger into it easily without resistance.
Light Brown Sugar — This sugar adds moisture and a subtle molasses note that deepens the peanut flavor. Don’t substitute dark brown sugar, which can make the cookies too wet and dark. If you only have granulated sugar, you can add 1 tablespoon of molasses per cup to mimic light brown sugar.
| Original Ingredient | Best Substitution | Flavor / Texture Impact |
|---|---|---|
| Creamy Peanut Butter | Crunchy Peanut Butter | Adds nutty bits; texture becomes slightly chunkier. Not recommended for filling. |
| Unsalted Butter | Vegan Butter (e.g., Miyoko’s) | Slightly less tender; flavor is neutral. Works well in both dough and filling. |
| Light Brown Sugar | Coconut Sugar | Less sweet, deeper caramel note. Cookies may be slightly denser. |
| All Purpose Flour | Gluten-Free 1-to-1 Blend | Cookies spread more; texture is tender but less structured. Use a blend with xanthan gum. |
How to Make Homemade Nutter Butters — Step-by-Step
Making these peanut butter sandwich cookies is easier than you think. I’ll guide you through each step with the same techniques I teach in my NYC cooking classes. Let’s bring that bakery experience home.
Step 1: Prep the Oven and Sugar
Preheat your oven to 350°F and line two cookie sheets with parchment paper or a silicone baking mat. Pour the 1/2 cup of granulated sugar into a small, shallow bowl. This will be our rolling sugar. Set it aside for now.
💡 mia’s Pro Tip: For extra sparkle, use sanding sugar or raw turbinado sugar for rolling. The larger crystals give a beautiful glisten and a gentle crunch that feels very professional.
Step 2: Mix the Dry Ingredients
In a medium mixing bowl, whisk together the all purpose flour, baking soda, and kosher salt. Whisking ensures the baking soda is evenly distributed, so your cookies rise uniformly. Set aside.
Step 3: Cream Butter, Sugar, and Peanut Butter
In a large bowl using a stand mixer (or a hand mixer), cream together the softened unsalted butter (1/2 cup), light brown sugar, and creamy peanut butter (1/2 cup). Beat on medium speed for about 3 minutes, until the mixture is light, fluffy, and pale in color. This step is critical — don’t rush it.
⚠️ Common Mistake to Avoid: Scooping peanut butter straight from the fridge. Cold peanut butter won’t cream properly with the butter and sugar, leading to dense cookies. Always bring peanut butter to room temperature before starting.
Step 4: Add Egg and Vanilla
Add the large egg and pure vanilla extract (1/2 teaspoon) to the creamed mixture. Beat on low speed until just combined. Scrape down the sides of the bowl with a spatula to ensure everything is incorporated.
Step 5: Combine Wet and Dry Ingredients
Gradually add the dry flour mixture to the wet ingredients, mixing on low speed. Stop as soon as the flour disappears — overmixing will develop gluten and make the cookies tough. The dough will be soft and slightly sticky.
Step 6: Shape and Sugar the Dough Logs
Divide the dough into small balls, about 1 1/2 tablespoons each (about the size of a ping pong ball). On a clean surface, roll each ball into a log shape about 2 inches long and 3/4 inch wide. Then roll each log in the bowl of sugar to coat evenly.
💡 mia’s Pro Tip: To get consistent logs, use a small cookie scoop to portion the dough. Then roll between your palms to form even cylinders. If the dough is too sticky to handle, dust your hands lightly with flour.
Step 7: Create the Crisscross Pattern
Place the sugar-coated dough logs on the prepared cookie sheets, spacing them about 2 inches apart. Use the tines of a fork to press a crisscross pattern onto each log. Press gently but firmly — you want the pattern, but not to flatten the log completely. After making the pattern, use your fingers to pinch the middle of each cookie lightly to form the classic peanut shape.
⚠️ Common Mistake to Avoid: Pressing the fork too hard, which flattens the dough. You want a gentle indentation. If the fork sticks to the dough, dip the tines in a bit of the sugar from your rolling bowl.
Step 8: Bake to Perfection
Bake the cookies for 10-12 minutes, rotating the pans halfway through for even baking. You’re looking for lightly browned edges while the centers remain puffed and soft. They will look slightly underdone — that’s perfect. Overbaking makes them dry.
💡 mia’s Pro Tip: Every oven runs differently. Start checking at 9 minutes. The cookies should feel set on the edges but still give slightly when touched in the center. They’ll continue to firm up on the pan as they cool.
Step 9: Cool the Cookies
Allow the cookies to cool on the baking sheet for exactly 5 minutes. This step is crucial — the cookies are still delicate and need to set. After 5 minutes, transfer them to a wire rack to cool completely. Don’t try to fill them while warm, or the filling will melt.
Step 10: Make the Filling
While the cookies are cooling, prepare the filling. In a clean bowl with a stand mixer or hand mixer, beat the softened unsalted butter (1/4 cup) and creamy peanut butter (1/2 cup) on medium speed until light and fluffy — about 2 minutes. Add the powdered sugar (1 1/2 cups), milk (2 tablespoons), and vanilla extract (1/4 teaspoon). Beat on low speed to combine, then increase to medium and beat for 1 minute until smooth and spreadable.
⚠️ Common Mistake to Avoid: Adding all the powdered sugar at once. It will create a snowstorm! Add it in batches, mixing on low speed after each addition to keep your kitchen clean.
Step 11: Assemble the Sandwiches
Group the completely cooled cookies into pairs by size and shape. Spoon about 1 tablespoon of filling onto the flat bottom of one cookie. Place the second cookie on top, flat side down, and gently press together until the filling reaches the edges. Repeat with all remaining cookies.
💡 mia’s Pro Tip: For a clean look, use a piping bag fitted with a large round tip to pipe the filling evenly. This is a trick I learned in Paris for perfect macaron assemblies. If you don’t have a piping bag, a zip-top bag with a corner snipped off works beautifully.
| Step | Action | Duration | Key Visual Cue |
|---|---|---|---|
| 1 | Prep Oven & Sugar | 2 min | Oven preheated, sugar in bowl |
| 2 | Mix Dry Ingredients | 2 min | Flour, baking soda, salt well combined |
| 3 | Cream Butter, Sugar, PB | 3 min | Light, fluffy, pale color |
| 4 | Add Egg & Vanilla | 1 min | Fully incorporated, smooth |
| 5 | Combine Dry into Wet | 1 min | No flour streaks remain |
| 6 | Shape & Sugar Dough | 8 min | Uniform logs, evenly coated |
| 7 | Create Crisscross Pattern | 3 min | Clear fork marks, peanut shape |
| 8 | Bake | 10-12 min | Light brown edges, puffy centers |
| 9 | Cool on Pan | 5 min | Cookies firm up slightly |
| 10 | Make Filling | 3 min |
 Homemade Nutter Butters Soft baked peanut butter cookies sandwiched around creamy peanut butter filling these Homemade Nutter Butter cookies are even better than the original! Ingredients
Scale
Instructions
Nutrition
Tried This Recipe? Leave a Comment!Did you make this recipe? I’d love to hear how it turned out! Please leave a comment and a rating below. Your feedback helps other home cooks and supports cheerychop.com! For more delicious inspiration, follow me on Pinterest! About Me Hey! I am Lora, the heart behind Ingredient Idea. Cooking has always been my passion, and I love creating traditional recipes that make every meal truly memorable. Recent Recipes |