Table of Contents
Peanut Butter Chocolate Oat Cups – No-Bake, Vegan & Gluten-Free
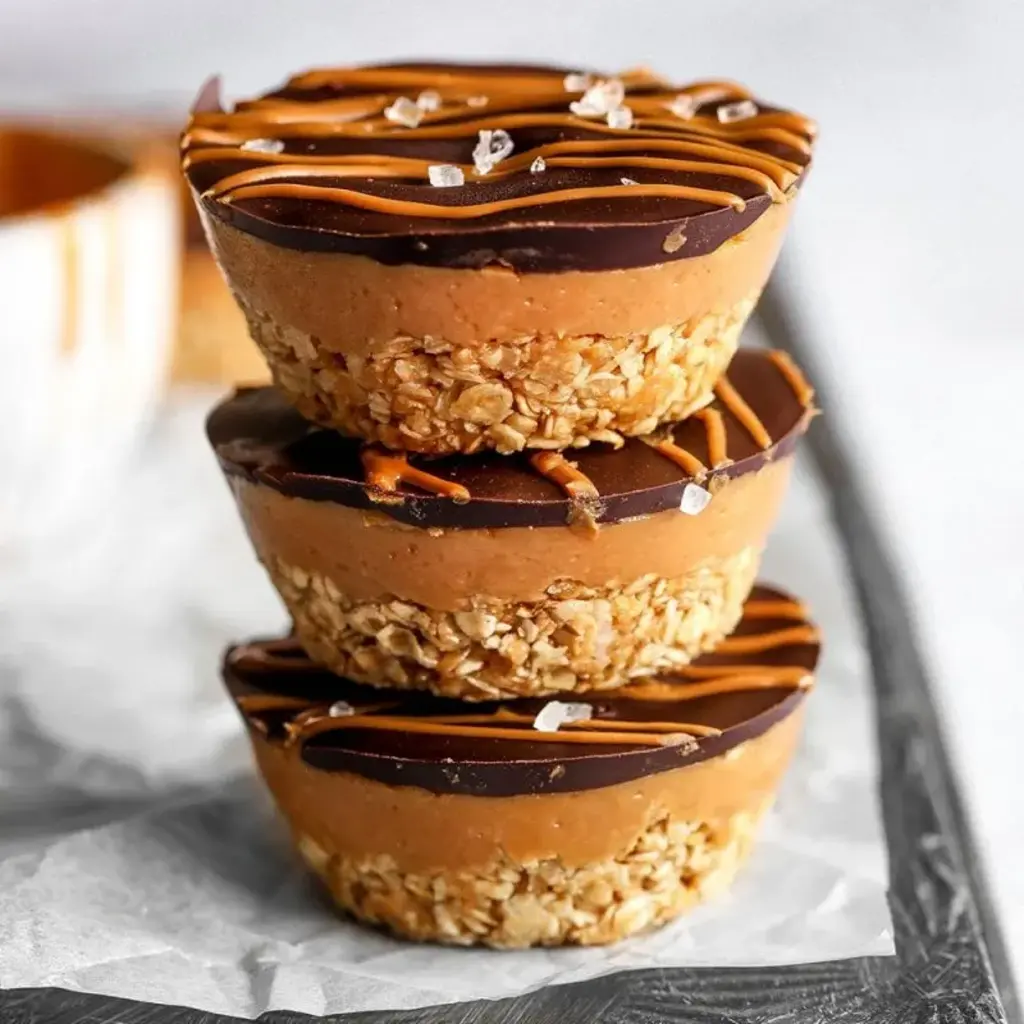
Growing up in Morocco, my mother always kept a jar of peanut butter chocolate oat cups in the fridge for after-school snacks. They were her quick answer to my sweet tooth — no oven required, just a few pantry ingredients. Now, decades later and after training in Paris, I’ve returned to that same simple treat with a refined touch. These no-bake oat cups are naturally vegan and gluten-free, but they taste like a decadent candy bar. The base is a crunchy oat mixture sweetened with maple syrup, then topped with a creamy peanut butter layer and finished with rich dark chocolate. It’s the kind of dessert that satisfies a craving without leaving you feeling heavy.
The first bite gives you a soft, slightly chewy oat crust that melts into the silky peanut butter filling. The dark chocolate on top snaps cleanly, then slowly softens against your tongue. I love adding a pinch of fleur de sel — a trick I picked up in Paris — to balance the sweetness. The aroma is pure nostalgia: toasted oats, earthy peanut butter, and deep cocoa. If you’re looking for a healthy peanut butter chocolate recipe that doesn’t compromise on taste, these cups are your answer.
What sets my version apart is the two-step chilling process. I freeze the base for 15 minutes so it firms up enough to hold the filling, then refrigerate the whole cup until the chocolate sets. That short freeze makes all the difference — no crumbly bottoms, no fall‑apart layers. I’ve tested this with both homemade and store‑bought peanut butter, and both work beautifully. 💡 mia’s Pro Tip: Use a silicone muffin tray — it lets you pop the cups out effortlessly without liners. One common mistake is rushing the chilling step; if the base isn’t cold, the layers will blend together. Trust the process, and you’ll have perfect little cups every time.
Why This Peanut Butter Chocolate Oat Cups Recipe Is the Best
The Flavor Secret
The magic lies in the combination of lightly salted oats and maple syrup. I use rolled oats (certified gluten‑free if needed) because they provide a nutty, toasted flavor without being too dense. In my Moroccan kitchen, we used honey for sweetness, but maple syrup gives a cleaner, more modern lift that pairs perfectly with the peanut butter. The dark chocolate — I prefer 70% cacao — adds a bittersweet contrast that keeps you coming back for more.
Perfected Texture
I learned in pastry school that texture is everything. The base must be firm enough to hold its shape but soft enough to bite into easily. By pressing the oat mixture firmly into the silicone molds and freezing it briefly, you get a compact crust that doesn’t crumble when you add the peanut butter layer. Then, the middle layer — just peanut butter and maple syrup — stays creamy and slightly sticky, creating a beautiful contrast with the hard chocolate shell.
Foolproof & Fast
This recipe works for beginners because it has no tricky techniques. No baking, no tempering chocolate (I simply melt it in the microwave), and no special equipment. The total hands‑on time is about 10 minutes, and the fridge does the rest. I’ve made these with my eight‑year‑old nephew, and he nailed it on his first try. That’s the kind of recipe I love sharing from my NYC kitchen — easy enough for a Tuesday night treat, elegant enough to serve at a party.
Peanut Butter Chocolate Oat Cups Ingredients
When I shop for these ingredients, I head to the Union Square Greenmarket in NYC for the best local maple syrup and rolled oats. Back in Morocco, I’d use argan oil instead of peanut butter, but here peanut butter is king. You’ll need two types of peanut butter: one for the base (to bind the oats) and another for the creamy middle layer. Make sure your peanut butter is smooth and drippy — not the super thick natural kind that separates easily.
Ingredients List
- 70g (about ¾ cup) rolled oats — use certified gluten-free if needed
- 2 tbsp smooth peanut butter (for the base)
- 2 tbsp maple syrup
- Pinch of salt
- 100g (about ⅓ cup) smooth peanut butter (for the middle layer)
- 1 tbsp maple syrup
- 70g (about ½ cup) dark chocolate, melted
- Optional: melted Biscoff spread for drizzling
Ingredient Spotlight
Rolled oats are the backbone of these cups. They absorb moisture from the peanut butter and maple syrup to form a cohesive base. Look for “old‑fashioned” rolled oats, not quick oats, which turn mushy. If you’re gluten‑sensitive, Bob’s Red Mill gluten‑free rolled oats work perfectly.
Peanut butter appears twice. For the base, a natural no‑sugar‑added peanut butter is fine, but avoid the dry, super‑thick ones — they won’t mix well. For the middle layer, you need a smooth, creamy peanut butter that spreads easily. I love using Skippy Natural (no hydrogenated oils) or my local grinder at the market.
Dark chocolate should be at least 60–70% cacao. I melt it gently in 30‑second bursts in the microwave with a splash of coconut oil for extra shine. Ghirardelli 72% is my go‑to for its rich flavor and smooth melting.
Maple syrup is the liquid sweetener that binds everything. Use pure maple syrup, not pancake syrup, for a clean, fruity sweetness. I buy Grade A Dark Amber from a farm in Vermont at the Greenmarket.
| Original Ingredient | Best Substitution | Flavor / Texture Impact |
|---|---|---|
| Rolled oats | Quick oats or quinoa flakes | Slightly softer; use a bit less liquid |
| Peanut butter | Almond butter, cashew butter, or sunflower seed butter | Subtle nuttiness; may need extra maple syrup if thick |
| Maple syrup | Agave nectar, honey (not vegan), or date syrup | Sweeter or thinner; adjust amount slightly |
| Dark chocolate | Milk chocolate or vegan white chocolate | Sweeter, less bitter; same texture |
How to Make Peanut Butter Chocolate Oat Cups — Step-by-Step
Ready to make these irresistible cups? Follow these simple steps and you’ll have a batch ready in under 30 minutes — most of that is chilling time!
Step 1: Make the Base
In a mixing bowl, combine 70g rolled oats, 2 tbsp smooth peanut butter, 2 tbsp maple syrup, and a pinch of salt. Stir with a spatula until the oats are evenly coated and the mixture sticks together when pressed. It should resemble a slightly sticky dough. Divide the mixture evenly among 6 silicone muffin cups (or a standard muffin tin lined with parchment squares). Press it down firmly with your fingers or the back of a spoon to create a compact, even layer. Place the tray in the freezer for 15 minutes to firm up.
💡 mia’s Pro Tip: Wet your fingers slightly if the mixture sticks too much. A silicone tray is key — it releases the cups without tearing. If using a metal tin, line it with paper liners and lightly grease them.
Step 2: Add the Middle Layer
While the base chills, make the middle layer. In a small bowl, mix 100g smooth peanut butter with 1 tbsp maple syrup until smooth and spreadable. After the base has been in the freezer for 15 minutes, remove the tray. Spoon the peanut butter mixture over each oat base, dividing it evenly. Gently spread it to the edges, but don’t press too hard — you want a distinct layer. Return the tray to the refrigerator while you melt the chocolate.
⚠️ Common Mistake to Avoid: Don’t skimp on the freeze time. If the base is still soft, the peanut butter layer will mix into the oats instead of staying separate. Set a timer!
Step 3: Top with Chocolate
Melt 70g dark chocolate in a microwave‑safe bowl in 30‑second bursts, stirring between each, until completely smooth. (Alternatively, use a double boiler.) Pour the melted chocolate over the peanut butter layer in each cup, tilting the tray gently to cover evenly. If you like, drizzle a little melted Biscoff on top for a decorative swirl. Refrigerate for at least 2 hours, or until the chocolate is fully set and firm.
💡 mia’s Pro Tip: For an extra shiny finish, stir a teaspoon of coconut oil into the melted chocolate before pouring. It also helps the chocolate set with a clean snap.
| Step | Action | Duration | Key Visual Cue |
|---|---|---|---|
| 1 | Mix base and press into molds | 5 min | Mixture holds together when squeezed |
| 2 | Freeze base | 15 min | Base is firm to the touch, not sticky |
| 3 | Add peanut butter layer | 3 min | Evenly spread, no gaps at edges |
| 4 | Top with melted chocolate | 2 min | Chocolate covers surface completely |
| 5 | Refrigerate until set | 2 hours+ | Chocolate is firm and no longer glossy |
Serving & Presentation
These peanut butter chocolate oat cups are incredibly versatile. I love serving them as a grab‑and‑go snack straight from the fridge — perfect for busy NYC mornings. For a prettier presentation, place each cup on a small plate, drizzle with a little extra melted peanut butter or Biscoff, and sprinkle with flaky sea salt. The salt brings out the sweetness and balances the dark chocolate beautifully. If you’re entertaining, arrange them on a wooden board with fresh berries and a few mint leaves.
Growing up in Morocco, we often enjoyed sweet treats with a pot of mint tea. Here in New York, these cups pair wonderfully with an oat milk latte or a cold glass of almond milk. For a truly indulgent dessert, serve them alongside a scoop of vanilla coconut ice cream — the cold, creamy scoop melts into the chocolate layer, creating a surreal experience.
| Pairing Type | Suggestions | Why It Works |
|---|---|---|
| Side Dish | Fresh berries, banana slices | Adds freshness and acidity to cut richness |
| Sauce / Dip | Extra peanut butter drizzle, caramel sauce | Enhances peanut butter flavor, adds sweetness |
| Beverage | Oat milk latte, black coffee, mint tea | Coffee/tea balance sweetness; oat milk complements oats |
| Garnish | Flaky sea salt, crushed peanuts, shredded coconut | Adds crunch, salt contrast, and visual appeal |
Make-Ahead, Storage & Reheating
These oat cups are the ultimate meal‑prep friend. I often make a double batch on Sunday and keep them in the fridge for the week. They store beautifully and only get better as the flavors meld. For my busy NYC schedule, I pack two in a small container for an afternoon pick‑me‑up. Here’s how to store them correctly.
| Method | Container | Duration | Reheating Tip |
|---|---|---|---|
| Refrigerator | Airtight container, layers separated by parchment | Up to 7 days | Serve cold; microwave 10–15 seconds to soften slightly |
| Freezer | Freezer‑safe bag or container, stacked with parchment | Up to 3 months | Thaw in fridge 1 hour, or microwave 20 seconds from frozen |
| Make-Ahead | Assemble fully, refrigerate without chocolate; add chocolate later | Up to 2 days in advance | Melt chocolate and pour just before serving |
If you want to serve these at room temperature, take them out of the fridge 15 minutes before eating — the texture softens just enough but holds its shape. I don’t recommend microwaving them for more than a few seconds, or the chocolate will melt entirely. For a frozen treat, enjoy them straight from the freezer — they’re like a healthy ice cream bar!
Variations & Easy Swaps
| Variation | Key Change | Best For | Difficulty Impact |
|---|---|---|---|
| Coconut Chocolate | Add toasted shredded coconut to oat base | Tropical twist, extra crunch | Easy |
| Nut-Free Sunflower Seed | Replace peanut butter with sunflower seed butter | School‑safe, allergy‑friendly | Easy |
| Spiced Moroccan | Add ¼ tsp cinnamon & pinch of cayenne | Warm, exotic flavor | Easy |
Coconut Chocolate Oat Cups
Toast 2 tablespoons of unsweetened shredded coconut until golden, then stir it into the oat base before pressing. The coconut adds a tropical crunch and pairs beautifully with the dark chocolate. This variation reminds me of the coconut stalls at the Marrakech souk — sweet, simple, and deeply satisfying.
Nut-Free Sunflower Seed Version
For a completely nut‑free option, replace both the peanut butter in the base and the middle layer with sunflower seed butter. Use 2 tbsp for the base and 100g for the middle layer. The flavor is slightly earthy but still creamy. Add an extra ½ tbsp maple syrup to the middle layer to balance the natural bitterness of sunflower seeds. This swap works perfectly for school lunchboxes or anyone with nut allergies.
Spiced Moroccan Chocolate Oat Cups
My personal favorite: stir ¼ teaspoon of ground cinnamon and a tiny pinch of cayenne pepper into the melted dark chocolate before pouring. The warmth of cinnamon and the gentle heat of cayenne elevate the chocolate, creating a complex, adult‑friendly treat. This is the version I make when I want to taste a little bit of my childhood — my mother would always add a whisper of cinnamon to everything sweet.
How do you make peanut butter chocolate oat cups without baking?
To make these no‑bake oat cups, simply mix rolled oats, peanut butter, maple syrup, and salt to form the base. Press the mixture into a silicone muffin tray and freeze for 15 minutes. Then spread a layer of peanut butter blended with maple syrup over the bases, and top with melted dark chocolate. Refrigerate until fully set — about 2 hours. No oven needed at all. The key is to freeze the base briefly so it holds its shape, then let the fridge do the rest of the work. This method keeps the layers distinct and the texture perfect.
What can I use instead of peanut butter in peanut butter chocolate oat cups?
You can substitute any nut or seed butter for peanut butter. Almond butter, cashew butter, and sunflower seed butter all work wonderfully. For the base, use the same amount (2 tbsp) and for the middle layer, use 100g. If you use sunflower seed butter, be aware that it can turn green when mixed with alkaline ingredients (like baking soda), but since this recipe doesn’t use any leavening, you’re fine. Add an extra teaspoon of maple syrup if the butter is very thick. For a completely nut‑free version, sunflower seed butter is your best bet.
How long do peanut butter chocolate oat cups need to set in the fridge?
You need to refrigerate the assembled cups for at least 2 hours to allow the chocolate to harden completely. For best results, I recommend 4 hours or overnight. The chocolate should be firm to the touch and no longer shiny. If you’re in a hurry, you can speed things up by freezing them for 30 minutes after adding the chocolate, but the fridge gives a more consistent set. The peanut butter layer also firms up during this time, creating a clean, sliceable texture. Don’t rush it — patience pays off with a perfect snap.
How do you keep peanut butter chocolate oat cups from sticking to the paper liners?
The easiest way to prevent sticking is to use a silicone muffin tray — the cups pop out effortlessly without any liners. If you prefer to use paper liners, lightly spray them with non‑stick cooking spray or brush with a tiny bit of melted coconut oil before adding the base mixture. Also, make sure you press the base firmly; any loose oats can stick. After the cups are fully set, gently peel the liner away rather than pulling it off. If you still have sticking, place the cups in the freezer for 5 minutes — the cold helps release the liner cleanly.
Are peanut butter chocolate oat cups healthy?
Yes, these cups are a healthier alternative to many store‑bought candy bars. Each serving has 273 calories, 17g of fat, 7g of protein, and just 11g of sugar — most of which comes from maple syrup and dark chocolate, not processed sugars. They’re made with whole‑grain oats, natural peanut butter, and dark chocolate, which provide fiber, healthy fats, and antioxidants. Since they’re no‑bake, you also avoid any trans fats or hydrogenated oils. They’re vegan and can easily be gluten‑free. Enjoy them as a guilt‑free treat or a quick energy boost.
Can I use quick oats instead of rolled oats?
Yes, you can substitute quick oats for rolled oats in these cups. However, quick oats are more finely processed, so they absorb liquid faster and create a slightly softer, more compact base. Because they’re less chewy, you may want to add a tablespoon of extra peanut butter to the base mixture to help bind them. The texture will be less rustic but still delicious. I personally prefer rolled oats for their hearty texture, but quick oats work in a pinch. Just avoid instant oatmeal packets as they often contain added sugar and flavorings.
Can I make these peanut butter chocolate oat cups nut‑free?
Absolutely! To make them nut‑free, replace the peanut butter with a seed butter such as sunflower seed butter or tahini (sesame paste). Sunflower seed butter offers the closest creamy consistency. For the base, use 2 tbsp of seed butter; for the middle layer, use 100g. Note that seed butters can be slightly more runny, so you may need to add a tablespoon of rolled oats to the middle layer to thicken it. Also, ensure your chocolate is from a nut‑free facility if you have severe allergies. These swaps keep the cups completely safe for school or nut‑free households.
How do I melt chocolate for peanut butter chocolate oat cups without burning it?
The easiest and safest method is to melt the chocolate in the microwave. Place 70g of dark chocolate (chopped or chips) in a microwave‑safe bowl. Heat in 30‑second bursts at 50% power, stirring well after each burst. Stop when the chocolate is mostly melted and stir until completely smooth. If you prefer the stovetop, use a double boiler: place a heatproof bowl over a pot of simmering water (don’t let the bowl touch the water). Stir constantly until melted. Never let water come into contact with the chocolate or it will seize. Adding a teaspoon of coconut oil helps it melt more evenly and gives a shiny finish.
Do I need to use a silicone muffin tray for this recipe?
A silicone muffin tray is highly recommended because it makes releasing the oat cups incredibly easy. You can simply push up from the bottom and the cups pop out cleanly without sticking. If you don’t have one, you can use a standard metal muffin tin lined with paper liners. Lightly spray the liners with non‑stick cooking spray to prevent sticking. Another option is to use small silicone molds like those for chocolate making. The key is that the cups must be easy to remove once the chocolate sets, so a non‑stick surface is important.
Can I add protein powder to these oat cups?
Yes, you can incorporate protein powder to boost the protein content. Start by replacing 2 tablespoons of the rolled oats with your favorite protein powder (vanilla or chocolate work best). Mix it into the base with the oats, peanut butter, and maple syrup. You may need to add an extra tablespoon of water or milk (dairy or plant‑based) if the mixture feels too dry. The texture will be slightly denser but still delicious. I’ve tried this with pea protein and brown rice protein, and both work well. Just be careful not to overdo it — too much protein powder can make the base crumbly.
Share Your Version!
I truly hope you fall in love with these peanut butter chocolate oat cups as much as I have. They’ve become a staple in my New York kitchen — perfect for a quick snack, a lunchbox surprise, or even a healthy dessert after a busy day. Now I want to see your creations! Leave a star rating and a comment below telling me how yours turned out. Did you try any of the variations? I’d love to hear which one became your favorite.
Take a photo of your beautiful oat cups and share it on Instagram or Pinterest. Tag @exorecipes so I can cheer you on. And if you have a twist you think I should try — like a drizzle of tahini or a sprinkle of za’atar — drop it in the comments. From my NYC kitchen to yours — I hope this recipe brings as much warmth to your table as it does to mine. — mia 🧡
Love This Recipe? Save It to Pinterest!
If you enjoyed this Peanut Butter Chocolate Oat Cups recipe, don’t let it get lost in your browser tabs! 😄 Pin it now so you can find it again anytime — and explore hundreds more tried-and-tested recipes waiting for you on my Pinterest boards.
👉 Follow mia on Pinterest @exorecipe
📌 Pin this recipe · 🔁 Re-pin your favorites · 💬 Tag me when you make it — I love seeing your creations!
Did you make this recipe?
I’d love to hear how your Peanut Butter Chocolate Oat Cups turned out! Share your photos on Instagram with #exorecipes or leave a comment below. Your feedback helps me create even better recipes for you. Happy no‑bake snacking! 🥜🍫
— mia 🧡
Peanut Butter Chocolate Oat Cups

A simple treat with a layer of peanut butter all topped with rich dark chocolate. No-bake, vegan AND gluten-free!
Ingredients
- 70g rolled oats (used gluten-free if necessary)
- 2 tbsp smooth peanut butter (or nut butter of choice)
- 2 tbsp maple syrup
- Pinch of salt
- 100g smooth peanut butter
- 1 tbsp maple syrup
- 70 g dark chocolate (melted)
- Optional drizzle of melted Biscoff spread
Instructions
- Mix all the base ingredients in a bowl, then press into a 6 cup silicon muffin tray. Freeze for 15 minutes.
- In the meantime mix the peanut butter and maple syrup in a small bowl to create the middle layer, then spread over the oat bases and top with the melted chocolate.
- Refrigerate until hardened. Enjoy!
Nutrition
- Calories: 273 kcal
- Sugar: 11 g
- Fat: 17 g
- Carbohydrates: 25 g
- Protein: 7 g
Tried This Recipe? Leave a Comment!
Did you make this recipe? I’d love to hear how it turned out! Please leave a comment and a rating below. Your feedback helps other home cooks and supports cheerychop.com!
For more delicious inspiration, follow me on Pinterest!