Table of Contents
Kit Kat Cookies Recipe: Double Chocolate Kit Kat Cookies with Chunks of Joy
The scent of baking chocolate is one of my strongest memories, evoking my mother’s kitchen in Marrakech where sugar and spices filled the air. Now, living in bustling New York City, I still find so much joy in creating comforting treats that feel both familiar and exciting. This Kit Kat Cookies Recipe is a perfect example – it takes a beloved classic, the chocolate chip cookie, and injects it with the delightful crunch and chocolatey goodness of Kit Kats. These aren’t just any chocolate chip Kit Kat cookies; they’re a double dose of joy, packed with chopped Kit Kats and rich chocolate chunks, resulting in a cookie that’s chewy in the middle with perfectly crisp edges. It’s a sensational way to elevate your homemade cookies and a fantastic way to use up any leftover Halloween candy!
Imagine biting into a cookie that’s deeply chocolatey, with tender, chewy centers that almost melt in your mouth, giving way to just the slightest crispness around the edges. Then, you hit those pockets of melted dark chocolate and the unmistakable, satisfying snap of coarsely chopped Kit Kat pieces. This texture contrast is what makes these homemade Kit Kat cookies so special. I’ve always loved how French patisseries balance textures, and this cookie achieves that beautifully. The aroma alone – a rich mix of cocoa, butter, and toasted chocolate – is enough to transport you. It’s a symphony of flavors and textures that truly sings.
While many recipes scatter simple chocolate chips, my approach infuses every bite with that signature Kit Kat crunch, making these arguably the best easy Kit Kat cookies you’ll ever try. I’ve refined the ratios of sugar and flour, along with a touch of cocoa, to ensure a robust chocolate flavor that complements the Kit Kats perfectly. I’ll share a key technique for perfectly integrating the mix-ins so you get that delightful crunch in every bite, and I’ll also point out a common mistake that can lead to dry, crumbly cookies. Get ready for a truly exceptional homemade cookie experience!
Why This Kit Kat Cookies Recipe Is the Best
My passion for blending Moroccan warmth with Parisian technique shines through in this recipe. The secret to these unique Kit Kat cookies lies in the double dose of chocolate – a rich cocoa base enhanced by finely chopped dark chocolate, which creates a deeper flavor profile than a standard cookie. This ensures the cookie itself is a decadent treat, ready to embrace the sweetness of the Kit Kats without being overpowered. It’s a culinary marriage of convenience and exquisite taste, much like how I aim to balance the boldness of NYC flavors with the refined techniques learned abroad.
Achieving that perfect texture is paramount in any cookie, and this recipe is no exception. By carefully balancing the brown and granulated sugars, and using both an egg and an egg yolk, I ensure a cookie that’s wonderfully chewy in the center while maintaining a slight crispness around the edges. This technique, honed during my pastry training in Paris, prevents the cookies from spreading too thinly or becoming cakey, giving you that substantial, satisfying bite that’s ideal for holding hearty mix-ins like crushed Kit Kat pieces.
For busy home cooks in cities like my beloved New York, ease and reliability are key. This Kit Kat Cookies Recipe is designed to be straightforward, using common pantry staples and simple steps that deliver professional results. I’ve focused on a dough that’s easy to handle and bakes consistently, making it approachable for beginners while still delighting seasoned bakers. The result is a foolproof batch of delicious, homemade Kit Kat cookies ready to impress any crowd, proving that gourmet doesn’t have to be complicated.
Kit Kat Cookies Ingredients
When I’m developing recipes here in NYC, I love visiting the farmers markets or specialty shops for the best ingredients. For these Kit Kat cookies, you’ll find most items readily available at your local grocery store, which is convenient for those weeknight baking urges. The star, of course, is the Kit Kat, and I often find a great variety at larger supermarkets or even convenience stores. Thinking back to my grandmother’s pantry in Morocco, I remember the importance of fresh spices and quality butter – principles that still guide my baking today.
Ingredients List
- 250g (about 1 cup + 2 tbsp) unsalted butter, at room temperature
- 200g (about 1 cup) granulated sugar
- 120g (about ½ cup + 2 tbsp) light or dark brown sugar
- 1 large egg, at room temperature
- 1 large egg yolk, at room temperature
- 1 tsp vanilla extract
- 200g (about 1 ½ cups) all-purpose flour, sifted
- 80g (about ¾ cup) unsweetened cocoa powder, sifted
- 1 tsp kosher salt
- ½ tsp baking powder
- ½ tsp baking soda
- 300g (about 10-12 standard bars) Kit Kats, coarsely chopped, plus extra for the tops (optional)
- 150g (about 1 cup) chopped chocolate (I used dark)
Ingredient Spotlight
Unsalted Butter: The foundation for rich flavor and tender texture. Using butter at room temperature is crucial for proper creaming, which incorporates air for a lighter cookie. If your butter is too cold, it will create lumps; too warm, and it can make your cookies spread excessively. For a more complex flavor, consider using European-style butter, which has a higher fat content and often a richer taste, something I learned to appreciate in high-end pastry classes in Paris.
Cocoa Powder: This is key to the double chocolate aspect of these cookies. I recommend using a good quality unsweetened natural or Dutch-processed cocoa powder. Dutch-processed tends to give a darker color and a smoother, less acidic chocolate flavor, which I find pairs beautifully with the sweetness of the Kit Kats. Always sift your cocoa powder to prevent any chalky bits in your finished cookies.
Kit Kats: The star of the show! For this recipe, I prefer standard milk chocolate Kit Kats because their sweetness is nicely balanced by the dark chocolate cookie base. Chop them coarsely rather than finely to ensure you get distinct pieces and a good crunch. You can use any variety you like, from dark chocolate to seasonal flavors, but be mindful that their sweetness might need slight adjustment in the cookie dough.
| Original Ingredient | Best Substitution | Flavor / Texture Impact |
|---|---|---|
| Unsalted Butter | Salted butter (reduce added salt) | Slightly saltier flavor profile; ensure you adjust the added salt in the recipe accordingly. |
| All-Purpose Flour | A 1:1 gluten-free all-purpose flour blend (with xanthan gum) | May result in a slightly more crumbly texture, but generally works well to make gluten-free Kit Kat cookies. |
| Coarsely chopped Kit Kats | Chopped chocolate-covered pretzels or other crunchy candy bars | Will change the flavor profile and texture; pretzels add a salty crunch, other candy bars will offer different chocolate/caramel notes. |
How to Make Kit Kat Cookies — Step-by-Step
Let’s get baking! These steps will guide you to perfection.
Step 1: Prep and Preheat
Preheat your oven to 350°F (175°C). Line two to three large baking sheets with parchment paper. This prevents sticking and ensures even baking, a simple step that makes all the difference in cookie presentation.
💡 mia’s Pro Tip: Using parchment paper not only makes cleanup a breeze but also helps prevent the bottoms of your cookies from burning, leading to a more evenly baked cookie.
Step 2: Cream Butter and Sugars
In the bowl of a stand mixer fitted with the paddle attachment, cream together the softened butter, granulated sugar, and brown sugar on medium speed for about 2-3 minutes. You’re looking for a light, fluffy, pale yellow mixture. This aerates the dough, which is crucial for cookie texture.
Step 3: Add Wet Ingredients
Add the room temperature egg, egg yolk, and vanilla extract to the creamed butter and sugar mixture. Mix on low speed until just combined, scraping down the sides and bottom of the bowl as needed to ensure everything is incorporated smoothly.
Step 4: Combine Dry Ingredients
In a separate medium bowl, whisk together the sifted all-purpose flour, sifted cocoa powder, kosher salt, baking powder, and baking soda. This ensures that all the leavening agents and salt are evenly distributed throughout the flour mixture, preventing pockets of bitterness or uneven rise.
Step 5: Mix Dough
Gradually add the dry ingredients to the wet ingredients in the stand mixer bowl. Mix on low speed until *just* combined. Be careful not to overmix. Then, add in the coarsely chopped Kit Kats and chopped chocolate. Mix on low speed for a few more seconds, or use a rubber spatula to gently fold them in by hand until evenly distributed. Final mixing by hand is key to prevent breaking the Kit Kats too much.
⚠️ Common Mistake to Avoid: Overmixing the dough once the flour is added. This develops the gluten too much, leading to tough, flat cookies instead of chewy ones. Mix until *just* combined, then fold in your mix-ins gently.
Step 6: Scoop and Shape Dough
Using a ¼ cup cookie scoop, portion the dough into balls. Place them onto the prepared baking sheets, leaving about 2-3 inches between each cookie to allow for spreading. I can usually fit about 6 cookies per half-sheet.
Step 7: Add Extra Kit Kats (Optional)
If you like an extra Kit Kat flair, gently press a few more chopped Kit Kat pieces onto the tops of the dough balls before baking. This makes them look extra special!
Step 8: Bake Cookies
Bake the cookies for 15-16 minutes at 350°F (175°C). They should look slightly set around the edges but may still appear a bit soft in the center. This is the secret to a chewy cookie!
Step 9: Shape and Cool
As soon as the cookies come out of the oven, you can gently use the back of a spoon or a spatula to scoot them into a more perfect round shape if they’ve spread unevenly. Let the cookies cool on the baking sheets for 15-20 minutes before carefully transferring them to a wire baking rack to cool completely. This resting period on the hot pan allows them to finish cooking and set up properly.
Step 10: Repeat and Store
Repeat the baking process with any remaining cookie dough balls. Once completely cooled, store your delicious homemade Kit Kat cookies in an airtight container at room temperature. They’re best enjoyed within 3-4 days.
| Step | Action | Duration | Key Visual Cue |
|---|---|---|---|
| 1 | Prep & Preheat Oven | 10 mins | Oven at 350°F (175°C) |
| 2 | Cream Butter & Sugars | 2-3 mins | Light, fluffy, pale yellow mixture |
| 3 | Add Wet Ingredients | 1 min | Uniformly combined mixture |
| 4 | Combine Dry Ingredients | 1 min | Homogenous dry powder |
| 5 | Mix Dough with Mix-ins | 2 mins | Just combined, mix-ins evenly distributed |
| 6 | Scoop Dough | 5 mins | Uniform balls on baking sheets |
| 7 | Add Extra Kit Kats | 0.5 min | Kit Kats nestled on top |
| 8 | Bake Cookies | 15-16 mins | Edges set, center slightly soft |
| 9 | Cool & Shape | 15-20 mins on pan, then rack | Firm but slightly yielding cookies |
Serving & Presentation
These double chocolate Kit Kat cookies are a statement piece on their own, but I love to present them on a simple white platter to let their rich, dark color and studded mix-ins pop. For an extra touch, especially when entertaining guests in my NYC apartment, I might dust them lightly with cocoa powder or serve them with a small dollop of espresso-infused whipped cream. The contrast of warm cookie with cool, lightly sweetened cream is divine, reminiscent of the decadent desserts I learned to perfect in France.
For a casual afternoon treat, a glass of cold milk is the undisputed champion, a classic pairing that has never failed. However, for a more sophisticated pairing, consider a rich espresso or a bold red wine like a Zinfandel or a Port. The bitterness of the coffee or the fruitiness and tannins of the wine cut through the sweetness of the cookie and complement the deep chocolate flavors beautifully. This pairing is one I often suggest when hosting friends, just as I’d serve a slice of my Moroccan honey cake with mint tea.
| Pairing Type | Suggestions | Why It Works |
|---|---|---|
| Side Dish | Not applicable for cookies. | Cookies are typically enjoyed as a dessert or snack. |
| Beverage | Cold Milk, Espresso, Ruby Port | Milk provides a classic creamy counterpoint. Espresso and Port cut through sweetness and enhance chocolate notes. |
| Garnish | Raspberry Coulis, Whipped Cream, Chocolate Shavings | Adds visual appeal & a complementary flavor/texture (fruitiness, creaminess, extra chocolate). |
Make-Ahead, Storage & Reheating
In my life here in NYC, juggling recipe development with a social life means meal prep is a lifesaver! Baking these cookies ahead of time is perfect. The dough balls can be frozen before baking, or baked cookies can be stored. This means you can have irresistible homemade Kit Kat cookies ready whenever a craving strikes or when unexpected guests drop by from Brooklyn.
| Method | Container | Duration | Reheating Tip |
|---|---|---|---|
| Refrigerator | Airtight container | 3-4 days | Enjoy at room temperature or very briefly microwave (10 seconds) for a soft, warm cookie. |
| Freezer | Freezer-safe bag or container | Up to 3 months | Thaw at room temperature. For a fresh-baked feel, reheat in a 300°F (150°C) oven for 5-7 minutes. |
| Make-Ahead | Dough balls can be frozen | Dough: Up to 1 month | Bake directly from frozen, adding 2-3 minutes to the baking time. |
For the best chewy texture, I recommend storing these cookies at room temperature in a well-sealed container. The humidity of your kitchen in NYC can sometimes affect them, so a good container is essential. If they lose a bit of their chewiness by day three, a quick 10-second zap in the microwave can often revive them, making them gooey and delicious again. Freezing is excellent for longer storage, and the reheating tip truly brings them back to life.
Variations & Easy Swaps
| Variation | Key Change | Best For | Difficulty Impact |
|---|---|---|---|
| Double Chocolate Kit Kat Cookies | Increase cocoa, add more dark chocolate chips/chunks. | Serious chocolate lovers. | Easy. |
| Gluten-Free/Dairy-Free Kit Kat Cookies | Use GF flour blend & dairy-free butter/chocolate. | Dietary restrictions. | Easy to Medium (depends on GF flour performance). |
| Seasonal Kit Kat Cookie Twist | Add spices like cinnamon or cardamom; use seasonal Kit Kat flavors. | Holiday baking, specific flavor profiles. | Easy. |
Double Chocolate Kit Kat Cookies
For an intensely chocolate experience, I amp up the cocoa powder to 100g and add an extra 100g of dark chocolate chunks to the dough. This creates a cookie that’s as dark and decadent as a fine Moroccan pastry. Don’t be afraid to go bold; the sweetness of the Kit Kats provides a perfect counterpoint to the deep, rich chocolate base, ensuring every bite is a delightful contrast.
Gluten-Free Dairy-Free Kit Kat Cookies
To make these cookies gluten-free and dairy-free, I’ve experimented with a few options. Use a reliable 1:1 gluten-free baking flour blend that contains xanthan gum. Ensure your Kit Kats are dairy-free (check labels, as not all varieties are). For dairy-free, swap the butter for a high-quality vegan butter stick and use dairy-free dark chocolate chips. These substitutions yield a surprisingly similar chewy texture and rich flavor, making them great for everyone to enjoy.
Seasonal Kit Kat Cookie Twist
My favorite way to play with seasonal flavors is to add warming spices. In the fall, I’ll add ½ teaspoon of cinnamon and ¼ teaspoon of nutmeg to the dry ingredients, reminiscent of the spices in Moroccan tagines. For a special holiday treat, consider using limited-edition Kit Kat flavors like mint or white chocolate, or add a sprinkle of sea salt on top before baking for an extra gourmet touch found in many high-end NYC bakeries.
How do you keep Kit Kat pieces from melting in the cookie dough?
The key to preventing Kit Kat pieces from completely melting into a sugary mess in the cookie dough is twofold. Firstly, ensure your dough is adequately chilled if you’re not baking immediately. Secondly, and most importantly, the baking time and temperature play a significant role. These cookies bake relatively quickly at 350°F (175°C). Because the Kit Kats are added at the very end and the baking time is focused on cooking the cookie dough itself, the Kit Kats tend to soften and slightly melt but retain some of their shape and signature crunch. Avoid overbaking, as this will cause them to disintegrate.
Can I use any flavor of Kit Kat for Kit Kat cookies?
Absolutely! While the recipe calls for standard milk chocolate Kit Kats, feel free to experiment with any flavor you love. Dark chocolate Kit Kats will lend a more intense chocolate flavor, while varieties like mint, orange, or even more unique seasonal flavors can add an exciting twist. Just be aware that some flavored Kit Kats might be sweeter or have a stronger flavor profile than the original, which could subtly alter the overall taste of the cookie. I recommend trying them and seeing which flavors become your personal favorites for these homemade Kit Kat cookies!
What is the best way to chop Kit Kat bars for cookies?
For the best texture and visual appeal in your Kit Kat cookies, I recommend chopping them coarsely. You can achieve this by using a sharp chef’s knife on a cutting board or even by roughly breaking them up with your hands if they’re slightly chilled. This method ensures you get satisfying chunks of Kit Kat that hold their shape during baking, providing distinct textural contrast. Avoid using a food processor, as it tends to pulverize the bars into too fine a powder, which can lead to them melting away into the dough rather than providing that signature crunch.
How long should I chill Kit Kat cookie dough before baking?
While this particular recipe is designed for an easy bake and doesn’t strictly require chilling if you plan to bake immediately – it’s often called an “easy Kit Kat cookie recipe” for this reason – chilling the dough for at least 30 minutes to an hour can significantly improve the texture and prevent excessive spreading. If you have the time, especially if your kitchen is warm, chilling the dough for an hour will help firm up the butter, leading to thicker cookies with a chewier texture and better-defined edges, ensuring your homemade Kit Kat cookies are perfect.
Can I make vegan Kit Kat cookies?
Yes, with a few simple substitutions, you can absolutely make delicious vegan Kit Kat cookies! You’ll need to use a high-quality vegan butter substitute (sticks work best for texture, not tubs) and ensure your chocolate chips are dairy-free. Many dark chocolate chips on the market are naturally vegan, but always double-check the packaging. The Kit Kats themselves may need a vegan-specific alternative or a different crunchy candy bar if standard varieties contain milk ingredients. The process remains the same, and the result is a delightful vegan version of these homemade cookies.
Why are my Kit Kat cookies spreading too much?
Excessive spreading in cookies often comes down to a few common culprits. First, if your butter was too soft or melted when you creamed it with the sugars, it can cause the dough to spread too much. Ensure your butter is just softened to room temperature. Second, too much sugar relative to flour can also lead to spreading. Making sure you measure your flour correctly (spooned and leveled, not scooped directly from the bag) is vital. Lastly, if you live in a very warm climate, chilling the dough for at least an hour before baking can help solidify the fats and prevent your easy Kit Kat cookies from becoming too thin.
How do I get the cookie to be chewy in the center?
Achieving that perfect chewy center in your homemade Kit Kat cookies is all about the ingredients and baking time. Using a combination of granulated and brown sugar is key; the molasses in brown sugar contributes to moisture and chewiness. Also, adding an extra egg yolk, as this recipe does, adds richness and fat, which further enhances chewiness. Crucially, underbaking slightly is essential. You want to pull the cookies out when the edges are set and lightly golden, but the center still looks soft and slightly underdone. They will continue to cook and set on the hot baking sheet.
Can I make these cookies without a stand mixer?
Absolutely! My mother never had a stand mixer in her Marrakech kitchen, and her baking was legendary. You can easily make these Kit Kat cookies by hand. You’ll need a sturdy whisk or a hand mixer for creaming the butter and sugars until light and fluffy – this is the most labor-intensive part, so be patient! For combining the dry and wet ingredients, a sturdy wooden spoon or spatula works perfectly. Gently folding in the Kit Kats and chocolate by hand is often preferred anyway to maintain their texture, so you won’t miss the mixer for that step!
Share Your Version!
I would absolutely love to see your creations! If you make these delicious Kit Kat Cookies Recipe, please leave a star rating and a comment below to let me know how they turned out. Your feedback helps me perfect my recipes and helps other bakers choose their next culinary adventure. Feel free to share a photo of your cookies on Instagram or Pinterest and tag me @exorecipe – I love seeing how my recipes come to life in your kitchens!
Have you tried any fun flavor combinations of Kit Kats in your baking, or perhaps added another complementary candy bar? I’m always inspired by your ideas and how you adapt recipes to your tastes!
From my NYC kitchen to yours — I hope this recipe brings as much warmth to your table as it does to mine. — mia 🧡
Love This Recipe? Save It to Pinterest!
If you enjoyed this Kit Kat Cookies recipe, don’t let it get lost in your browser tabs! 😄 Pin it now so you can find it again anytime — and explore hundreds more tried-and-tested recipes waiting for you on my Pinterest boards.
👉 Follow mia on Pinterest @chefrecipes2
📌 Pin this recipe · 🔁 Re-pin your favorites · 💬 Tag me when you make it — I love seeing your creations!

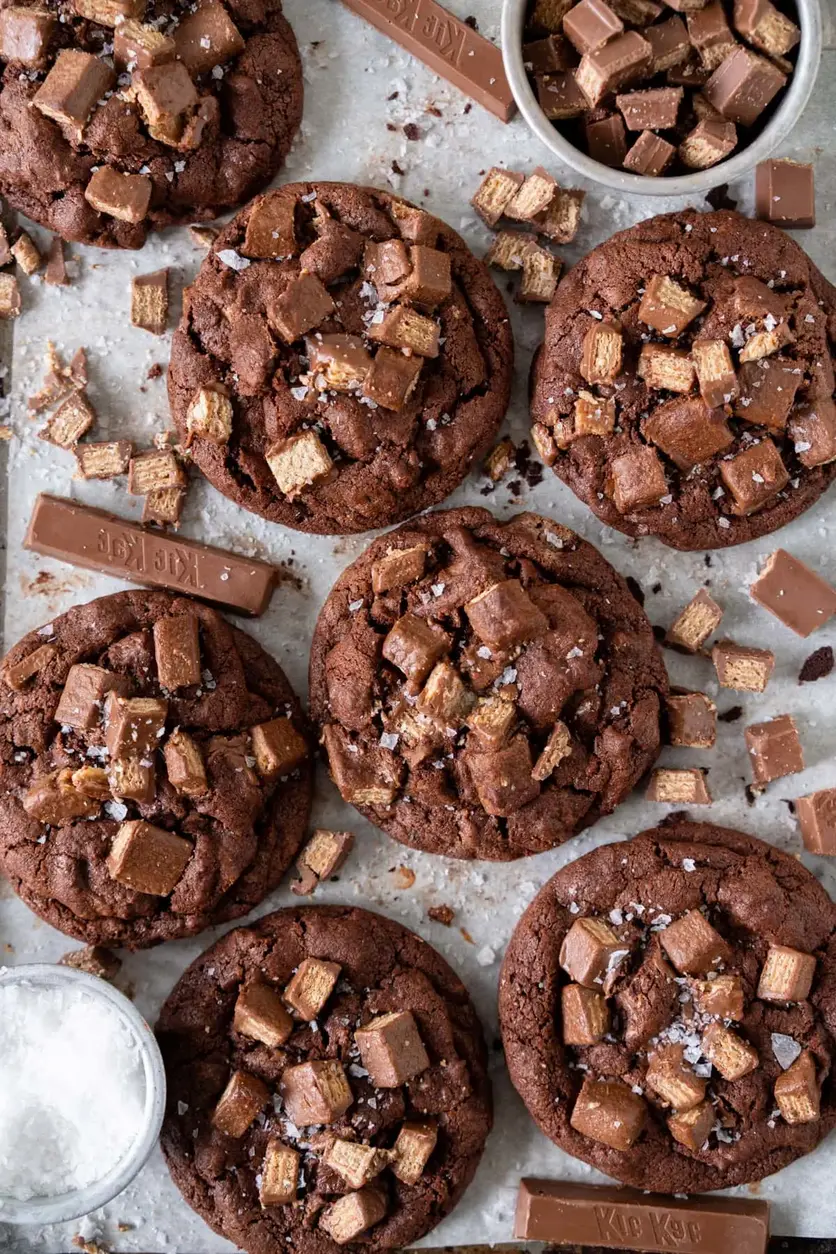
Kit Kat Cookies

These Double Chocolate Kit Kat Chocolate Chip Cookies are perfect for using up Halloween candy. They are soft and chewy in the center and slightly crunchy around the edges, and are filled with chocolate chunks and chopped Kit Kat.
Ingredients
- 250g unsalted butter, at room temperature
- 200g granulated sugar
- 120g light or dark brown sugar
- 1 egg, at room temperature
- 1 egg yolk, at room temperature
- 1 tsp vanilla extract
- 200g All-Purpose Flour, sifted
- 80g Cocoa, sifted
- 1 tsp kosher salt
- 1/2 tsp baking powder
- 1/2 tsp baking soda
- 300g kit kats, coarsely chopped, plus extra for the tops (optional)
- 150g chopped chocolate (I used dark)
Instructions
- Preheat the oven to 350°f / 180°c. Line 2-3 baking sheets with parchment paper.
- In the bowl of a stand mixer fitted with the paddle attachment, cream together the butter, granulated sugar, and brown sugar until light and fluffy, 2-3 minutes.
- Add the egg, egg yolk, and vanilla, and mix to combine, scraping down the edges as needed.
- Add the flour, cocoa, salt, baking powder and baking soda, and mix until just combined.
- Add in the chopped Kit Kat and chocolate and mix until just incorporated. Mix a few times by hand with a rubber spatula to ensure that the mix-ins are evenly incorporated.
- Using a 1/4 cup cookie scoop, scoop balls of dough out onto the prepared baking sheet, leaving enough space for spreading (I can fit 6 per half baking sheet).
- Press additional chopped Kit Kat onto the tops of the balls.
- Bake the cookies for 15-16 minutes, until slightly set around the edges.
- Remove from the oven and scoot into shape if desired (see notes).
- Repeat the baking process with the remaining cookie dough balls.
- Allow to cool on the pans for 15-20 minutes before transferring to a baking rack and allowing to cool completely.
- Store leftovers in an airtight container at room temperature.
Tried This Recipe? Leave a Comment!
Did you make this recipe? I’d love to hear how it turned out! Please leave a comment and a rating below. Your feedback helps other home cooks and supports cheerychop.com!
For more delicious inspiration, follow me on Pinterest!