Table of Contents
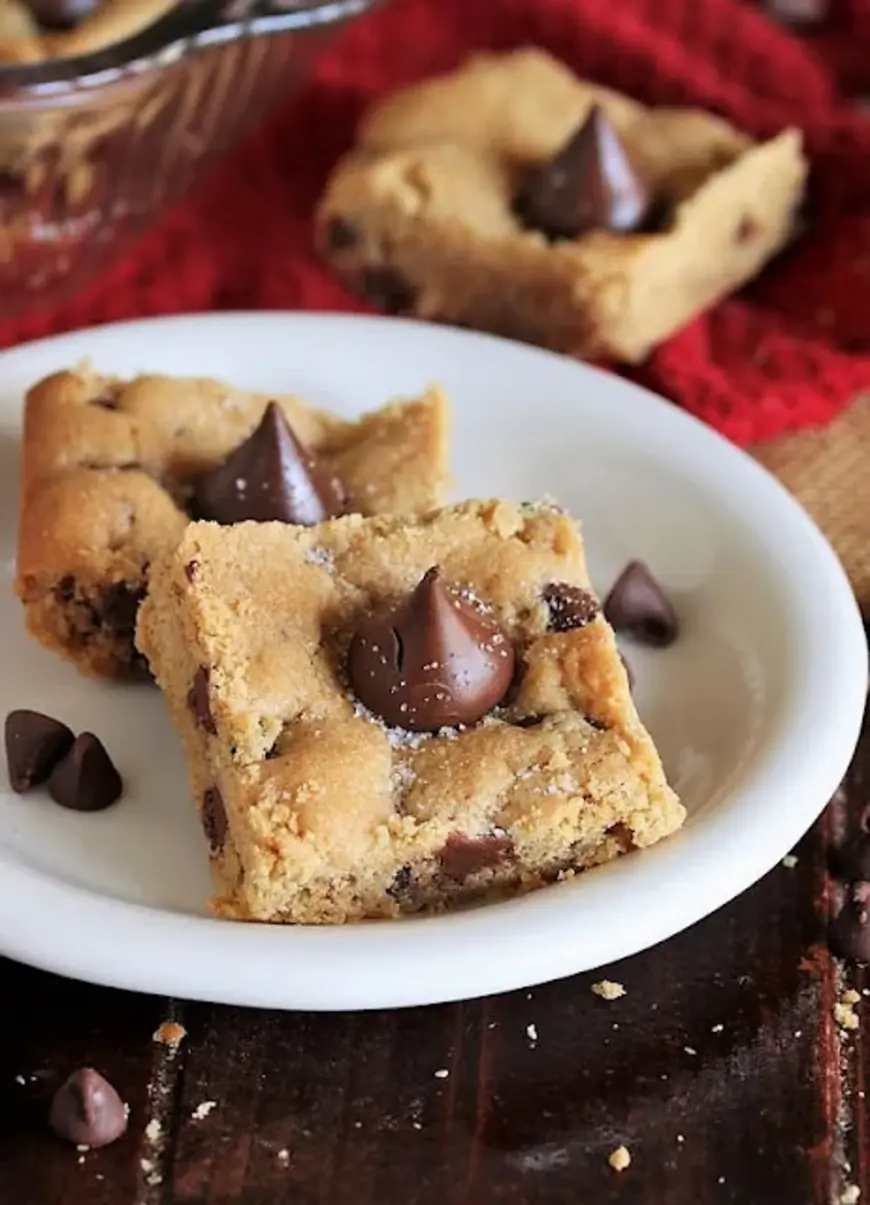
Peanut Butter Blossom Bars with a Chocolate Kiss Twist
There are some treats that are just pure nostalgia, and the classic Peanut Butter Blossom cookie is absolutely one of them for me. I can vividly remember my mother making them in her kitchen in Rabat, the sweet, nutty aroma filling the air, and the excitement of pressing that candy kiss into the warm cookie. Now, living in a bustling city like New York, time is always of the essence, but I never want to sacrifice those comforting flavors. That’s why I’m so thrilled to share this ingenious recipe for Peanut Butter Blossom Bars. It captures all the beloved magic of the original, transforming it into an even easier bar format, perfect for bake sales, holiday platters, or just a weeknight craving. These Peanut Butter Blossom Bars are everything you love — rich, peanut buttery, and crowned with that iconic chocolate kiss — but simplified for maximum enjoyment with minimum fuss.
Imagine this: a chewy, tender blondie-like base, deeply flavored with creamy peanut butter and studded with pockets of melty milk chocolate chips. Then, gently fused into the warm surface, a smooth, glossy Hershey’s Kiss, its rich chocolate a perfect counterpoint to the nutty sweetness. The texture is sublime – slightly crisp edges giving way to a soft, fudgy interior. This recipe takes inspiration from the French patisserie’s attention to foundational flavors but delivers it with an American comfort food sensibility. The touch of sparkling sugar sprinkled on top adds a delicate crunch and a beautiful shimmer, reminiscent of the festive lights of Manhattan during the holidays. It’s a dessert that’s both familiar and excitingly new, a true crowd-pleaser that tastes like home, no matter where home is.
What makes this recipe truly special is its nod to ease without compromising on taste or presentation. I’ve refined the classic cookie into a bar, a shortcut that’s as practical as it is delicious. These Peanut Butter Blossom Bars are incredibly forgiving, even for novice bakers. I’ll also share a little trick I learned in pastry school in Paris for achieving that perfect chewy-to-fudgy ratio, which is crucial for a bar that holds its shape beautifully. And, of course, I’ll guide you on a common mistake many home bakers make that can lead to a dry or crumbly texture, ensuring your bars are a guaranteed success every single time. Get ready for an easy peanut butter dessert that will become a staple!
Why This Peanut Butter Blossom Bars Recipe Is the Best
As a chef who’s spent years perfecting techniques from Moroccan tagines in my mother’s kitchen to delicate pastries in Paris, I’ve learned that the best recipes balance comfort with a touch of culinary craft. My Peanut Butter Blossom Bars are this philosophy in action. The secret lies in a precise ratio of fats and sugars, creating a base that is rich and tender without being greasy, allowing the peanut butter and chocolate flavors to truly sing. This isn’t just a simple adaptation; it’s an elevation of a beloved classic. I’ve ensured the ingredients meld beautifully, producing a result that’s both deeply satisfying for the peanut butter lover and elegantly balanced for the discerning palate.
Achieving that signature chewy-yet-fudgy texture is often the challenge with bar cookies, but I’ve incorporated a technique that guarantees success. By creaming the butter and sugars properly, and then being careful not to overmix the flour, we develop just enough gluten for structure while maintaining a tender crumb. This method, honed in professional kitchens, ensures each bite melts in your mouth. The addition of chocolate chips throughout the dough adds another layer of texture and delightful bursts of chocolate, making every single bite an adventure. These bars hold their shape perfectly, making them ideal for slicing and serving without crumbling.
Beyond the superior taste and texture, these Peanut Butter Blossom Bars are remarkably easy to make. The recipe uses simple, pantry-staple ingredients and comes together in one bowl with minimal fuss. The one-pan baking means less cleanup, which is always a win in my busy New York City life! This recipe is perfect for busy weeknights, last-minute potlucks, or even a fun baking project with kids. You can feel confident serving these, knowing they look and taste like they came from a professional bakery, but were made effortlessly by you. They are truly the easiest peanut butter dessert you’ll find.
Peanut Butter Blossom Bars Ingredients
When I’m developing a recipe like these Peanut Butter Blossom Bars, I always think about where my readers will be sourcing their ingredients here in the States. I love popping into Eli Zabar’s for the freshest butter or picking up quality chocolate chips at Kalustyan’s for inspiration. But these ingredients are widely available at any good supermarket. My mother’s pantry in Morocco always had sugar, flour, and peanut butter, and while we didn’t have Hershey’s Kisses growing up, the concept of a sweet, iconic confectionery topping was familiar. These ingredients come together to create pure magic!
Ingredients List
- 1/2 cup unsalted butter, softened
- 1/2 cup granulated sugar
- 1/2 cup brown sugar, packed
- 1/2 cup creamy peanut butter
- 1 large egg
- 1 1/2 cups all-purpose flour
- 3/4 teaspoon baking soda
- 1/2 teaspoon baking powder
- 1/8 teaspoon salt
- 2/3 cup milk chocolate chips
- 24 Hershey’s Kisses, unwrapped
- 3 teaspoons white sparkling sugar OR granulated sugar
Ingredient Spotlight
Unsalted Butter: The foundation of most good baked goods, butter lends richness and creates that wonderful tender texture. Always measure it for bars when it’s softened — not melted or cold. If you can’t find unsalted, you can substitute salted butter, but you’ll want to reduce or omit the added salt in the recipe to avoid over-salting.
Creamy Peanut Butter: For this recipe, any smooth, creamy peanut butter works beautifully. I prefer one that’s not overly sweetened, so the peanut flavor can really shine. If you absolutely love a bit of crunch, you can certainly use crunchy peanut butter, though it will alter the texture slightly, adding little nuggets of peanuts.
Hershey’s Kisses: This is the iconic signature! They provide that delightful chocolate crown. While milk chocolate is traditional and pairs perfectly, don’t hesitate to experiment with dark chocolate or even caramel-filled Kisses for a twist. Just make sure they are unwrapped before baking as they will melt into the bars.
All-Purpose Flour: This forms the structure of our bars. It’s important not to overmix the dough once flour is added, as this can lead to tough bars. For accurate measuring, spoon the flour into your cup and level it off with a straight edge, rather than scooping directly from the bag, which can compact it.
| Original Ingredient | Best Substitution | Flavor / Texture Impact |
|---|---|---|
| Creamy Peanut Butter | Crunchy Peanut Butter | Adds small peanut pieces for texture; flavor remains similar. |
| Milk Chocolate Chips | Dark Chocolate Chips / Semi-Sweet Chocolate Chips | Bittersweet or less sweet chocolate; slightly richer flavor profile. |
| Hershey’s Kisses | Rolo Chocolates (unwrapped) | Adds a caramel center, making the treat richer and chewier. |
| Sparkling Sugar | Coarse Sanding Sugar | Similar crunch and sparkle, slightly less sweet. |
How to Make Peanut Butter Blossom Bars — Step-by-Step
Making these Peanut Butter Blossom Bars is a straightforward process that yields incredibly rewarding results. Let’s get baking!
Step 1: Cream the Wet Ingredients
In a large mixing bowl, combine the softened unsalted butter, granulated sugar, packed brown sugar, creamy peanut butter, and the large egg. Beat everything together with an electric mixer on medium speed until the mixture is light, fluffy, and well combined. This step is crucial for a tender bar!
💡 mia’s Pro Tip: Ensure your butter is truly softened – it should give slightly when pressed but not be greasy or melted. This allows it to properly emulsify with the sugars and air, creating a light base.
Step 2: Add Dry Ingredients and Chips
By hand, gently stir in the all-purpose flour, baking soda, baking powder, and salt until just combined. This is where you want to be careful not to overmix – stop as soon as no dry streaks of flour remain. Then, fold in the milk chocolate chips until they are evenly distributed throughout the dough.
⚠️ Common Mistake to Avoid: Overmixing the dough after adding the flour. This develops the gluten too much, leading to tough or dense bars instead of the chewy, tender texture we’re aiming for.
Step 3: Press and Sugar the Dough
Grease a 9×13-inch baking pan (I prefer a light coating of butter or baking spray). Press the dough evenly into the bottom of the prepared pan. Don’t worry if it’s a bit stiff; that’s expected. Sprinkle about 2 teaspoons of the white sparkling sugar (or granulated sugar) evenly over the top of the dough.
Step 4: Bake Until Golden
Bake in a preheated oven at 350°F (175°C) for 22-24 minutes. The bars should be puffed up all over and a beautiful golden brown around the edges. They might still look slightly soft in the center, which is perfect as they’ll continue to set as they cool.
Step 5: Top with Kisses and Sugar
Immediately after removing the pan from the oven, place the unwrapped Hershey’s Kisses evenly over the hot bars in a pattern, typically 4 rows by 6 rows. Sprinkle the remaining teaspoon of white sparkling sugar (or granulated sugar) over the Kisses and the bars. The residual heat will begin to soften the Kisses.
💡 mia’s Pro Tip: Do NOT touch or try to press the Kisses into the bars after placing them. The heat from the baked bars will gently melt them, causing them to glisten and adhere beautifully while retaining their shape. Moving them too early will smudge them.
Step 6: Cool and Cut
Allow the bars to cool completely in the pan on a wire rack. This is essential for them to set properly. Once fully cooled, cut the bars into squares. Each square should ideally have one of the beautifully positioned Hershey’s Kisses right in the center.
Note: The dough will be a stiff, almost crumbly dough, which is correct for this recipe. Don’t be tempted to add more liquid unless absolutely necessary; it will make the bars too cakey.
| Step | Action | Duration | Key Visual Cue |
|---|---|---|---|
| 1 | Cream wet ingredients | ~3-4 minutes | Light, fluffy, well-combined mixture |
| 2 | Stir in dry ingredients & chips | ~1-2 minutes | Just combined, no dry flour streaks, chips distributed |
| 3 | Press dough & sprinkle sugar | ~2 minutes | Even layer of dough, sugar sprinkled on top |
| 4 | Bake | 22-24 minutes | Puffed up, golden brown edges |
| 5 | Add Kisses & sugar | Immediate, ~1 minute | Kisses placed evenly, sugar sprinkled on top |
| 6 | Cool completely & cut | ~1-2 hours | Firm enough to cut cleanly |
Serving & Presentation
These Peanut Butter Blossom Bars are simple yet elegant. I love to serve them on a festive platter, perhaps alongside some spiced Moroccan mint tea, which offers a refreshing contrast to the sweetness. In New York, we often see these as part of a larger dessert spread, a comforting classic amongst more modern creations. For an extra touch, a light dusting of powdered sugar can mimic a gentle snowfall over the chocolate kiss. They are perfect on their own, but can also be served with a dollop of whipped cream or a scoop of vanilla bean ice cream.
| Pairing Type | Suggestions | Why It Works |
|---|---|---|
| Side Dish | Glass of Cold Milk / Hot Coffee | Classic pairings that complement the rich, sweet flavors. |
| Sauce / Dip | Raspberry Coulis / Chocolate Ganache Drizzle | Adds a fruity tang or extra chocolate intensity. |
| Beverage | Moroccan Mint Tea / Earl Grey Tea | Herbal notes cut through sweetness; an elegant contrast. |
| Garnish | Crushed Toasted Pecans / Dusting of Powdered Sugar | Adds nuttiness and visual appeal or a ‘frosted’ look. |
Make-Ahead, Storage & Reheating
In my bustling NYC calendar, it’s essential to have baked goods that can be made ahead. These Peanut Butter Blossom Bars are perfect for that! I often bake a batch on Sunday to enjoy throughout the week. They store beautifully, making them a reliable go-to for unexpected guests or a quick dessert craving.
| Method | Container | Duration | Reheating Tip |
|---|---|---|---|
| Refrigerator | Airtight container | 5-7 days | Serve chilled or let come to room temperature for about 15-30 minutes. |
| Freezer | Freezer-safe container or wrapped tightly in plastic wrap and foil | 2-3 months | Thaw overnight in the refrigerator. Reheating in a toaster oven for a minute or two can refresh them. |
| Make-Ahead | Leave whole in the pan, slightly under plastic wrap | 2 days before serving | Once cooled in the pan, cover loosely and store at room temperature. Cut just before serving. |
If you find the bars a bit too firm after refrigeration, a quick 10-15 seconds in the microwave at low power can soften them slightly, just enough for the chocolate kiss to feel wonderfully melty again. For freezing, I recommend cutting them into individual squares before freezing; this makes it easier to grab just one or two without thawing the whole batch. They truly maintain their delicious texture and flavor.
Variations & Easy Swaps
| Variation | Key Change | Best For | Difficulty Impact |
|---|---|---|---|
| Seasonal Fall Spice | Add 1/2 tsp cinnamon and 1/4 tsp nutmeg to dry ingredients. Use caramel Kisses. | Autumn / Holiday baking | Easy |
| Gluten-Free / Dairy-Free | Use GF flour blend & dairy-free butter/chocolate/Kisses. | Dietary needs | Slightly tricky to get exact texture, test small batch. |
| Chocolate Lover’s Dream | Use dark chocolate chips, dark chocolate Kisses, and add 1 tbsp cocoa powder to dry ingredients. | Serious chocolate cravings | Easy, richer flavor. |
Seasonal Fall Spice Blossom Bars
To evoke the cozy flavors of autumn, I love adding warm spices to the dough. A generous sprinkle of cinnamon and nutmeg, just like my mother used in her Moroccan pastries, makes these bars utterly irresistible. I also swap the milk chocolate chips for dark chocolate and crown them with caramel-filled Kisses when they’re fresh out of the oven. This variation is perfect for Thanksgiving or any fall gathering.
Gluten-Free and Dairy-Free Blossom Bars
For my friends with dietary restrictions, these bars can be made gluten-free and dairy-free with a few key swaps. Use a good quality gluten-free all-purpose flour blend (one that contains xanthan gum). For dairy-free, opt for a plant-based butter substitute and dairy-free chocolate chips and Kisses. The texture might be slightly different, so I recommend testing a small batch first.
Chocolate Lover’s Dream Blossom Bars
If you’re a true chocolate devotee, like many New Yorkers I know, this variation is for you. Increment the chocolate intensity by adding 1 to 2 tablespoons of unsweetened cocoa powder to the dry ingredients. Use dark chocolate chips and dark chocolate Hershey’s Kisses. This creates a deeper, richer, more sophisticated chocolate flavor profile that’s incredibly decadent. I sometimes add a pinch of sea salt on top to enhance the dark chocolate notes.
Can I use crunchy peanut butter instead of creamy for Peanut Butter Blossom Bars?
Absolutely! You can use crunchy peanut butter instead of creamy for these Peanut Butter Blossom Bars. The primary difference will be textural – you’ll have little bits of peanuts throughout the bar, adding a pleasant crunch. The overall peanut flavor will remain strong and delicious. Just measure it cup-for-cup as you would the creamy variety. If you prefer a smoother bar, creamy is the way to go, but crunchy adds a satisfying contrast.
How do I keep the peanut butter blossoms from spreading too much in the pan?
The key to preventing excessive spreading in these Peanut Butter Blossom Bars lies in a few factors. First, ensure you’re using softened butter, not melted or overly soft, which can make the dough too liquid. Second, avoid overmixing the flour into the dough; this develops gluten, which can cause dough to spread. Pressing the dough evenly into the pan and sprinkling the sugar on top also helps create a good structure. Finally, baking them at the correct temperature (350°F / 175°C) is essential for them to set properly.
Do I need to chill the dough before making Peanut Butter Blossom Bars?
No, you do not need to chill the dough before making these Peanut Butter Blossom Bars. Unlike traditional cookies where chilling often prevents spreading and deepens flavor, this bar recipe is designed for ease and speed. The dough is intentionally a bit stiff, allowing you to press it directly into the pan. Chilling isn’t necessary here and would only add an extra step, making the dough harder to work with right out of the mixer.
How long do Peanut Butter Blossom Bars stay fresh and how should I store them?
Peanut Butter Blossom Bars stay fresh for about 5-7 days when stored properly. The best way to keep them fresh and maintain their soft, chewy texture is to store them in an airtight container at room temperature. If your kitchen is particularly warm, or if you prefer them chilled, they can also be stored in the refrigerator for up to a week. Just be sure to let them come to room temperature for about 15-30 minutes before serving for the best experience.
Can I use dark chocolate Kisses instead of milk chocolate?
Absolutely, you can use dark chocolate Kisses instead of milk chocolate for these Peanut Butter Blossom Bars! This is a wonderful way to add a richer, more intense chocolate flavor that pairs beautifully with the peanut butter. It’s a simple swap that can significantly alter the overall taste profile, making the bars a bit more sophisticated and less sweet. Whether you experiment with dark, semi-sweet, or even caramel-filled Kisses, they all add a delicious finishing touch.
What kind of pan is best for Peanut Butter Blossom Bars?
A standard 9×13-inch baking pan is ideal for making these Peanut Butter Blossom Bars. You can use metal, glass, or ceramic pans. Metal pans tend to conduct heat more efficiently, potentially leading to slightly crispier edges. Glass or ceramic pans bake more evenly and can help prevent the bottom from over-browning. Whichever material you choose, ensure it’s well-greased (with butter or baking spray) to prevent sticking and make for easy removal after baking.
Share Your Version!
I truly hope you love making and eating these Peanut Butter Blossom Bars as much as I do! They’re a simple joy that connects us to comforting memories and creates new ones. If you give this recipe a try, please consider leaving a star rating and a comment below – it means the world to me and helps other bakers find their next favorite treat. I also adore seeing your creations! Tag me in your photos on Instagram or Pinterest (@exorecipes) so I can share in your baking success. What’s your favorite way to put your own spin on classic recipes?
From my NYC kitchen to yours — I hope this recipe brings as much warmth to your table as it does to mine. — mia 🧡
Love This Recipe? Save It to Pinterest!
If you enjoyed this Peanut Butter Blossom Bars recipe, don’t let it get lost in your browser tabs! 😄 Pin it now so you can find it again anytime — and explore hundreds more tried-and-tested recipes waiting for you on my Pinterest boards.
👉 Follow mia on Pinterest @chefrecipes2
📌 Pin this recipe · 🔁 Re-pin your favorites · 💬 Tag me when you make it — I love seeing your creations!

Peanut Butter Blossom Bars
We all know and love iconic Peanut Butter Blossom cookies — but why not enjoy this classic treat in easy bar form? Just like their classic cookie inspiration, Peanut Butter Blossom Bars are rich in peanut butter flavor with that signature Hershey’s Kiss perched deliciously on top. And they’re super easy to make, too.
Ingredients
- 1/2 c. unsalted butter, softened
- 1/2 c. granulated sugar
- 1/2 c. brown sugar
- 1/2 c. creamy peanut butter
- 1 egg
- 1 1/2 c. all-purpose flour
- 3/4 tsp. baking soda
- 1/2 tsp. baking powder
- 1/8 tsp. salt
- 2/3 c. milk chocolate chips
- 24 Hershey's Kisses, unwrapped
- 3 tsp. white sparkling sugar OR granulated sugar
Instructions
- In large mixing bowl, combine the butter, 1/2 cup granulated sugar, brown sugar, peanut butter, and egg. Beat with an electric mixer on medium speed until well mixed.
- By hand, stir in flour, baking soda, baking powder, and salt until just combined and a dough forms. Stir in milk chocolate chips.
- Press dough into the bottom of a greased 9×13-inch baking pan. Sprinkle evenly with 2 teaspoons of the white sparkling sugar (or granulated sugar).
- Bake at 350x for 22-24 minutes, or until puffed up all over and golden brown.
- Remove from oven and immediately top with unwrapped Hershey's Kisses in a 4 rows by 6 rows pattern. Sprinkle with remaining teaspoon of the white sparkling sugar (or granulated sugar).
- Cool completely. Cut into squares with one of the Hershey's Kisses in the center of each bar.
- Store in an airtight container.
- The dough will be a stiff, almost crumbly dough.
- After placing the Hershey's Kisses on the baked bars, don't touch the Kisses again until the bars are completely cooled. The Kisses do melt (and glisten) from the heat of the baked bars, but do keep their shape. If you touch the Kisses at this point, they will smush and their shape will warp.
Tried This Recipe? Leave a Comment!
Did you make this recipe? I’d love to hear how it turned out! Please leave a comment and a rating below. Your feedback helps other home cooks and supports cheerychop.com!
For more delicious inspiration, follow me on Pinterest!