Table of Contents
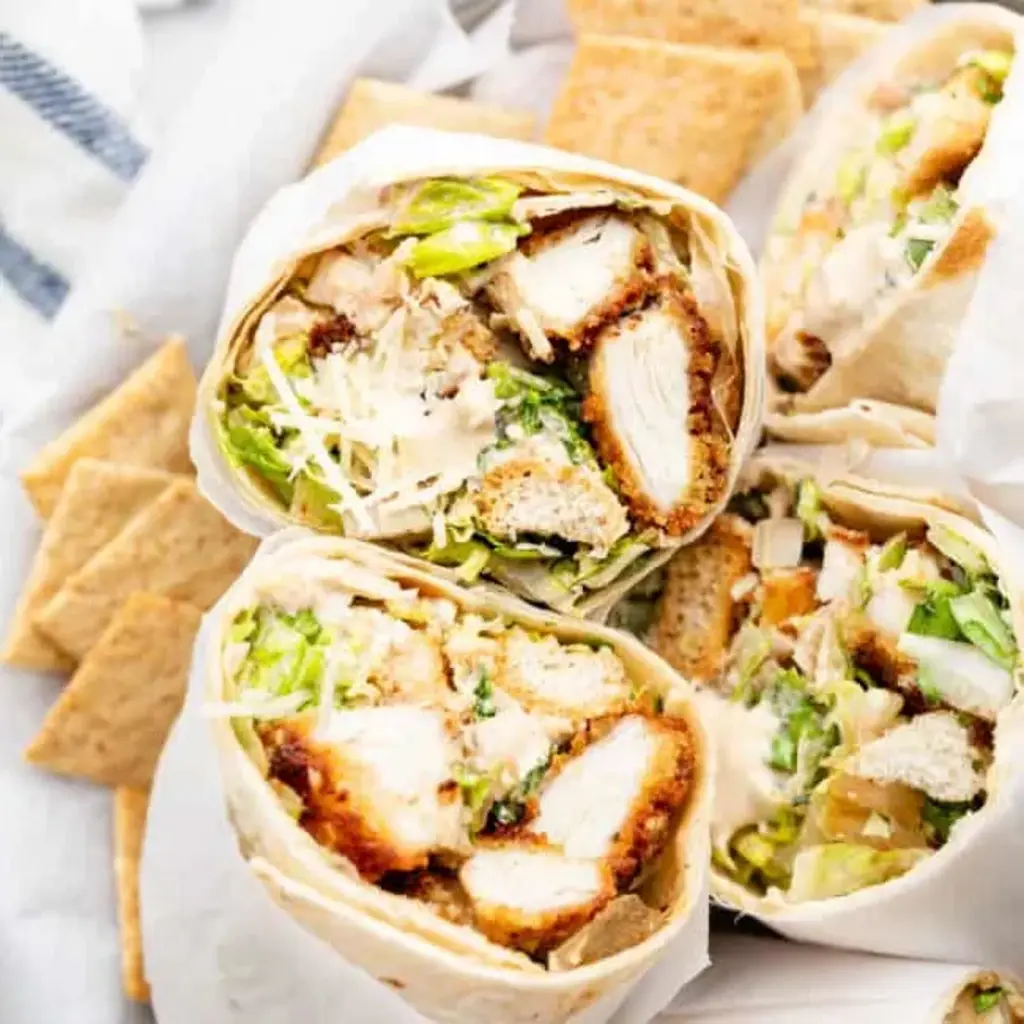
Chicken Caesar Wrap Recipe – The Ultimate Homemade Comfort
Growing up in Morocco, my mother always taught me that the best meals aren’t necessarily the ones that take all day to simmer; they are the ones made with intention and high-quality ingredients. Whether I’m grabbing lunch between shifts at a busy NYC restaurant or cooking for friends on a weekend, this easy chicken Caesar wrap is my go-to. It captures that classic, restaurant-quality crunch I learned to perfect during my culinary training in Paris, but simplifies the process so you can have a healthy lunch wrap on the table in under 30 minutes.
There is something undeniably satisfying about the marriage of crispy, panko-crusted chicken, cold snappy romaine, and a sharp, Parmesan-heavy dressing. My homemade Caesar wrap leans into the science of texture; the chicken maintains a golden, shatteringly crisp exterior while the interior stays tender thanks to a careful, thin-pound technique. It’s balanced with the brightness of freshly grated cheese and a creamy, umami-packed dressing that elevates this humble chicken wrap recipe into a meal that feels like a decadent bistro experience right in your own kitchen.
Creating the perfect wrap is all about assembly. I’ve spent years refining this method, and I’m sharing my secrets to ensure your wrap never soggies or leaks during lunch. The key is in the layering and the precise cooling of the breaded chicken. Even if you are a novice in the kitchen, this recipe is designed to be foolproof. I’ll guide you through the dredge station and the perfect way to wrap your ingredients, so you can stop settling for sad, store-bought lunches and start enjoying a truly elevated chicken Caesar wrap recipe.
Why This Chicken Caesar Wrap Recipe Is the Best
The secret lies in the panko and Parmesan crust. By blending these two, you create a golden-brown shell that doesn’t just add crunch—it provides a nutty depth that standard breadcrumbs lack. This is a technique I borrowed from my classical training in Paris, where we are taught that fats carry flavor, and the synergy of the cheese oils and frying creates a deeply savory profile.
Texture is everything. By pounding the chicken flat, we ensure even, quick cooking. This prevents the centers from drying out while the outside browns perfectly. A dry piece of chicken is the enemy of a great wrap, but by keeping the meat at exactly 1/4 inch thickness, you get a beautiful ratio of crispy coating to juicy protein in every single bite you take.
Finally, this recipe is incredibly efficient for our modern lives. The three-bowl dredging station is a classic culinary technique that, once you learn the rhythm, turns a complex-sounding meal into a 15-minute quick-fry delight. It’s fast, it’s clean, and it yields a result better than any neighborhood deli near my home in the city.
Chicken Caesar Wrap Ingredients
When I shop at the local NYC markets, I look for the freshest romaine and high-quality Parmesan. You will need: 2 large chicken breasts, 1 cup flour, 1/2 tsp salt/pepper, 2 eggs, 2 cups panko breadcrumbs, 1 cup grated Parmesan, 1/4 cup neutral oil, a head of romaine, 1 cup croutons, shredded Parmesan, 1/2 cup Caesar dressing, and 4 extra-large burrito wraps.
- Chicken Breasts (2 large)
- Flour, Salt, & Pepper (for dredging)
- 2 Eggs (beaten)
- Panko & Grated Parmesan (the coating)
- Neutral Oil (for shallow frying)
- Romaine Lettuce & Croutons
- Caesar Dressing
- 4 Large Burrito Wraps
How to Make Chicken Caesar Wrap — Step-by-Step
Don’t be intimidated by the frying process; it’s much simpler than it looks!
Step 1: Prep the Chicken
Slice the breasts through the width and pound to 1/4 inch thickness.
💡 mia’s Pro Tip: Use a piece of parchment paper over the chicken while pounding to keep your kitchen clean and prevent meat fibers from tearing.
Step 2: The Dredge
Set up your three-bowl station: bowl 1 with flour, salt, pepper; bowl 2 with eggs; bowl 3 with panko and Parmesan.
⚠️ Common Mistake to Avoid: Don’t crowd your bowl. Ensure your bowls are wide enough to accommodate the full width of the chicken for even coating.
Make-Ahead, Storage & Reheating
I often prep the chicken cutlets early in the week and store them in the fridge. When lunch rolls around, I assemble the wrap fresh to ensure the lettuce stays crisp and the croutons maintain their crunch.
How do you keep a chicken Caesar wrap from getting soggy?
The secret to avoiding the dreaded “soggy wrap” is to ensure your breaded chicken has cooled completely before it touches the lettuce and dressing. If the steam from the hot chicken hits the cold dressing and leaves behind moisture inside the wrap, the structural integrity of your flour tortilla will fail rapidly, leading to a mushy bite. I also recommend a “barrier layer”—place a few dry lettuce leaves directly against the flour tortilla before adding the dressed mixture; this acts as a moisture shield.
Can I use rotisserie chicken for a chicken Caesar wrap?
Absolutely, 100%. Using store-bought rotisserie chicken is one of my favorite time-saving shortcuts for busy workdays. While you lose that classic crispy panko crunch, you gain significant time. If you go this route, I recommend tossing the shredded chicken with a tablespoon of olive oil and a pinch of salt and smoked paprika just before adding it to the wrap to keep it flavorful and moist.
What type of tortilla is best for a chicken Caesar wrap?
Look for room-temperature, extra-large “burrito size” flour tortillas. Before you build your wrap, place the tortilla on the stove over low heat for just 10 seconds on each side. Heating the tortilla makes it pliable and elastic, which prevents cracking or tearing when you exert pressure during the rolling process. A cold, stiff tortilla is far more likely to split open as you try to fold it tightly.
How do you reheat a chicken Caesar wrap without it becoming dry?
Honestly, the best way to handle this wrap is to avoid reheating the entire thing once the salad is inside. If you have leftovers, store the breaded chicken separately from the lettuce/dressing mixture. When ready, reheat the chicken in an air fryer or toaster oven for a few minutes to restore its crispness, then assemble your fresh wrap. If you must reheat a pre-assembled wrap, use an air fryer, but wrap it loosely in foil to prevent the tortilla from becoming rock-hard and brittle.
Can I make this dairy-free or gluten-free?
Yes, both are quite easy. For gluten-free, swap out the flour for a rice flour blend and the panko for a certified gluten-free brand or even crushed pork rinds for extra crispiness. For dairy-free, simply skip the Parmesan in the coating—replacing it with fine almond flour adds that necessary fat content—and ensure your Caesar dressing is dairy-free (most contain anchovies but not always dairy, so do check the label of your preferred brand!).
Love This Recipe? Save It to Pinterest!
If you enjoyed this Chicken Caesar Wrap recipe, don’t let it get lost in your browser tabs! 😄 Pin it now so you can find it again anytime.
Did you make this recipe? I’d love to hear how it turned out! Leave a star rating and comment below, or tag me on Instagram! From my NYC kitchen to yours — I hope this recipe brings as much warmth to your table as it does to mine. — mia 🧡

Chicken Caesar Wrap Recipe

Fill up on a protein-rich, satisfying Chicken Caesar Wrap Recipe made with parmesan cheese, panko breadcrumbs, and a mouth watering homemade dressing.
Ingredients
- 2 large chicken breasts (~1.5lbs)
- 1 cup flour
- 1/2 tsp salt
- 1/2 tsp pepper
- 2 eggs
- 2 cups panko breadcrumb
- 1 cup grated parmesan cheese
- 1/4 cup neutral oil, with more as needed (vegetable, smooth olive oil, avocado oil)
- 1 large head romaine lettuce, chopped small
- 1 cup croutons
- 1 cup shredded parmesan (or more grated)
- 1/2 cup caesar dressing (I used this one)
- 4 extra large burrito wraps
Instructions
- Slice chicken in half through the width, like butterflying but cutting all the way through.
- Pound each of the 4 chicken pieces into 1/4 inch thick using a meat pounder or rolling pin.
- Set up a station in three wide bowls. In the first bowl, mix the flour and salt and pepper. In the second bowl, whisk both eggs. In the third bowl, mix together the panko and parmesan cheese.
- Coat each chicken breast evenly in flour on both sides, then dip the chicken breasts into the egg mixture and coat well. After the egg mixture, dip into the breadcrumb mixture and coat very well, pressing into breadcrumbs and covering the whole surface of chicken on both sides. Repeat until all chicken has been coated.
- Heat a large saucepan over medium-high heat and add the oil.
- Once hot, add two chicken breasts at a time, cooking for 4-5 minutes on each side. Set chicken breasts aside on paper towel lined plate and repeat until all are cooked.
- Meanwhile, in a bowl, add lettuce, croutons, parmesan, and caesar dressing. Toss till combined.
- Slice chicken cutlets into bite sized pieces. Add to salad mixture and toss.
- In a large wrap, add salad mixture and wrap tightly. Cut in half and serve.
Nutrition
- Calories: 1192 calories
- Sugar: 8.8 g
- Fat: 57.2 g
- Carbohydrates: 100.6 g
- Protein: 66.9 g
Tried This Recipe? Leave a Comment!
Did you make this recipe? I’d love to hear how it turned out! Please leave a comment and a rating below. Your feedback helps other home cooks and supports cheerychop.com!
For more delicious inspiration, follow me on Pinterest!