Table of Contents
Muddy Buddy Cookies with a Chocolate Peanut Butter Twist – Easy No-Bake Dessert
Oh, the joy of discovering a new dessert that instantly becomes a family favorite! For me, it often starts with a scent drifting from my mother’s kitchen in Morocco or a technique I perfected during my time in Paris. Today, I’m so excited to share my Muddy Buddy Cookies recipe, a delightful twist on a beloved no-bake dessert. These cookies capture that irresistible chocolate and peanut butter magic in every bite, reminiscent of the classic “puppy chow” snack but in a perfectly portioned cookie form. I tweaked them to be wonderfully easy, making them ideal for any day of the week.
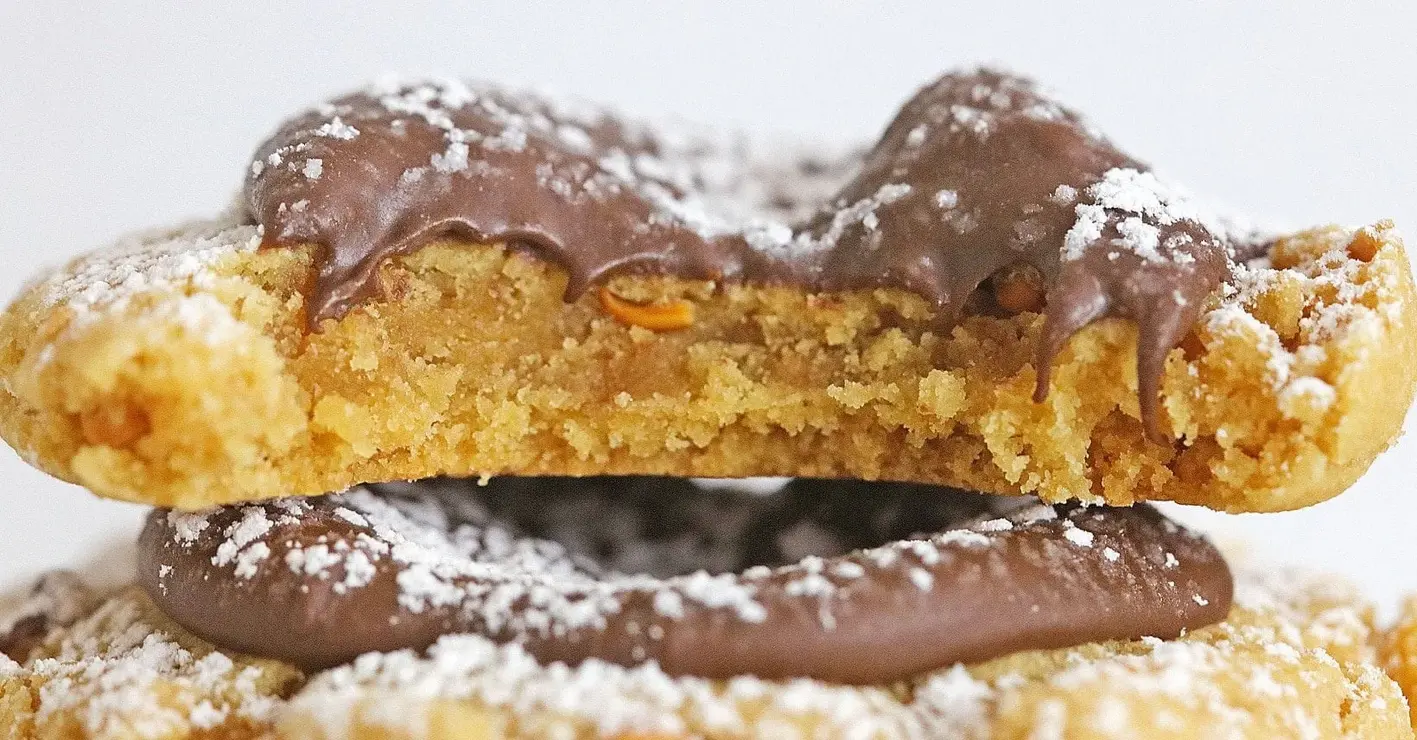
Imagine a cookie that’s soft yet satisfying, with a rich, creamy peanut butter cookie dough base that melts in your mouth. We then adorn it with a swirl of luscious milk chocolate and a delicate dusting of powdered sugar, creating a visual and gustatory masterpiece. The aroma alone, warm peanut butter meeting sweet chocolate, is enough to transport you. It’s the kind of comfort food that feels both nostalgic and entirely new, a fusion of simple, wholesome ingredients transformed into something truly special. This recipe balances textures so you get a satisfying chew with a delicate melt.
What makes this Muddy Buddy Cookies recipe special is its simplicity and how it elevates familiar flavors. I’ve refined the technique to ensure a perfect cookie every time, avoiding the common pitfall of dry, crumbly cookies. You’ll find a pro tip in the instructions that guarantees that signature slightly-cracked texture. The blend of ingredients is carefully balanced, ensuring you get the perfect ratio of chocolate to peanut butter. Ready to create these little gems?
Why This Muddy Buddy Cookies Recipe Is the Best
The secret to these Muddy Buddy Cookies lies in the thoughtful balance of flavors and textures, a principle I learned from masters in Paris and always apply when blending my Moroccan heritage with New York’s vibrant culinary scene. My recipe takes the beloved “puppy chow” concept and transforms it into a delightful, handheld cookie. The base is a rich peanut butter cookie dough, boasting a depth of flavor that pairs beautifully with the bittersweet chocolate finish. This isn’t just another cookie; it’s an experience that celebrates the iconic chocolate peanut butter cookie combination in a unique way.
From a professional cook’s perspective, achieving that perfect, slightly chewy texture with a hint of crispness around the edges is crucial. The technique of gently pressing the cookies after baking helps create a wonderful surface for the chocolate topping and ensures an even bake. This subtle step, often overlooked, makes a significant difference in the final outcome, preventing the cookie from being too dense or too airy. It’s a small detail that my culinary training emphasized, and it truly elevates these simple Muddy Buddy Cookies.
One of the reasons I’m so proud of this Muddy Buddy Cookies recipe is how utterly foolproof it is. You don’t need any fancy equipment or advanced skills. Whether you are a seasoned baker or just starting in your kitchen, you can succeed. These are truly easy muddy buddies to whip up. I’ve tested it countless times, ensuring that each step is clear and actionable. Plus, the “no-bake” aspect of the topping means you can get them ready without even turning on the oven once the cookies are baked, saving you time and effort. It’s the perfect no-bake dessert cookie.
Muddy Buddy Cookies Ingredients
When I shop for ingredients here in New York City, I love visiting the Union Square Greenmarket or picking up quality staples from my local grocery. For these Muddy Buddy Cookies, you’ll want the freshest ingredients to ensure the best flavor. My mother always insisted on creaming butter and sugar until it was light and fluffy, a fundamental step that makes all the difference in cookie texture. These ingredients are common and easy to find, making this recipe accessible for everyone.
Ingredients List
- 1/2 cup Butter (softened)
- 1/2 cup Peanut Butter
- 1/2 cup Granulated Sugar (plus to roll cookie balls in)
- 1/2 cup Brown Sugar
- 1 teaspoon Vanilla extract
- 1 Egg
- 1/4 teaspoon Salt
- 1 teaspoon Baking Soda
- 2 cups all-purpose Flour
- 1 cup Milk Chocolate Chips
- 1/4 cup Powdered Sugar (to sprinkle tops of cookies)
Ingredient Spotlight
Peanut Butter: The heart of these cookies! I prefer creamy peanut butter for its smooth integration into the dough, ensuring richness without chunky interruptions. However, crunchy peanut butter works beautifully too, adding a textural contrast. When shopping, look for brands with minimal added sugar or oils – just peanuts and salt. If you’re in a pinch, any standard creamy peanut butter from brands like Jif or Skippy will work perfectly fine. The key is that it’s at room temperature for easy creaming.
Milk Chocolate Chips: These provide that essential chocolatey element that melts into the cookies. I recommend good quality milk chocolate chips that melt smoothly. If you don’t have chips, you can chop up a milk chocolate bar. The goal is a smooth, meltable chocolate. If you want a richer, darker flavor, feel free to use semi-sweet chocolate chips; the combination is also wonderful and a staple pairing.
Butter: Using softened butter is crucial for achieving a light and creamy texture in your cookie dough. It should be pliable but not melted. If you forget to leave it out, you can gently warm cubes of butter in the microwave for short intervals, watching carefully so it doesn’t melt. Unsalted butter is generally preferred in baking to control the salt level, allowing me to perfectly balance the flavors in my recipes.
| Original Ingredient | Best Substitution | Flavor / Texture Impact |
|---|---|---|
| Peanut Butter | Almond Butter or Sunflower Seed Butter | Almond butter offers a slightly nuttier, earthier flavor. Sunflower seed butter provides a similar creamy texture with a distinct, milder “seed” flavor, excellent for nut allergies. |
| Milk Chocolate Chips | Semi-Sweet Chocolate Chips or Dark Chocolate Chips | Dark chocolate will make the topping less sweet and more intense. Semi-sweet offers a classic, balanced chocolate flavor. |
| All-purpose Flour | Gluten-Free All-Purpose Flour Blend (1:1 replacement) | Results in a similar texture if a good blend is used. May require slight adjustments in baking time. |
How to Make Muddy Buddy Cookies — Step-by-Step
Let’s get baking! This recipe is designed for simplicity, so don’t hesitate to jump in.
Step 1: Cream the Butter and Sugars
In the bowl of a stand mixer fitted with the paddle attachment, cream together the softened butter, peanut butter, granulated sugar, and brown sugar. Beat on medium speed until the mixture is light, fluffy, and well combined, resembling creamy frosting. This usually takes about 3-4 minutes. Scrape down the sides of the bowl as needed.
💡 mia’s Pro Tip: Ensure your butter and peanut butter are at room temperature for the creamiest texture. This is key for incorporating air, which will make your cookies tender!
Step 2: Add Wet and Dry Ingredients
Add the vanilla extract and egg to the creamed butter mixture and mix until just combined. In a separate medium bowl, whisk together the all-purpose flour, salt, and baking soda. Gradually add the dry ingredients to the wet ingredients, mixing on low speed until a smooth dough forms. Be careful not to overmix, as this can lead to tough cookies.
Step 3: Prepare for Baking
Line a baking sheet with parchment paper. Preheat your oven to 350°F (175°C). This preparation ensures your cookies won’t stick and bake evenly.
⚠️ Common Mistake to Avoid: Overmixing the dough after adding flour. This develops gluten, resulting in dense, tough cookies instead of tender ones.
Step 4: Shape and Bake
Roll tablespoon-sized balls of dough. Gently roll each ball in the extra granulated sugar you set aside. Place the sugar-coated balls about 2 inches apart on the prepared baking sheet. Bake for 10-12 minutes, or until the edges are lightly golden brown and the centers have begun to crack. While the cookies are still warm on the baking sheet, gently press the center of each cookie with the bottom of a flat glass or a measuring cup to create a slight indentation. Let them cool on the baking sheet for about 5 minutes before carefully transferring them to a wire rack to cool completely.
Step 5: Melt and Add Chocolate
Once the cookies have cooled, melt the milk chocolate chips. Place them in a microwave-safe bowl and heat in 15-second intervals, stirring well between each interval, until smooth and fully melted. Be patient; melting chocolate requires care to avoid scorching. Spoon about a teaspoon of melted chocolate into the center indentation of each cooled cookie. Allow the cookies to sit at room temperature for about an hour, or until the chocolate has begun to set.
Step 6: Finish and Serve
Once the chocolate topping has set, lightly sprinkle the powdered sugar over the tops of the cookies. This final dusting gives them that signature “muddy buddy” look. Serve immediately and enjoy this delightful treat!
| Step | Action | Duration | Key Visual Cue |
|---|---|---|---|
| 1 | Cream Butter & Sugars | 3-4 minutes | Light, fluffy, creamy mixture |
| 2 | Incorporate Wet & Dry | Until combined | Smooth, cohesive dough |
| 3 | Prep Oven & Pan | 5 minutes | Parchment-lined sheet, oven preheated to 350°F |
| 4 | Shape, Roll, Bake & Smash | 10-12 minutes baking + 5 mins resting on sheet | Golden brown edges, cracked centers, gently indented |
| 5 | Melt & Add Chocolate | Melt: ~1-2 mins; Add & set: ~60 mins | Smooth melted chocolate in indentations, beginning to set |
| 6 | Dust & Serve | Immediate | Light dusting of powdered sugar on set chocolate |
Serving & Presentation
These Muddy Buddy Cookies are as delightful to look at as they are to eat. The contrast between the soft cookie, the rich chocolate center, and the powdery dusting is visually appealing. For a more elegant presentation, especially for guests, I love arranging them on a rustic wooden board or a simple white ceramic platter. A few fresh berries, like raspberries or small strawberries, can add a pop of color and a fresh counterpoint to the sweetness. Think of it as a little nod to the vibrant fruit stalls you see in Marrakech!
For a casual gathering or a potluck, they are perfect right out of the container. They pair wonderfully with a cold glass of milk (a childhood favorite I still enjoy!) or a cup of coffee. In my New York life, I often find myself reaching for them with an afternoon espresso. If you’re feeling adventurous, a drizzle of white chocolate over the milk chocolate could add another layer of visual interest and flavor complexity, a touch of Parisian artistry.
| Pairing Type | Suggestions | Why It Works |
|---|---|---|
| Side Dish | A simple green salad; Fresh fruit platter | Balances the richness of the cookie with freshness. |
| Sauce / Dip | Caramel sauce for dipping; Raspberry coulis | Complements the chocolate and peanut butter flavors. |
| Beverage | Cold Milk; Espresso or strong coffee; Earl Grey tea | Classic pairings that enhance the sweet and rich notes. |
| Garnish | A few fresh raspberries; A tiny mint sprig; A light dusting of cocoa powder | Adds visual appeal and subtle flavor enhancements. |
Make-Ahead, Storage & Reheating
As a busy New Yorker, I rely on smart meal prep, and that includes desserts! These Muddy Buddy Cookies are fantastic for making ahead. You can bake them a day or two in advance and store them at room temperature, adding the chocolate and powdered sugar just before serving if you want them to look their absolute freshest. However, they hold up beautifully with the toppings already applied.
| Method | Container | Duration | Reheating Tip |
|---|---|---|---|
| Refrigerator | Airtight container | Up to 5 days | Bring to room temperature for 30 minutes before serving. |
| Freezer | Freezer-safe airtight container or bag | Up to 2 months | Defrost overnight in the refrigerator, then bring to room temperature. |
| Make-Ahead | Airtight container | Up to 2 days in advance (bake and cool fully) | Add chocolate and powdered sugar topping just before or on the day of serving for best appearance. |
If your cookies become slightly stale, you can gently rehydrate them. Place a cookie on a microwave-safe plate and microwave on low power for just 5-10 seconds. This can revive their soft texture. For the chocolate topping, ensure it’s fully set before storing. If it seems soft, give it more time at room temperature or a brief stint in the fridge. Enjoying them within a few days is best for optimal flavor and texture.
Variations & Easy Swaps
| Variation | Key Change | Best For | Difficulty Impact |
|---|---|---|---|
| Classic Peanut Butter Chocolate Chip | Add 1/2 cup of mini chocolate chips to the dough. | Chocolate lovers, classic cookie fans. | Slightly increased baking time. |
| Gluten-Free & Dairy-Free Friendly | Use GF flour blend and dairy-free butter/chocolate. | Those with dietary restrictions or allergies. | Requires careful ingredient selection. |
| Seasonal Spiced Treats | Add cinnamon, nutmeg, or a pinch of cardamom to the dough. | Autumn holidays, cozy evenings. | Minimal change, just adds aromatic depth. |
Classic Peanut Butter Chocolate Chip
For a truly decadent experience, I love adding mini chocolate chips directly into the cookie dough. This creates pockets of melted chocolate throughout the cookie, complementing the peanut butter base. It’s like getting two beloved cookies in one! This variation is inspired by the classic American chocolate chip cookie, which I’ve always admired for its comforting appeal, and it pairs beautifully with the spiced notes of my Moroccan heritage.
Gluten-Free & Dairy-Free Friendly
Making these accessible for everyone is important to me. To create a gluten-free version, I use a good quality 1:1 gluten-free all-purpose flour blend. For dairy-free, opt for a plant-based butter substitute and dairy-free milk chocolate chips. The texture might be slightly different depending on the specific products used, but the flavor profile remains wonderfully intact. I’ve found these swaps work remarkably well, maintaining that signature chewy texture.
Seasonal Spiced Treats
During the cooler months, I love to infuse these Muddy Buddy Cookies with warm spices. A pinch of cinnamon or nutmeg, or even a hint of cardamom, adds a wonderful aromatic depth reminiscent of the spices in my mother’s tagines. This subtle twist transforms them into a perfect cozy treat for autumn or winter gatherings. It’s a simple way to elevate the flavor profile and make them feel extra festive, especially during the holiday season.
Can I use creamy peanut butter instead of crunchy in Muddy Buddy Cookies?
Absolutely! Using creamy peanut butter will result in a smoother, more uniform cookie dough and a creamier texture. I often prefer creamy myself for that exact reason. Crunchy peanut butter can also be used, and it will add a pleasant textural contrast within the cookie itself. Both options will yield delicious results, so feel free to use whichever you have on hand or prefer!
How long do Muddy Buddy Cookies need to set before serving?
Once the melted chocolate is spooned onto the cookies, they need about 1 hour to set at room temperature. If you’re in a hurry, you can place them in the refrigerator for about 20-30 minutes to speed up the setting process. It’s important for the chocolate to be firm before you sprinkle them with powdered sugar. This ensures a neat finish and prevents the chocolate from smudging.
What can I substitute for the powdered sugar in Muddy Buddy Cookies?
For the final dusting, if you don’t have powdered sugar, you can lightly dust the cookies with a fine layer of granulated sugar for a subtle crunch, though the classic look will be slightly different. Another option is to leave them plain after the chocolate sets, or add a dusting of cocoa powder for a richer, more intense chocolate flavor. A sprinkle of coarse sea salt can also add a lovely savory contrast.
How should I store Muddy Buddy Cookies to keep them fresh?
To keep your Muddy Buddy Cookies fresh, store them in an airtight container at room temperature. They are best enjoyed within 3-4 days. If your kitchen is particularly warm, you can store them in the refrigerator, but be sure to bring them back to room temperature for about 30 minutes before serving, as refrigeration can sometimes make the cookie slightly harder.
Can I make these Muddy Buddy Cookies ahead of time?
Yes, absolutely! Baking the cookies completely and letting them cool is perfectly fine. You can store them in an airtight container for up to 2 days before adding the chocolate topping and powdered sugar. For the best appearance, I recommend adding the chocolate and sugar dusting on the day you plan to serve them. However, they will still taste delicious even if fully assembled ahead of time.
Can I use dark chocolate instead of milk chocolate?
You can definitely use dark chocolate or semi-sweet chocolate chips if you prefer! Dark chocolate will give the topping a more intense, less sweet flavor that beautifully complements the peanut butter cookie base. Semi-sweet offers a classic balance. Whichever you choose, ensure they melt smoothly. The color will be a bit deeper, but the deliciousness factor remains high!
Why did my cookies spread too much?
Over-spreading in cookies typically happens when the butter is too warm or melted, or when the dough is overmixed. For this recipe, ensure your butter is softened but not liquid. Mixing the dough until *just* combined after adding the flour also prevents excess gluten development. Chilling the dough for about 15-20 minutes before baking can also help prevent excessive spreading.
Share Your Version!
I truly hope you adore these Muddy Buddy Cookies as much as I do! They are a simple yet incredibly satisfying treat that I often whip up when I need a little comfort or a quick crowd-pleaser. Please, if you make them, leave a star rating and your thoughts in the comments below—it genuinely makes my day to hear from you! And if you share photos on Instagram or Pinterest, tag me @exorecipe; I absolutely love seeing your creations coming out of your kitchens!
I’m especially curious to know how you experience the chocolate peanut butter flavor fusion. Do you find it reminds you of a favorite childhood treat, or does it inspire new culinary creations for you? I can’t wait to read your feedback and see how these delightful cookies bring joy to your tables too.
From my NYC kitchen to yours — I hope this recipe brings as much warmth to your table as it does to mine. — mia 🧡
Love This Recipe? Save It to Pinterest!
If you enjoyed this Muddy Buddy Cookies recipe, don’t let it get lost in your browser tabs! 😄 Pin it now so you can find it again anytime — and explore hundreds more tried-and-tested recipes waiting for you on my Pinterest boards.
👉 Follow mia on Pinterest @chefrecipes2
📌 Pin this recipe · 🔁 Re-pin your favorites · 💬 Tag me when you make it — I love seeing your creations!

Muddy Buddy Cookies
Muddy Buddy Cookies are the perfect blend of chocolate and peanut butter flavor in every bite. These cookies are made with rich peanut butter cookie dough and topped with chocolate and powdered sugar.
Ingredients
- 1/2 cup Butter (softened)
- 1/2 cup Peanut Butter
- 1/2 cup Granulated Sugar (plus to roll cookie balls in)
- 1/2 cup Brown Sugar
- 1 teaspoon Vanilla extract
- 1 Egg
- 1/4 teaspoon Salt
- 1 teaspoon Baking Soda
- 2 cups all-purpose Flour
- 1 cup Milk Chocolate Chips
- 1/4 cup Powdered Sugar (to Sprinkle tops of Cookies)
Instructions
- In the mixing bowl of a stand mixer, mix the Butter, Peanut Butter, Sugar, and Brown Sugar, until creamy and smooth. Add the Vanilla, and Egg, and blend well.
- In a separate bowl, mix the flour, salt, and baking soda until well combined. Add the mixing bowl, and blend between additions. Mix until smooth dough forms.
- Line a Cookie Sheet with Parchment paper, and set the oven to 350 degrees.
- Roll the dough into Tablespoon size balls, and roll in sugar, then place on the Parchment lined cookie sheet. Bake for 10 minutes, or until cookies have turned golden brown, and have begun to crack . Remove the cookie sheet from the oven, and gently smash the cookies, with the bottom of a flat glass, pushing the center in slightly. Leave cookies on cookie sheet for about 5 minutes, then remove to a wire rack to cool completely.
- When all cookies have been baked, place the Chocolate chips in a microwave safe bowl, and melt the chocolate chips at 15 second intervals, stirring between, until chocolate chips are melted. Spoon melted chocolate into the center of each cookie, and let cookies sit for about an hour, until chocolate begins to set.
- Once chocolate is set in the center of the cookies, sprinkle the powdered Sugar over the cookies. Serve, and Enjoy!
Nutrition
- Calories: 140 kcal
- Sugar: 9 g
- Fat: 7 g
- Carbohydrates: 18 g
- Protein: 3 g
Tried This Recipe? Leave a Comment!
Did you make this recipe? I’d love to hear how it turned out! Please leave a comment and a rating below. Your feedback helps other home cooks and supports cheerychop.com!
For more delicious inspiration, follow me on Pinterest!