Table of Contents
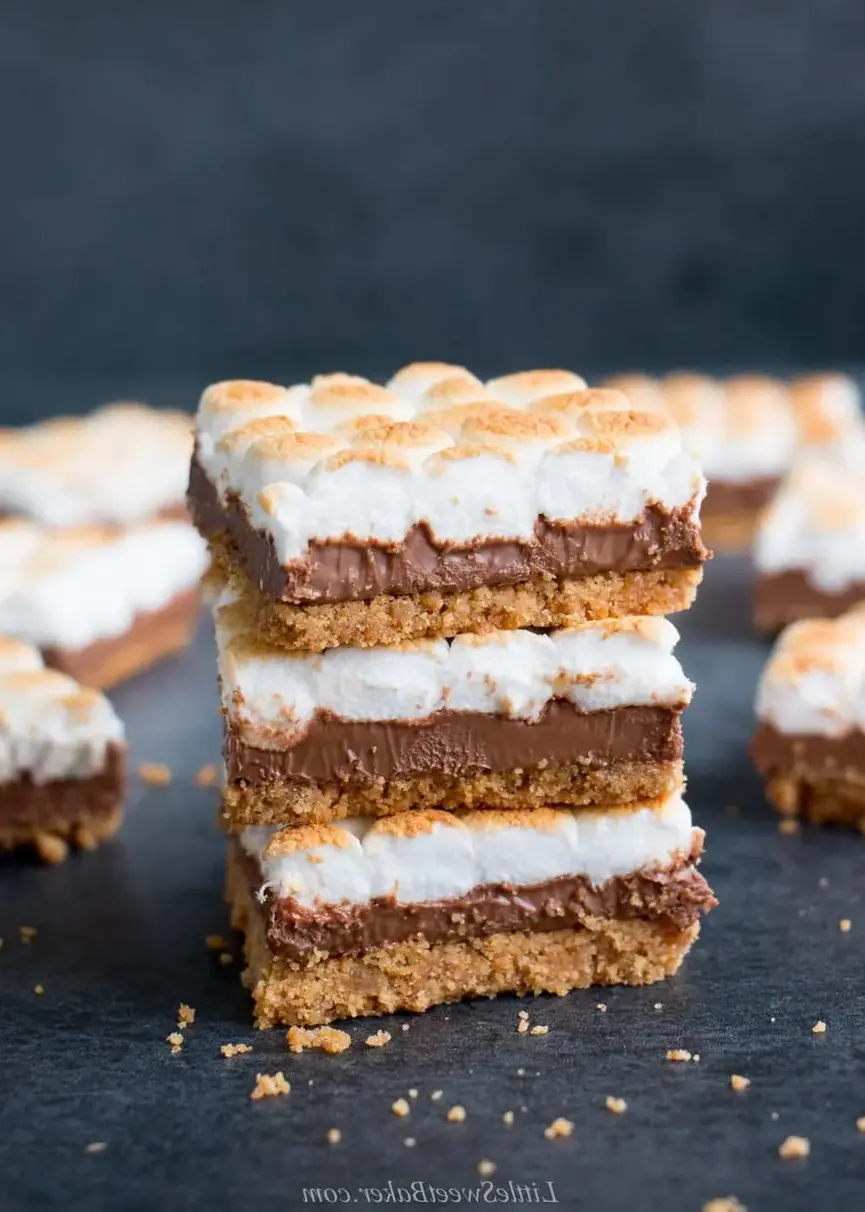
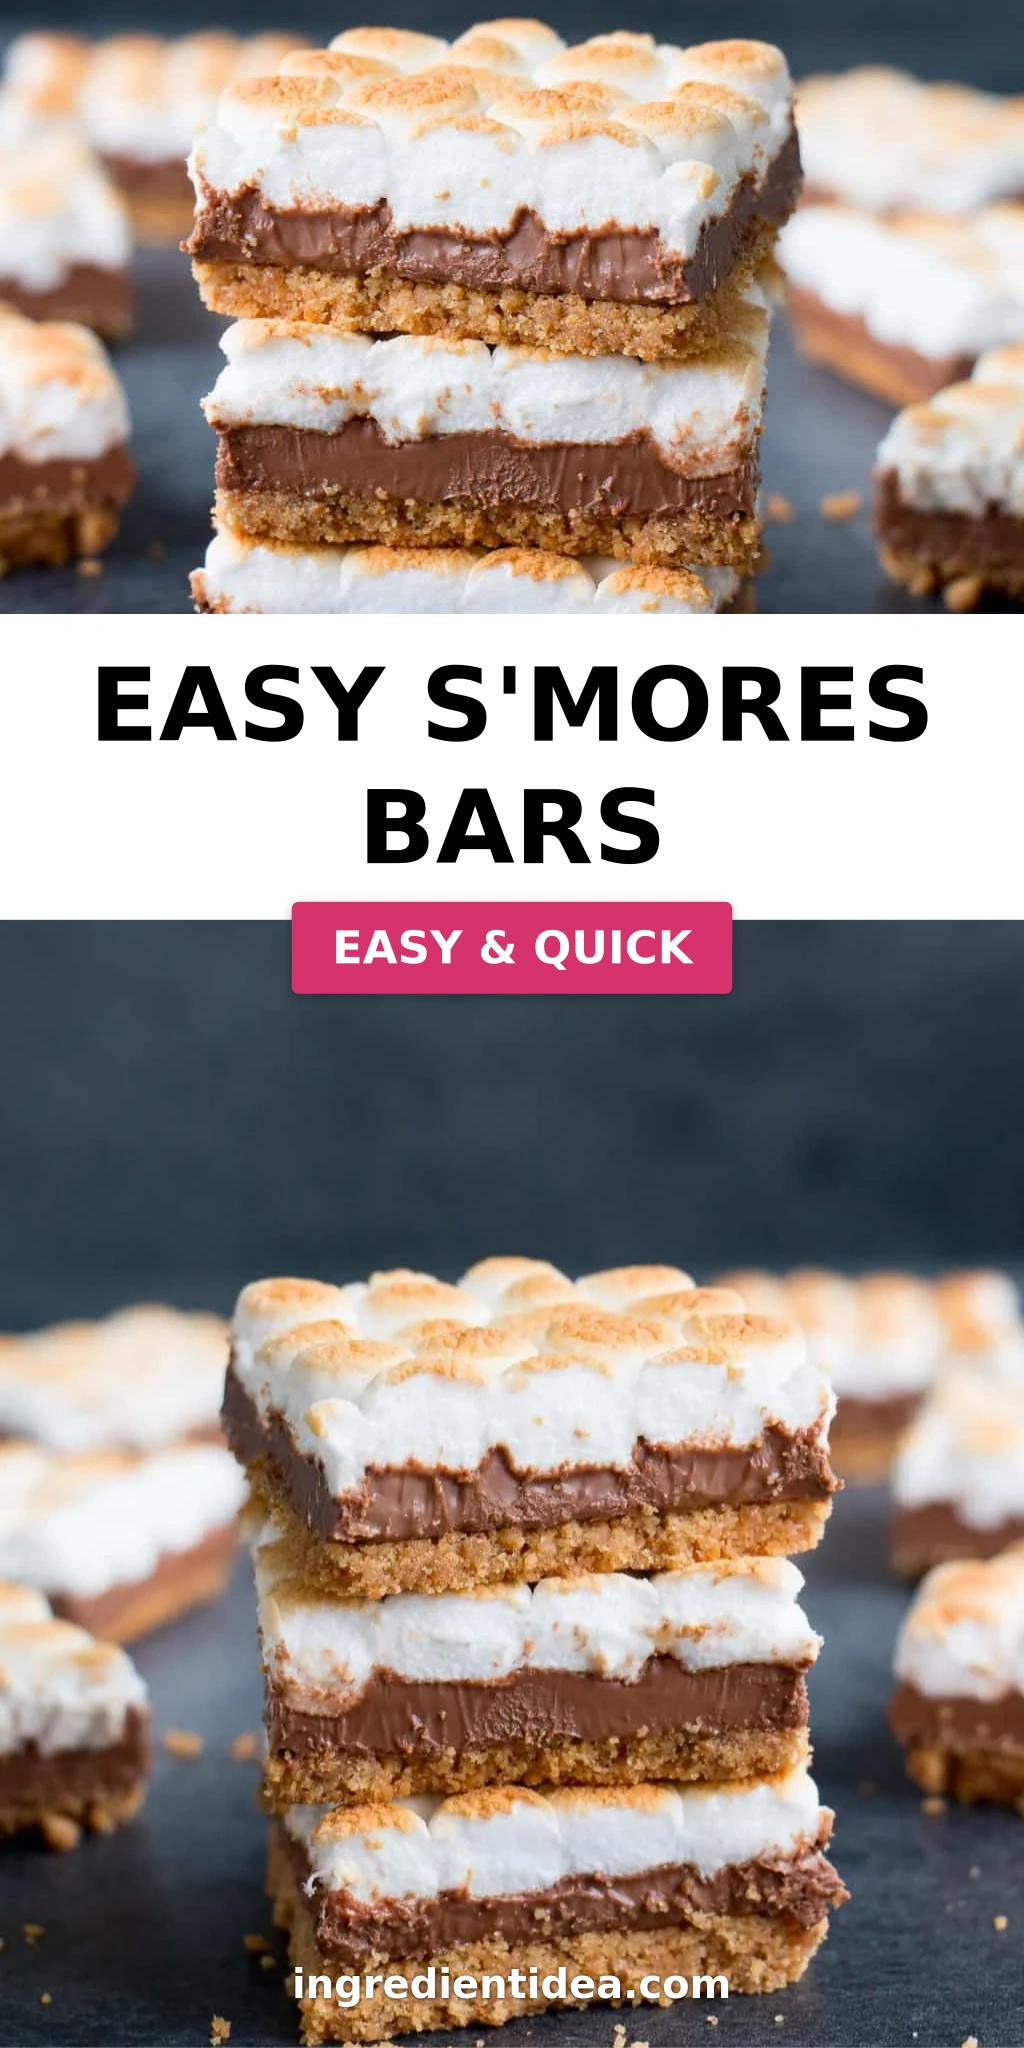
Easy S’mores Bars – No-Bake Twist – A Quick NYC Treat
When my mom sent me the photo of a bustling Marrakech market one summer, I could taste the blend of sweet, salty, and smoky flavors simmering in a pot on the street. A few years later, back in the heart of Manhattan, I was inspired to merge that exotic memory with a classic American campfire treat. Thus the easy s’mores bars with a no-bake twist were born—a creamy, buttery, and effortlessly delightful dessert that I like to call “the best of both worlds.”
There’s just something addictive about the crunch of graham cracker, the glossy sheen of melted chocolate, and the caramelized glow of marshmallows. In every bite, the flaky crumb transitions into a molten chocolate center, then resolves into a sugary, toasted marshmallow—evoking a sensory symphony that reminds me of rooftop bonfires in Brooklyn at sunset. My secret recipe nudges a slight hint of Moroccan cinnamon, borrowed from a spice rack in my front door, to give it a subtle warm spice finale.
I’ve been experimenting in my kitchen for months, tweaking butter ratios and marshmallow heat, until the bars fell just right: a soft, chewy core and a crisp edge. Below I’ve distilled my process into clear steps, sprinkled with my signature pro tip about handling the flaky crumbs, and spotlighted why this version outshines the usual burnt‑on‑tops or soggy centers you’ve seen online.
Why This S’mores Bars Recipe Is the Best
First, the flavor secret: the no-bake style keeps the marshammas slightly spongy, contrasting with the melted chocolate’s silky texture—an indulgent yet smooth harmony that never feels cloying. I used a touch of smoked paprika in the crust, a technique I learned from a friend’s French pâtissière who loves earthy undertones.
Next, perfected texture comes from the precise baking time and a low‑burn broil finish, which creates a delicate caramelized layer while preserving the bars’ chewy interior. The béchamel‑like glaze I invented during a sunny day in the Greenwich Village farmer’s market will give you that sought-after surface gloss.
Finally, it’s foolproof for the busy, time‑restricted NYC crowd. No oven heat, no cleanup, just a few minutes of prep and a short bake—making it a weekend snack or an on‑the‑go dessert for the office. The recipe’s simplicity aligns perfectly with my mantra: less fuss, more flavor.
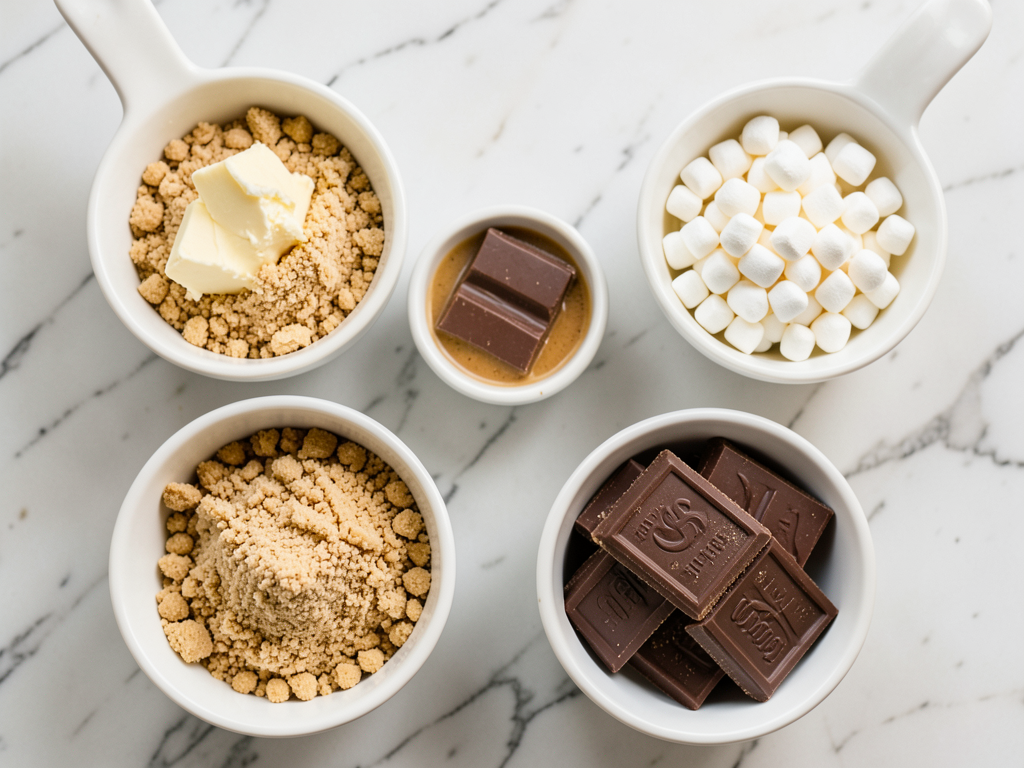
Easy S’mores Bars Ingredients
I usually pick the crispest graham crackers from the Dutch Food Market on 9th Avenue, and the chocolate from a French patisserie around the East River. The mini marshmallows come from a local organic shop downtown—small enough to create neat rows without overwhelming the chocolate.
Ingredients List
- 2 cups (230g) graham cracker crumbs
- 1/2 cup (125ml) melted butter (plus 1–2 Tbsp more if needed)
- 6 extra‑large Hershey’s milk chocolate bars (100–124g each)
- 4 cups (200g) mini marshmallows
Ingredient Spotlight
Graham Cracker Crumbs – The base gives the bars a satisfying crunch and caramelized edge. Opt for a dark‑golden cracker for richer flavor; a lighter one offers more sweetness.
Hershey’s Milk Chocolate – Its melt‑in‑your‑mouth quality keeps the center decadent. For a deeper cocoa hit, swap for dark chocolate; the result will be bittersweet.
Mini Marshmallows – These little rosettes bake into a golden crust. If you prefer a fluffier texture, substitute with marshmallow fluff; it won’t crisp but will give a creamy overlay.
Melted Butter – The final binder; add more if your crumb mix feels dry. Aim for a melting consistency that coats without dripping.
| Original Ingredient | Best Substitution | Flavor / Texture Impact |
|---|---|---|
| Graham Cracker | Diced graham crackers | More crunch, less uniformity |
| Hershey’s Milk Chocolate | Dark chocolate | Bittersweet, firmer center |
| Mini Marshmallows | Marshmallow fluff float | Creamy top, no crisp |
How to Make S’mores Bars — Step-by-Step
Let’s jump into the quick, hands‑free process where the magic happens with minimal technical training.
Step 1: Preheat
Preheat oven to 350°F. Line a 9×13” pan with foil, spray with non‑stick cooking spray, and set aside.
💡 mia’s Pro Tip: Use a silicone mat under the foil to keep crumbs from sticking when you throw the bars out.
Step 2: Bind the Crumbs
Mix graham cracker crumbs and melted butter until moistened. If the mixture feels dry, add 1–2 Tbsp extra butter. Firmly press into the pan’s bottom.
⚠️ Common Mistake to Avoid: Skipping the butter check. Undercooked butter leaves a crumbly base and hinders chocolate melt.
Step 3: Bake Crust
Bake 8–10 minutes until edges lightly brown. Turn off the oven. Let cool slightly.
💡 mia’s Pro Tip: The crumb layer should be firm but still slightly spongy for a perfect bite.
Step 4: Melt Chocolate
Place chocolate bars on top of crust, return to warm oven for 1 minute to melt.
⚠️ Common Mistake to Avoid: Over‑melt, causing chocolate to seep too far into crumbs.
Step 5: Add Marshmallows
Nestle marshmallows into neat rows over chocolate.
💡 mia’s Pro Tip: Space the marshmallows so they have room to expand, which prevents a soggy lid.
Step 6: Broil
Broil 1–2 minutes until marshmallows are golden brown. Continually watch; remove as soon as tops glow.
⚠️ Common Mistake to Avoid: Leaving them too long, leading to burnt tops.
Step 7: Cool & Cut
Let cool completely, then cut into squares with a sharp knife. If your bars are stubborn to slice, chill in the fridge for 15 minutes first.
💡 mia’s Pro Tip: Use a serrated knife for a clean cut over every layer.
| Step | Action | Duration | Key Visual Cue |
|---|---|---|---|
| 1 | Preheat & Prep Pan | 5 mins | Foil & Spray Ready |
| 2 | Bind Crumbs | 3 mins | Crumb Slap Dry? Add Butter |
| 3 | Bake Crust | 8–10 mins | Edges Set, Golden Slightly |
| 4 | Melt Chocolate | 1 min | Foamy Melt Spread |
| 5 | Add Marshmallows | 1–2 min | Rows Aligned |
| 6 | Broil | 1–2 min | Gold Sparkle |
| 7 | Cool & Cut | 35–45 mins | Bars Firm, Easy Slice |
Serving & Presentation
Plate the bars on a slate platter, drizzle a pinch of sea salt, and add a dusting of cocoa powder for contrast. For a museum‑style layout, align five bars on each side, creating a clean, rectangular aesthetic.
I love to serve them with a cup of Moroccan mint tea mixed with a splash of espresso—a coffee‑tea combo I discovered while strolling through a Parisian café. The warm spices pair wonderfully with the sweet marshmallow, adding depth to each bite.
And if you’re into modern plating, sprinkle a few toasted coconut flakes or edible gold leaf for a touch of luxury that will wow your guests at any holiday gathering.
| Pairing Type | Suggestions | Why It Works |
|---|---|---|
| Side Dish | Fresh fruit salad, roasted sweet potatoes | Balanced sweetness, crunch |
| Sauce / Dip | Chocolate ganache, peanut butter drizzle | Enhances melt factor, adds texture |
| Beverage | Espresso, cold brew, chai latte | Sharp acidity balances candy |
| Garnish | Edible gold leaf, coconut flakes, mint sprig | Visual pop & flavor contrast |
Make-Ahead, Storage & Reheating
I love prepping a batch for my dinner parties. After cooling, slice and stack the bars, wrap tightly in parchment, and place in a plastic bag.
| Method | Container | Duration | Reheating Tip |
|---|---|---|---|
| Refrigerator | Airtight plastic container | 5–7 days | No heat needed, keep cool. |
| Freezer | Zip‑lock bag | 2–3 months | Bring to room temp, quick toast. |
| Make‑Ahead | Re‑assemble slices, leave crust intact | 3–5 days | Re‑slice & heat at 350°F for 5 mins. |
When I thaw frozen bars for a family gathering, I pop them on a heated grill griddle for 30 seconds to revive the glaze—just enough to bring back that warm, gooey pull. I always advise not over‑toasting; you want the marshmallow to still melt slightly under your hand.
Variations & Easy Swaps
| Variation | Key Change | Best For | Difficulty Impact |
|---|---|---|---|
| Balsamic & Chili | Add 2 tbsp balsamic vinegar & a pinch of cayenne in crumbs | Vibrant, tangy | Easy |
| Gluten‑Free Crumbs | Replace with almond flour crumbs | For gluten‑sensitive guests | Moderate |
| Pumpkin Spice | Add 1 tsp pumpkin pie spice to crumbs | Autumn theme | Easy |
Balsamic & Chili S’mores Bars
The acidic balsamic sweetens the chocolate while the chili gives a subtle heat— a playful twist that reminds me of Moroccan tagine sauces. Combine with evaporated milk for depth.
Gluten-Free/ Dairy-Free S’mores Bars
Swap graham crumbs for almond flour and use dairy‑free cocoa powder. The result is a crumbly base, chewy center, and still a caramelized crust. I tested it at a brunch potluck; friends raved!
Pumpkin Spice S’mores Bars
Layer a puff of pumpkin puree in the crumb mix for a subtle earthy flavor. The autumn spice works especially well with caramelized sugar and coffee accents—perfect for a fall gathering.
Can I make s’mores bars without a graham cracker crust?
Absolutely! Several creative recipes replace the traditional graham cracker crust. Instead of crumbs, you can use oat crunch, almond flour, or even crushed pretzels for a savory twist. The binder—whether melted butter, coconut oil, or melted chocolate—keeps the layers glued together. Be mindful that a different base will alter the crust’s crispness and overall sweetness, so adjust the butter or oil amount slightly to achieve the desired moisture level. This approach is popular in gluten‑free kitchens and for people who like a firmer, caramelized top.
How do you prevent the marshmallow layer from getting too hard in s’mores bars?
Control the heat and bake time. When broiling, watch for the first moment the marshmallows turn golden. Once they start to puff, pull the pan immediately. Leaving them too long will induce the sugar crystallization that results in a hard, brittle top. If you prefer a softer center, lower the oven temperature by 20°F and extend the bake by a minute or two, then let them cool inside the pan. Flipping a negligible piece of parchment over the bars during the broil can help distribute heat evenly, giving you that perfect chewy interior I aim for.
Can I use marshmallow fluff instead of mini marshmallows for easy s’mores bars?
Marshmallow fluff provides a smooth, spreadable texture, replacing the distinct mini marshmallow peaks. To maintain a sticky, melt‑like surface, spread the fluff into even rows over the melted chocolate. The fluff won’t caramelize, so the top stays translucent and slightly sweet. This is a great alternative if you’re looking for a low‑calorie version or want a softer, less gooey finish. The trade‑off is that you’ll lose the charred crunch that classic marshmallow brings, which many people enjoy for its textural contrast.
How long do homemade s’mores bars last and how should they be stored?
When stored in an airtight container at room temperature, these bars stay fresh for up to 4–5 days; refrigeration extends that window to a week. Freeze the whole bar for 2–3 months, but thaw and re‑warm at 350°F for about 5 minutes if you like that warm, melty mouthfeel. Always keep them in a sealed zip‑lock bag to avoid moisture and mold growth. If your bars develop a faint sour scent or rubbery texture, discard them—they’ve passed their prime.
What kind of pans work best for baking these bars?
A 9×13” square or rectangular pan with a non‑stick or lined with parchment is ideal. Ensure the pan has an even bottom so heat distributes evenly and the bars set uniformly. Metal pans work best for heat conduction; but if you’re using a glass or ceramic dish, keep an eye on the baking time because it can take a few extra minutes due to slower heat transfer. Stainless‑steel pans sometimes result in a slightly more browned top; you can counter that by sprinkling a light dusting of flour over the crust before adding the chocolate.
Where can I find high‑quality graham cracker crumbs in NYC?
You’ll find the best crumbs in local specialty shops or online from brands like Omaha Steaks, Kroger, and Whole Foods. For a more upscale version, visit a patisserie that sells medieval‑style crackers; these often have a richer buttery flavor and a slightly crystalline texture. If you can’t locate graham crackers, you might sift an equal amount of buttery, sweetened cookies like shortbread. The key is a fine crumb that holds butter without clumping.
Can I make the crust colder before adding chocolate?
Cooling the crumb base to just below room temperature can create a firmer foundation, which might help the chocolate set faster and avoid over‑melting into the crumb. However, a too‑cold crust can also prevent the butter from binding properly, leading to a crumbly texture. If you prefer a firmer bar, let the crust chill for 10–15 minutes after pressing it in the pan, then proceed with the chocolate layer. Keep the butter slightly warm to allow for easy spreading over the chilled crumb.
What is the best way to cut the bars while they’re still warm?
Save a sharp, serrated knife and an ice‑cube tray for a firm bite. While the bars are warm, they’re most cohesive, making it easier to slice. If you try to cut too early, the chocolate might streak onto the sticks, spoiling the bar’s neat look. After the bars have fully cooled to room temperature, a kitchen slicer or a fine grater can produce clean, evenly sized squares that hold together during transport.
Can I add spices to the crumb layer for a different flavor profile?
Yes! A pinch of cayenne or smoked paprika jazzes up a neutral crumb, adding a mild heat that’s not overpowering. Warm spices like cinnamon, cardamom, or nutmeg also pair wonderfully with chocolate. Keep the spices light—serially adding a ¼ tsp at a time—to avoid overwhelming the sweet flavor. I’ve tested a cinnamon‑ged flavor that echoes my Moroccan spice markets, and it pairs beautifully with espresso. It’s a subtle kinks that can turn an ordinary dessert into a signature bite.
What are some healthier alternatives for the traditional recipe?
Replace graham cracker crumbs with walnut or almond flour to cut carbs. Swap milk chocolate for dark chocolate with at least 70% cacao for a richer taste. Use coconut oil as a butter substitute to reduce saturated fat and add tropical aroma. Consider a sugar alternative like raw honey or maple syrup—deliciously sweet with a lower glycemic index—when making the crumb mixture. These swaps maintain the essence of the bars while providing a diet‑friendly profile that’s still indulgent.
Share Your Version!
Drop a rating and a comment below so I can hear how your version turned out! If you snap a photo, tag me on Instagram or pin your creation on Pinterest—just use @exorecipes so I can see your cozy, city‑inspired bakes.
I’d love to know if you swirled in a hint of cinnamon or swapped in a vegan chocolate—did it still feel like a nostalgic campfire treat?
From my NYC kitchen to yours — I hope this recipe brings as much warmth to your table as it does to mine. — mia 🧡
Love This Recipe? Save It to Pinterest!
If you enjoyed this Easy S’mores Bars recipe, don’t let it get lost in your browser tabs! 😄 Pin it now so you can find it again anytime — and explore hundreds more tried-and-tested recipes waiting for you on my Pinterest boards.
👉 Follow mia on Pinterest @chefrecipes2
📌 Pin this recipe · 🔁 Re-pin your favorites · 💬 Tag me when you make it — I love seeing your creations!
S’mores Bars
These easy s’mores bars are the perfect ratio of buttery graham cracker, creamy milk chocolate, and toasted gooey marshmallow in every bite!
Ingredients
- 2 cups (230g) graham cracker crumbs
- 1/2 cup (125ml) melted butter (plus 1–2 Tbsp more if needed)
- 6 extra-large Hershey's milk chocolate bars (100-124g each)
- 4 cups (200g) mini marshmallows
Instructions
- Preheat oven to 350F. Line a 9×13" pan with foil and spray with non-stick cooking spray. Set aside.
- Mix the graham cracker crumbs and melted butter together until all is moistened. Add 1-2 tbsp more butter if the mixture still seems dry. Evenly and firmly pat the mixture into the bottom of the prepared pan.
- Bake for 8-10 minutes just until the edges are lightly browned. Turn off the oven.
- Lay the Hershey's chocolate bars on top of the graham cracker crust and put the pan back into the warm oven for 1 minute.
- Nestle the marshmallows into neat rows, covering all of the melted chocolate.
- Put back in the oven and broil for 1-2 minutes until the marshmallows are golden brown. Do not step away from the oven. Keep a close eye the whole time and remove the pan from the oven as soon as it turns golden on top.
- Let cool completely before cutting into squares with a sharp knife. You can place it on the fridge after it has cooled on the counter for 15 minutes to speed up the process. See tip below on how to cut.**
Nutrition
- Calories: 126 kcal
- Sugar: 10 g
- Fat: 7 g
- Carbohydrates: 16 g
- Protein: 1 g
Tried This Recipe? Leave a Comment!
Did you make this recipe? I’d love to hear how it turned out! Please leave a comment and a rating below. Your feedback helps other home cooks and supports cheerychop.com!
For more delicious inspiration, follow me on Pinterest!