Table of Contents
Oreo Ice Cream Sandwich Cake – The Easiest No-Bake Frozen Oreo Dessert with Layers of Creamy Fudge
Growing up in Morocco, my mother would make simplicity feel like a celebration—whether it was a tagine that simmered for hours or a cool dessert whipped up in minutes. Years later, after training in Paris and settling into my New York City kitchen, I still chase that same feeling: big flavor without the fuss. This Oreo ice cream sandwich cake is exactly that. With just four ingredients and no oven required, this no-bake Oreo cake layers ice cream sandwiches (the humble hero) with whipped topping, hot fudge, and crushed Oreos to create a frozen Oreo dessert that’s pure magic. It’s the kind of easy ice cream cake recipe that makes you wonder why you ever bothered with complicated baking.
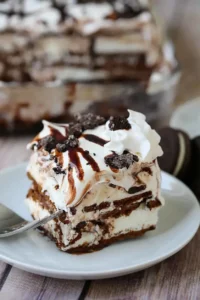
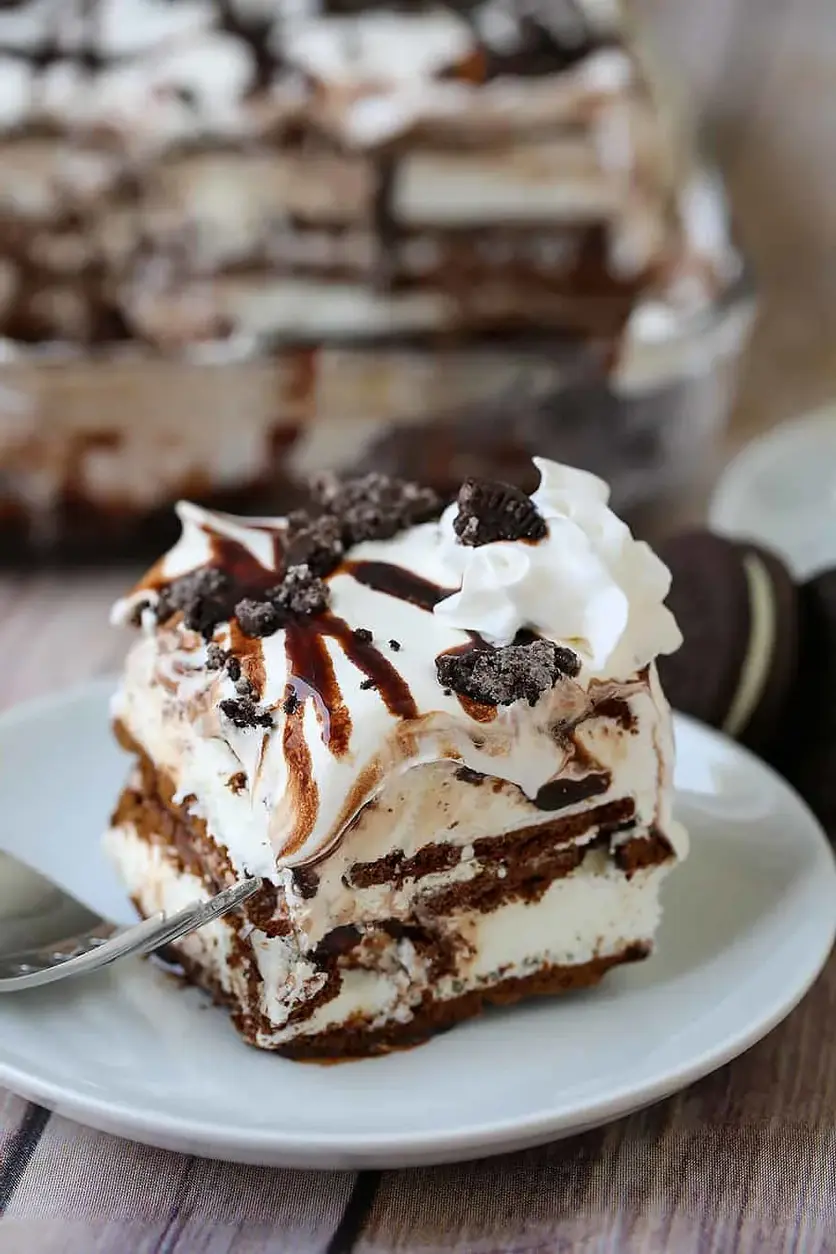
The first bite is pure nostalgia—a cool, creamy slice with a crunch of Oreo, a ribbon of fudge, and the soft chew of the ice cream sandwich layers. Each forkful melts on your tongue, carrying the rich chocolate-and-cream balance that made Oreos famous. My French pastry training taught me to respect textures, and this cake delivers: a firm base from the sandwiches, airy lightness from the whipped topping, and a fudge layer that stays soft-spreadable even after freezing. The crushed Oreos on top add a playful crunch, like little surprises hiding between the layers. It’s a dessert that looks impressive—sliced cleanly with distinct stripes—but tastes like childhood happiness.
What I love most about this Oreo icebox cake is how forgiving it is. You don’t need a pastry bag or a thermometer. My version focuses on three things: using room-temperature whipped topping for smooth spreading, drizzling the fudge while the topping is still soft to create those beautiful marbled ribbons, and letting the cake rest for about 10 minutes before serving so it’s sliceable but not soupy. A common mistake is freezing it uncovered, which dries out the surface—I’ll show you how to avoid that. Let’s put together this no-bake wonder that’s perfect for summer barbecues, birthday parties, or just a lazy Sunday treat.
Why This Oreo Ice Cream Sandwich Cake Recipe Is the Best
The Flavor Secret – My Moroccan roots taught me that layering is everything—just like a tagine, each layer here builds flavor. The ice cream sandwiches provide a vanilla-malt base, the whipped topping adds cloudlike sweetness, the fudge brings deep chocolate richness, and the crushed Oreos deliver that iconic cookie crunch. It’s simple, but the proportions are chef-tested: 24 sandwiches, 8 ounces of whipped topping, and a generous drizzle of fudge create the perfect ratio of creamy to crunchy.
Perfected Texture – In Paris, I learned that texture comes from technique, not complexity. By spreading the whipped topping while it’s fully thawed (but still cold), you get even layers that freeze beautifully. The key? Let the whipped topping sit at room temperature for 15 minutes before spreading. This prevents it from tearing the soft ice cream sandwiches. The fudge stays pourable at room temperature, so no microwaving needed—just stir and drizzle.
Foolproof & Fast – This easy ice cream cake recipe is designed for real life. No baking, no special equipment, and only 15 minutes of active work. The hardest part is waiting for it to freeze! Even if you’re a brand-new cook, you’ll nail it on the first try. My neighbors in NYC have made this for their kids’ parties and texted me photos—it always comes out perfect.
Oreo Ice Cream Sandwich Cake Ingredients
I pick up my ingredients at the Fairway Market on the Upper West Side, where I can grab ice cream sandwiches by the box and fresh whipped topping from the dairy aisle. The beauty of this recipe is its simplicity—everything is likely already in your kitchen. Here’s what you’ll need:
Ingredients List
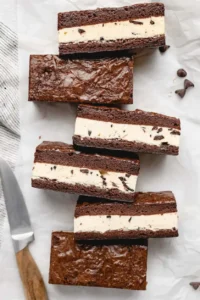
- 24 ice cream sandwiches (vanilla, from a 12-pack box)
- 12 Oreo cookies (crushed, about 1 cup of crumbs)
- 1 cup hot fudge topping (not syrup, look for the thick, spoonable kind)
- 8 oz whipped topping, thawed and divided (like Cool Whip, or use homemade whipped cream)
Ingredient Spotlight
Ice Cream Sandwiches: The backbone of this no-bake Oreo cake. Choose standard rectangular vanilla ice cream sandwiches. The classic rectangular shape fits perfectly in a 9×13-inch baking dish. Avoid mini or jumbo sizes—they won’t layer evenly. If you’re dairy-free, look for non-dairy ice cream sandwiches (they work exactly the same).
Oreo Cookies: Use the classic Oreo (not double-stuffed or thin). The filling-to-cookie ratio is perfect for this frozen Oreo dessert. Crush them in a zip-top bag with a rolling pin—don’t overdo it; you want a mix of fine crumbs and small chunks for texture. Mint Oreos or Peanut Butter Oreos would also work for a flavor twist.
Hot Fudge Topping: This is the secret to the fudge layer. Do not use chocolate syrup—it’s too thin and will soak into the cake. Look for a topping that is thick, spoonable, and comes in a jar (like Hershey’s Hot Fudge or a premium brand). At room temperature, it should be pourable but not runny. If it’s too thick, microwave for 10 seconds.
Whipped Topping: Thawed and divided means you’ll use half on the first layer and half on the second. Cool Whip is my go-to because it holds its shape after freezing, but homemade whipped cream works if you stabilize it with a tablespoon of powdered sugar. The whipped topping adds the airy, creamy element that ties the layers together.
| Original Ingredient | Best Substitution | Flavor / Texture Impact |
|---|---|---|
| Ice cream sandwiches | Vanilla wafer ice cream | Similar base, but softer texture; freeze 15 minutes longer. |
| Oreo cookies | Chocolate sandwich cookies (generic) | Slightly less sweetness, but same crunch. |
| Hot fudge topping | Chocolate syrup | Thinner, will soak into layers; use half the amount. |
| Whipped topping | Homemade whipped cream + 1 tbsp powdered sugar | Lighter but less stable; serve within 2 days. |
How to Make Oreo Ice Cream Sandwich Cake — Step-by-Step
Ready to build your Oreo ice cream sandwich cake? It’s as simple as layering and freezing—just follow these steps and you’ll have a party-ready dessert in no time.
Step 1: Layer the Base
Arrange 12 ice cream sandwiches in a single layer at the bottom of a 9×13-inch baking dish. If they don’t fit perfectly, break one in half to fill the gaps—no one will notice in the final slice.
💡 mia’s Pro Tip: Work quickly while the sandwiches are still frozen. If they get too soft, pop the dish in the freezer for 10 minutes before adding the next layer.
Step 2: Add Creaminess
Spread half (4 oz) of the thawed whipped topping evenly over the ice cream sandwich layer. Use an offset spatula or the back of a spoon. Don’t press too hard—you want to keep the sandwiches intact.
⚠️ Common Mistake to Avoid: Spreading cold whipped topping straight from the fridge will tear the sandwiches. Let it sit at room temperature for 15 minutes for easy spreading.
Step 3: Drizzle Fudge
Drizzle about 3/4 cup of hot fudge topping over the whipped topping. Use a spoon or a squeeze bottle for more control. You want ribbons, not a solid sheet—this creates those beautiful chocolate swirls in the final slice.
💡 mia’s Pro Tip: If the fudge is too thick to drizzle, microwave the jar (lid off) for 10 seconds. Stir, then drizzle.
Step 4: Crush and Sprinkle
Sprinkle half (about 1/2 cup) of the crushed Oreos evenly over the fudge layer. The crumbs will slightly sink into the fudge, creating a bit of texture in every bite.
⚠️ Common Mistake to Avoid: Crushing the Oreos too fine. Leave some small chunks for crunch—powdered crumbs won’t give that satisfying bite.
Step 5: Repeat and Freeze
Repeat all layers: another 12 ice cream sandwiches, the remaining whipped topping, a generous drizzle of fudge, and the remaining crushed Oreos. Cover the dish tightly with plastic wrap or foil and freeze for at least 6 hours or overnight.
💡 mia’s Pro Tip: Covering the dish prevents freezer burn and keeps the cake from picking up off-flavors from the freezer. For best results, freeze for 8 hours or overnight.
Step 6: Serve and Enjoy
Remove the cake from the freezer. Let it sit at room temperature for about 10 minutes before slicing. This softens it just enough to cut cleanly without melting. Use a sharp knife—run it under hot water for a few seconds for even cleaner slices.
⚠️ Common Mistake to Avoid: Skipping the rest time. If you slice it straight from the freezer, the ice cream sandwiches will be rock-hard and the layers will slide apart. Patience pays off!
| Step | Action | Duration | Key Visual Cue |
|---|---|---|---|
| 1 | Layer ice cream sandwiches | 2 minutes | Smooth, even base |
| 2 | Spread whipped topping | 3 minutes | Even white layer |
| 3 | Drizzle fudge | 1 minute | Ribbons of chocolate |
| 4 | Sprinkle crushed Oreos | 1 minute | Even crumb layer |
| 5 | Repeat all layers | 5 minutes | Six visible layers |
| 6 | Freeze | 6-8 hours | Firm to the touch |
Serving & Presentation
When it’s time to serve, I like to bring this Oreo ice cream sandwich cake out of the freezer about 10 minutes before slicing. The top should be firm but not rock solid—a sharp knife will glide through the layers, revealing those gorgeous stripes of white, chocolate, and black. I often garnish each slice with a dollop of fresh whipped cream, an extra Oreo half, and a drizzle of fudge. It feels like a diner-style sundae in cake form.
For parties, I arrange the whole cake on a wooden board and let guests cut their own slices. My French training taught me to plate with intention: a clean cut, a swipe of fudge on the plate, and a shower of crushed Oreos on top. In NYC, I’ve served this at summer rooftop gatherings, and it’s always the first dessert to disappear. Pair it with a tall glass of cold milk or a robust coffee.
| Pairing Type | Suggestions | Why It Works |
|---|---|---|
| Side Dish | Fresh berries, mint leaves | Bright contrast to rich chocolate |
| Sauce / Dip | Caramel sauce, chocolate syrup, strawberry syrup | Adds extra sweetness and color |
| Beverage | Cold milk, iced coffee, espresso | Classic Oreo pairings, cuts richness |
| Garnish | Extra crushed Oreos, cookie sticks | Adds crunch and visual appeal |
Make-Ahead, Storage & Reheating
Living in NYC means I’m always thinking ahead—whether it’s for a last-minute dinner invitation or a weekend treat. This easy ice cream cake recipe is designed for make-ahead perfection. I usually assemble the entire cake the night before a gathering, wrap it tightly, and let it freeze overnight. In the morning, I add the final garnish and keep it frozen until serving.
| Method | Container | Duration | Reheating Tip |
|---|---|---|---|
| Refrigerator | Not recommended | N/A | Will soften and melt layers |
| Freezer | Covered with plastic wrap + foil | Up to 2 weeks | Serve directly from freezer with 10-min rest |
| Make-Ahead | Covered dish in freezer | Up to 24 hours in advance | Add crushed Oreos just before serving for crunch |
If you’re storing leftovers (unlikely, but happens), wrap the cake tightly in plastic wrap and then a layer of foil. This double wrap prevents freezer burn. To serve, let it thaw for about 10 minutes on the counter. If the cake has been frozen for more than a week, the texture may become slightly icy—but it will still be delicious. I’ve kept a half cake for two weeks and it was still a hit.
Variations & Easy Swaps
Tried This Recipe? Leave a Comment!
Did you make this recipe? I’d love to hear how it turned out! Please leave a comment and a rating below. Your feedback helps other home cooks and supports cheerychop.com!
For more delicious inspiration, follow me on Pinterest!