Table of Contents
Oven Baked Chicken Parmesan – Crispy, No-Fry Italian Classic
Growing up in my mother’s kitchen in Morocco, I learned that the best comfort food doesn’t need to be complicated—it just needs to be made with love. Now, living here in New York City, I bring that same warmth to every dish I create, including this Oven Baked Chicken Parmesan. Today, I’m sharing my oven baked chicken parmesan recipe that swaps the classic frying method for a healthier, oven-baked approach, yet delivers all the crispy, cheesy goodness you crave. This chicken parmigiana recipe is perfect for busy weeknights when you want something wholesome, quick, and deeply satisfying—without a skillet full of oil. It’s become a staple in my NYC apartment, and I know it will be in your home too.
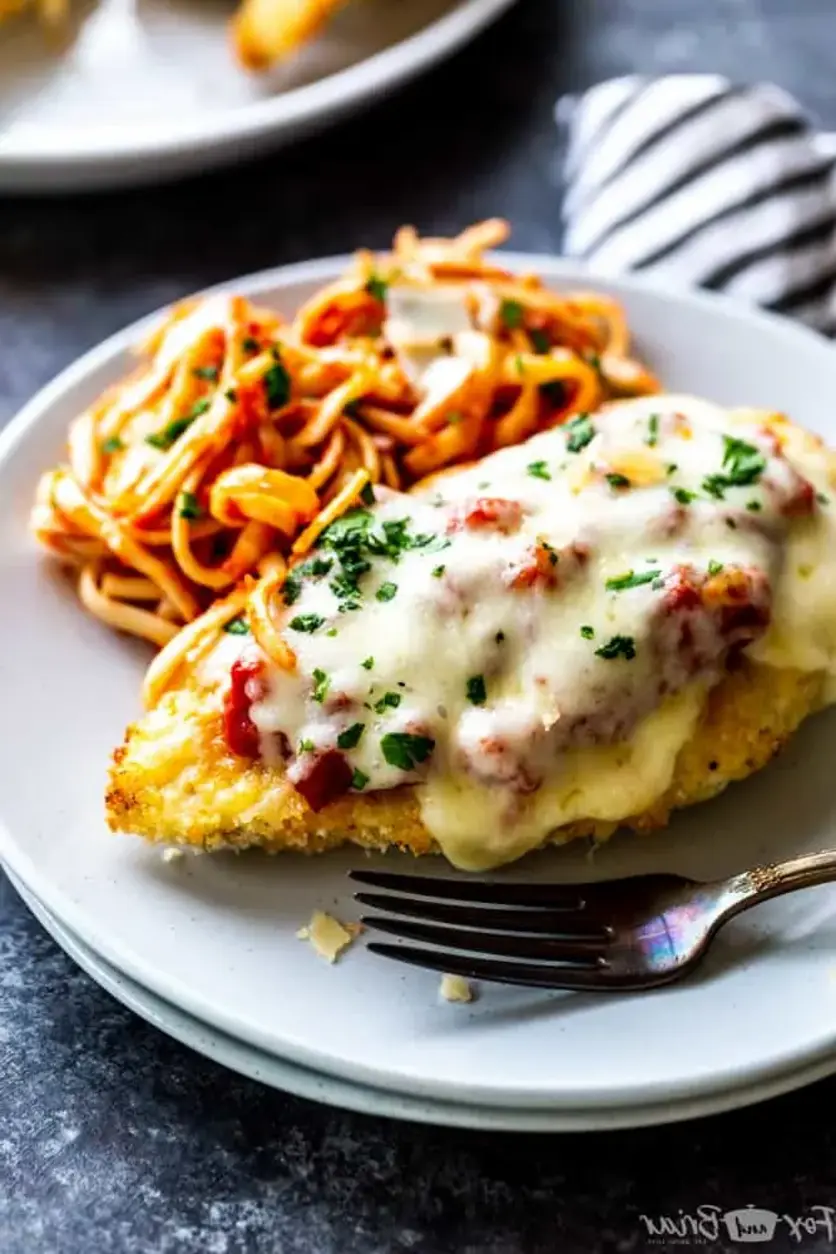
When you pull this baked chicken parmesan from the oven, you’ll be met with the most incredible aroma: rich marinara sauce, bubbling mozzarella, and golden, crispy crust clinging to tender chicken. Each bite offers a perfect harmony—crunchy panko coating gives way to juicy, perfectly seasoned meat, all topped with melted cheese and bright, tangy tomato sauce. There’s a slight whisper of oregano and garlic that transports me back to my French culinary training in Paris, where we learned that even simple dishes deserve layers of flavor. And since this is a baked chicken parmesan, there’s none of the greasy heaviness of traditional versions—just pure, satisfying comfort.
I’ve tested this easy chicken parmesan recipe countless times, tweaking the technique to ensure you get a crispy baked chicken crust that stays perfect in the oven. The secret? My Parisian culinary school taught me that proper panure à l’anglaise (the breading technique) and the right rack placement are everything. Plus, I’ll share a pro tip for avoiding that dreaded soggy bottom—no one wants that! This recipe is a true crowd-pleaser, and whether you’re a seasoned cook or a beginner, you’ll be amazed at how simple it is to make restaurant-quality chicken parmesan at home. Let’s get started!
Why This Oven Baked Chicken Parmesan Recipe Is the Best
The flavor secret to my oven baked chicken parmesan lies in the crust. I’ve combined panko breadcrumbs with freshly grated Parmesan cheese—not the pre-shredded stuff from a bag, which often contains anti-caking agents that prevent even browning. The panko provides an incredibly light, crunchy texture, while the Parmesan adds a savory, nutty depth that permeates every bite. This is a technique I refined during my time in Paris, where we learned the importance of building flavor into every component, not just relying on the sauce.
Perfected texture is all about the technique. Instead of shallow-frying, I bake the breaded chicken on a foil-lined sheet brushed with olive oil, placed on the second rack from the top. This allows the heat to circulate perfectly, crisping the top while keeping the chicken moist. Then—and this is key after baking—I flip the chicken, add the marinara and cheese, and finish under the broiler. This ensures the crust stays crunchy instead of soaking up sauce and turning soft. It’s a simple trick I learned as a professional cook, and it makes all the difference.
Finally, this recipe is foolproof and fast. With only 15 minutes of prep and 20 minutes of oven time, it’s a perfect weeknight hero. The ingredients are straightforward—you likely have most of them in your pantry right now. And because there’s no messy frying, cleanup is a breeze. Whether you’re feeding a hungry family or meal-prepping for the week, this easy chicken parmesan delivers reliable, restaurant-quality results every single time.
Oven Baked Chicken Parmesan Ingredients
I love sourcing my ingredients from the Union Square Greenmarket here in NYC, where the fresh herbs and artisan cheeses are incredible. But for this oven baked chicken parmesan, you don’t need anything fancy—just good-quality basics you can find at any grocery store. Let me walk you through what you’ll need.
Ingredients List
- 2 tablespoons olive oil
- 2 chicken breasts (about 1 pound total)
- 1 large egg
- 1 cup panko bread crumbs
- 1/2 cup freshly grated Parmesan cheese
- 1 teaspoon dried oregano
- 1/2 teaspoon garlic powder
- 1 teaspoon kosher salt
- 1/2 teaspoon black pepper
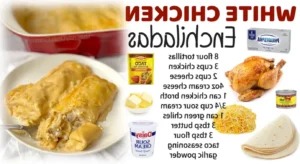
- 1 cup marinara sauce (your favorite jarred or homemade)
- 1 ½ cups shredded mozzarella cheese
- 2 tablespoons minced fresh parsley (optional, for garnish)
Ingredient Spotlight
Chicken Breasts: The backbone of this dish. Look for boneless, skinless chicken breasts that are roughly the same size for even cooking. If they’re very thick, you can butterfly them yourself. Avoid “superior” or “woody” chicken—feel for a firm, smooth texture. Substitution: boneless, skinless chicken thighs will work beautifully; they’re juicier and more forgiving, though you’ll need to adjust baking time slightly by 3–5 minutes.
Panko Bread Crumbs: These Japanese-style crumbs are larger and flakier than standard breadcrumbs, giving you that super-crispy crust without frying. I never use regular breadcrumbs here—they’ll make a dense, heavy coating. Substitution: If you’re gluten-free, use gluten-free panko (I like Ian’s brand) and the texture will be nearly identical. You can also crush up gluten-free crackers for a different crunch.
Parmesan Cheese: Freshly grated from a wedge is a must. Pre-shredded Parmesan is coated in cellulose to prevent clumping, which means it won’t melt or brown as nicely. Spend the extra 30 seconds grating it yourself—the flavor difference is huge. Substitution: Pecorino Romano works wonderfully if you want a sharper, saltier kick. Just reduce the added salt slightly.
Marinara Sauce: A good-quality jarred marinara is perfect for convenience. Look for one with whole tomatoes listed first, no added sugar, and a simple ingredient list. Substitution: You can use crushed tomatoes with a pinch of dried basil and oregano if you’re in a pinch. My personal favorite from my NYC kitchen is Rao’s Homemade Marinara—it’s rich and flavorful.
| Original Ingredient | Best Substitution | Flavor / Texture Impact |
|---|---|---|
| Chicken Breasts | Chicken Thighs (boneless, skinless) | Juicier, more tender; slightly longer bake time |
| Panko Bread Crumbs | Gluten-Free Panko | Nearly identical crunch; great for GF diets |
| Parmesan Cheese | Pecorino Romano (freshly grated) | Saltier, sharper; reduce added salt by 1/4 tsp |
| Marinara Sauce | Crushed Tomatoes + dried basil/oregano | Slightly chunkier texture; more rustic flavor |
How to Make Oven Baked Chicken Parmesan — Step-by-Step
Don’t be intimidated—this oven baked chicken parmesan is incredibly straightforward, and I’ll guide you through every step. Remember, the key to a perfect crispy baked chicken is proper preparation and smart oven technique.
Step 1: Prepare Your Baking Sheet and Oven
Line a baking sheet with aluminum foil and brush the foil generously with olive oil. This prevents sticking and helps the crust brown. Adjust your oven rack to the second-from-top position—this is crucial for getting that deep golden color without burning. Preheat the oven to 400°F.
⚠️ Common Mistake to Avoid: Using dark non-stick baking sheets without foil — they can over-brown the bottom of your chicken. Stick with a light-colored sheet and foil.
Step 2: Prep the Chicken
Cut each chicken breast in half horizontally (like butterflying, but all the way through) to create 4 even pieces. Place them in a gallon-sized zip-top bag, seal it, and use a meat pounder or rolling pin to pound to an even 1/2-inch thickness. This ensures quick, uniform cooking. Pat the chicken completely dry with paper towels—moisture is the enemy of a crispy crust. Season both sides with the kosher salt and 1/4 teaspoon of the black pepper.
💡 mia’s Pro Tip: Pounding the chicken not only ensures even cooking but also tenderizes the meat. I learned this in culinary school—it’s the difference between a tough chew and a tender bite.
Step 3: Set Up Your Breading Station
In one shallow dish, combine the panko bread crumbs, grated Parmesan cheese, dried oregano, garlic powder, remaining 1/4 teaspoon black pepper, and a pinch of extra salt. Mix well with a fork. In a second shallow dish, whisk the egg until frothy. Arrange the dishes: first the seasoned chicken, then the egg wash, then the panko mixture, and finally your prepared baking sheet.
Step 4: Bread the Chicken
Working with one piece at a time, dip the chicken into the egg wash, letting any excess drip off. Then, place it in the panko mixture and press gently with your fingers to ensure the crumbs adhere well on all sides. Transfer to the prepared baking sheet. Repeat with all 4 pieces.
⚠️ Common Mistake to Avoid: Don’t skip pressing the crumbs in—if they’re just dusted on, they’ll fall off during baking. Use gentle but firm pressure.
Step 5: Bake the Chicken
Place the baking sheet on your preheated oven’s second-from-top rack. Bake for 15 minutes, or until the chicken is golden and cooked through (internal temperature should reach 165°F). The crust should be firm and crispy.
💡 mia’s Pro Tip: For the crispiest results, don’t crowd the pan. Leave at least 1 inch of space between each piece of chicken so the heat can circulate and crisp all sides.
Step 6: Add Sauce and Cheese
Carefully flip each piece of chicken over using tongs. Spoon 1/4 cup of marinara sauce over each piece, then top with shredded mozzarella cheese (about 6 tablespoons per piece). Return the baking sheet to the oven and switch the oven to broil. Broil for 2–4 minutes, watching closely, until the cheese is melted, bubbly, and the edges of the chicken start to brown. Garnish with fresh parsley if desired.
⚠️ Common Mistake to Avoid: If you don’t flip the chicken, the sauce will soak into the top crust and make it soggy. Flipping ensures the sauce sits on the cooked side while the bottom stays crunchy.
| Step | Action | Duration | Key Visual Cue |
|---|---|---|---|
| 1 | Prepare pan & preheat oven | 5 mins | Oven at 400°F, rack second from top |
| 2 | Cut & pound chicken | 5 mins | Even 1/2″ thickness, patted dry |
| 3 | Bread chicken | 5 mins | Pieces fully and evenly coated |
| 4 | Bake chicken | 15 mins | Golden brown, 165°F internal temp |
| 5 | Flip, add sauce & cheese, broil | 2–4 mins | Cheese bubbly, edges browning |
Serving & Presentation
Once your oven baked chicken parmesan is out of the oven, let it rest for about 2 minutes—this helps the cheese set slightly and makes slicing easier. I love serving this over a bed of al dente spaghetti tossed with a little extra marinara or a simple garlic and olive oil sauce. A sprinkle of fresh basil or parsley adds a pop of color and freshness, just like my mother used to do with fresh herbs from her garden in Morocco.
For a low-carb option, serve it alongside a crisp Caesar salad or roasted zucchini and bell peppers. In my NYC kitchen, I often pair this with a side of sautéed spinach with garlic and a squeeze of lemon—it lightens the meal beautifully. If you’re feeling indulgent, a side of garlic bread is always welcome to soak up any extra sauce!
This baked chicken parmesan also makes an incredible sandwich. Slice the chicken breasts and pile them onto a toasted ciabatta roll with extra mozzarella and a drizzle of marinara—perfect for a quick lunch or game day treat. However you serve it, this dish is sure to impress.
| Pairing Type | Suggestions | Why It Works |
|---|---|---|
| Side Dish | Spaghetti, Caesar salad, roasted broccoli, garlic bread | Classic Italian-American combos that soak up sauce and add crunch |
| Sauce / Dip | Extra marinara, creamy pesto, or balsamic glaze | Adds moisture and flavor contrast to the crispy chicken |
| Beverage | Chianti, Pinot Noir, or a crisp lager | Acidity cuts through richness; beer cleanses the palate |
| Garnish | Fresh basil, parsley, microgreens, red pepper flakes | Adds color, freshness, and a touch of heat if desired |
Make-Ahead, Storage & Reheating
This oven baked chicken parmesan is perfect for meal prep—I often make a double batch on Sunday for busy NYC weekdays. The key to successful storage is separating the components: keep the baked chicken (without sauce and cheese) in one container, and the sauce and cheese in another. This prevents the crust from becoming soggy.

Tried This Recipe? Leave a Comment!
Did you make this recipe? I’d love to hear how it turned out! Please leave a comment and a rating below. Your feedback helps other home cooks and supports cheerychop.com!
For more delicious inspiration, follow me on Pinterest!