Table of Contents
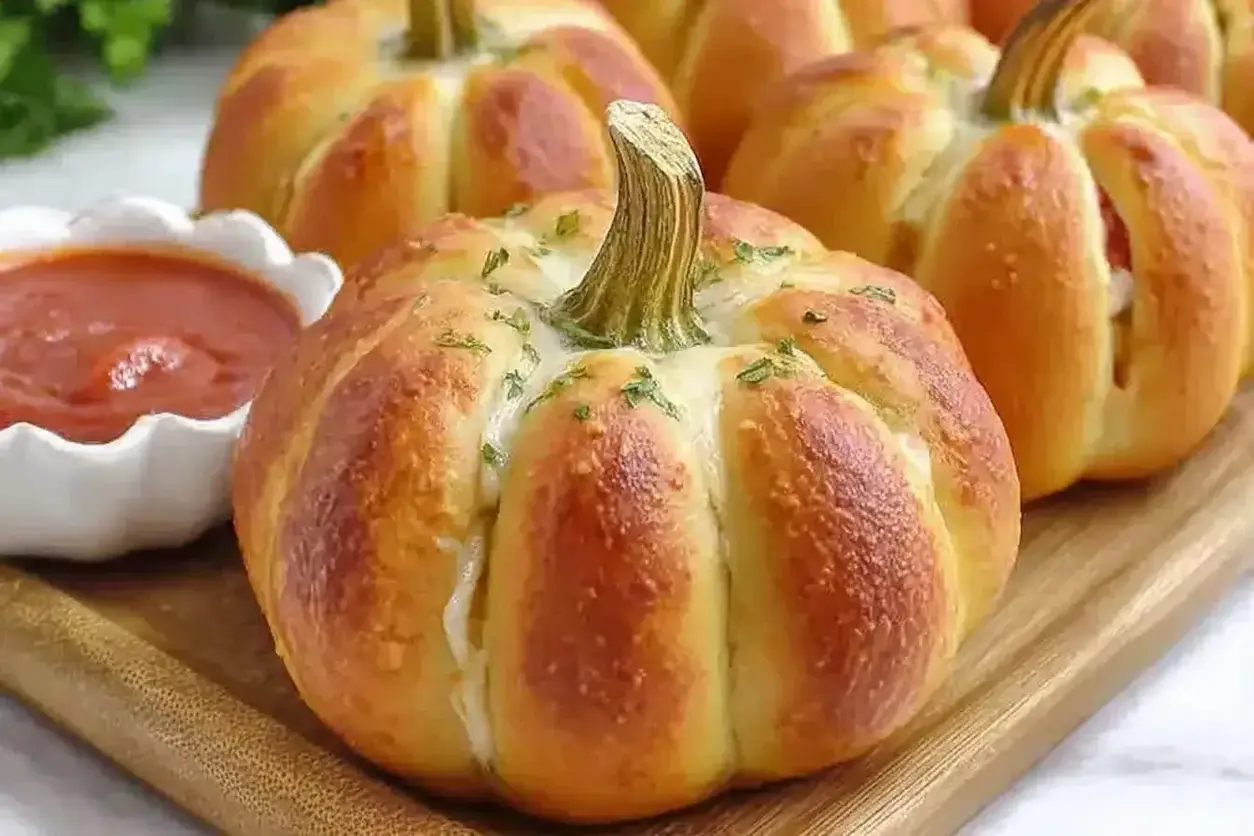
Pepperoni Pizza Pumpkins Recipe – Easy Fall Appetizer

The first time I made these Pepperoni Pizza Pumpkins, I was standing in my tiny NYC kitchen with a ball of pizza dough in one hand and a piece of kitchen twine in the other, half-laughing at myself. Could I really turn a classic pepperoni pizza into little pumpkin-shaped bites? Well, let me tell you — when they came out of the oven all golden and puffy, I knew I had struck gold. These Pepperoni Pizza Pumpkins are everything you love about pizza wrapped in golden dough and shaped like adorable little pumpkins. They’re stuffed with melty mozzarella, zesty marinara, and savory pepperoni, making them a crowd-pleasing fall appetizer or festive easy fall snack.
Growing up in Morocco, my mother would make these little stuffed breads called briouats — crispy triangles filled with spiced meat and cheese. Years later, when I was training in Paris at Le Cordon Bleu, I learned how to shape dough into all sorts of decorative forms. These Pepperoni Pizza Pumpkins bring together both worlds: the playful, festive shaping I love from my pastry training and the warm, comforting flavors of a classic pepperoni pizza. The aroma that fills your kitchen as they bake — garlicky tomato, melted cheese, and that unmistakable pepperoni spice — is absolutely intoxicating. Every bite gives you a crisp golden exterior, a soft pillowy center, and that glorious cheese pull we all dream about.
I’ve tested this recipe over a dozen times to make sure it’s completely foolproof for home cooks. My version uses refrigerated pizza dough for convenience — no yeast, no rising time, no fuss. But the real secret is in how you tie the twine to create those perfect pumpkin ridges without crushing the dough. After years of making these for fall parties, Friendsgiving gatherings, and Halloween game nights, I’ve perfected every detail so you can nail it on your first try. If you’re looking for more seasonal inspiration, check out our collection of easy appetizer recipes for more crowd-pleasing ideas. And for more pumpkin-shaped inspiration, take a look at these pumpkin-shaped recipes that are perfect for autumn entertaining.
Why This Pepperoni Pizza Pumpkins Recipe Is the Best
The Flavor Secret — What sets these Pepperoni Pizza Pumpkins apart is the ratio of filling to dough. I use mini mozzarella balls (bocconcini) that melt into a creamy, stretchy center, plus two slices of pepperoni per pumpkin for that perfect meat-to-cheese balance. A small spoonful of marinara adds just enough acidity to cut through the richness. It’s the same principle I learned in Paris: every bite should have contrast. The pepperoni I source from a little Italian deli in Greenwich Village — it’s slightly smoky, a little spicy, and crisps up beautifully inside the dough as it bakes.
Perfected Texture — The key to getting that gorgeous golden crust is the egg wash. I whisk one egg with a splash of water and brush it generously over each dough ball before baking. This creates a shiny, deep golden exterior that looks bakery-worthy. I also let the assembled pumpkins rest for a few minutes before egg-washing — this relaxes the gluten and prevents the dough from shrinking back as it bakes. The result is a pumpkin-shaped pizza bite that’s crispy on the outside, soft and airy on the inside, with a molten cheese center that stays gooey for minutes after baking.
Foolproof & Fast — From start to finish, these Pepperoni Pizza Pumpkins come together in under 30 minutes. I’ve had friends with zero baking experience make these and nail them on the first try. The recipe uses only seven main ingredients, most of which you probably already have in your fridge. And because each pumpkin is individually portioned, they’re perfect for parties — no slicing, no serving utensils needed. They’re also endlessly customizable, which I’ll walk you through in the variations section. For more party-ready ideas, browse our fall party appetizers collection.
Pepperoni Pizza Pumpkins Ingredients
I buy most of my ingredients for these Pepperoni Pizza Pumpkins from the Union Square Greenmarket or my local Italian specialty store in Brooklyn. But everything here is available at any standard US grocery store. Let me walk you through what you need and why each ingredient matters.
Ingredients List
- 1 can refrigerated pizza pie crust (like Pillsbury or store brand)
- 2 tablespoons marinara sauce (plus more for serving)
- 16 slices of pepperoni
- 8 mini mozzarella balls (or 8 cubes of mozzarella)
- 1 egg, slightly beaten with 2 tsp water
- Long kitchen twine (unwaxed, food-safe)
- Optional: parsley or Italian seasoning for garnish
Ingredient Spotlight
Pizza Dough — Refrigerated pizza crust is the MVP here. It’s soft, pliable, and bakes up golden and tender. Look for a can that says “thin crust” or “regular” — both work well. If you want to use homemade dough, make sure it’s a soft, enriched dough (not a lean bread dough) for the best texture.
Pepperoni — Go for good-quality pepperoni from the deli counter rather than pre-packaged slices. It has better flavor, renders less grease, and crisps up beautifully inside the dough. I use Boar’s Head or the house-made pepperoni from my local Italian market.
Mozzarella — Mini mozzarella balls (bocconcini or ciliegine) work best because they melt into a creamy, stretchy center without turning into a puddle. If you can only find a large mozzarella ball, just cut it into 8 equal cubes. Fresh mozzarella gives the best cheese pull!
| Original Ingredient | Best Substitution | Flavor / Texture Impact |
|---|---|---|
| Refrigerated pizza crust | Homemade pizza dough (enriched) | Chewier, slightly more effort; richer flavor |
| Pepperoni slices | Cooked Italian sausage crumbles | More savory, less crispy; heartier texture |
| Mini mozzarella balls | Shredded low-moisture mozzarella | Less gooey, more uniform melt; easier to find |
| Marinara sauce | Pesto or Alfredo sauce | Different flavor profile; pesto adds herbiness |
How to Make Pepperoni Pizza Pumpkins — Step-by-Step
Making these Pepperoni Pizza Pumpkins is easier than you think. I’ve broken down every step with the exact techniques I use in my own kitchen. Follow along and you’ll have a tray full of adorable pumpkin-shaped pizza bites in no time.
Step 1: Preheat and Prep
Preheat your oven to 400°F. Line a baking sheet with parchment paper and set aside. The parchment prevents sticking and makes cleanup effortless. Make sure your oven is fully heated before baking — a hot oven ensures the dough puffs up quickly and develops that beautiful golden crust.
💡 Lora’s Pro Tip: Place your baking sheet in the oven while it preheats. A hot pan helps the bottoms crisp up faster and gives a more even bake.
Step 2: Cut the Dough Circles
Roll out the pizza dough on a lightly floured surface. Use a 3½ to 4-inch round cutter (a biscuit cutter or drinking glass works perfectly) to cut out 8 circles. Reroll the scraps once to get all 8 rounds. Keep the circles covered with a clean kitchen towel while you work to prevent them from drying out.
⚠️ Common Mistake to Avoid: Don’t stretch or pull the dough as you cut — press straight down. Stretching creates weak spots that can tear during sealing.
Step 3: Fill the Centers
In the center of each circle, add a small spoonful of marinara sauce (about ¾ teaspoon), 2 pepperoni slices, and 1 mini mozzarella ball or cube. Don’t overfill — you need enough dough to seal completely around the filling. The sauce should stay in the center, not spread to the edges, or it will prevent a good seal.
💡 Lora’s Pro Tip: Blot the pepperoni slices with a paper towel before adding them. This removes excess grease and helps the dough seal tighter.
Step 4: Seal and Shape
Bring the edges up and around the filling, pinching tightly to seal. Form a round dough ball, making sure no filling is exposed. Pinch the seams firmly — this is crucial because any opening will leak cheese during baking. Roll the ball gently between your palms to smooth it out.
⚠️ Common Mistake to Avoid: If the dough feels sticky or won’t seal, dust your fingers with a little flour. Wet dough is a sign the sauce has touched the edges — wipe the edges clean before sealing.
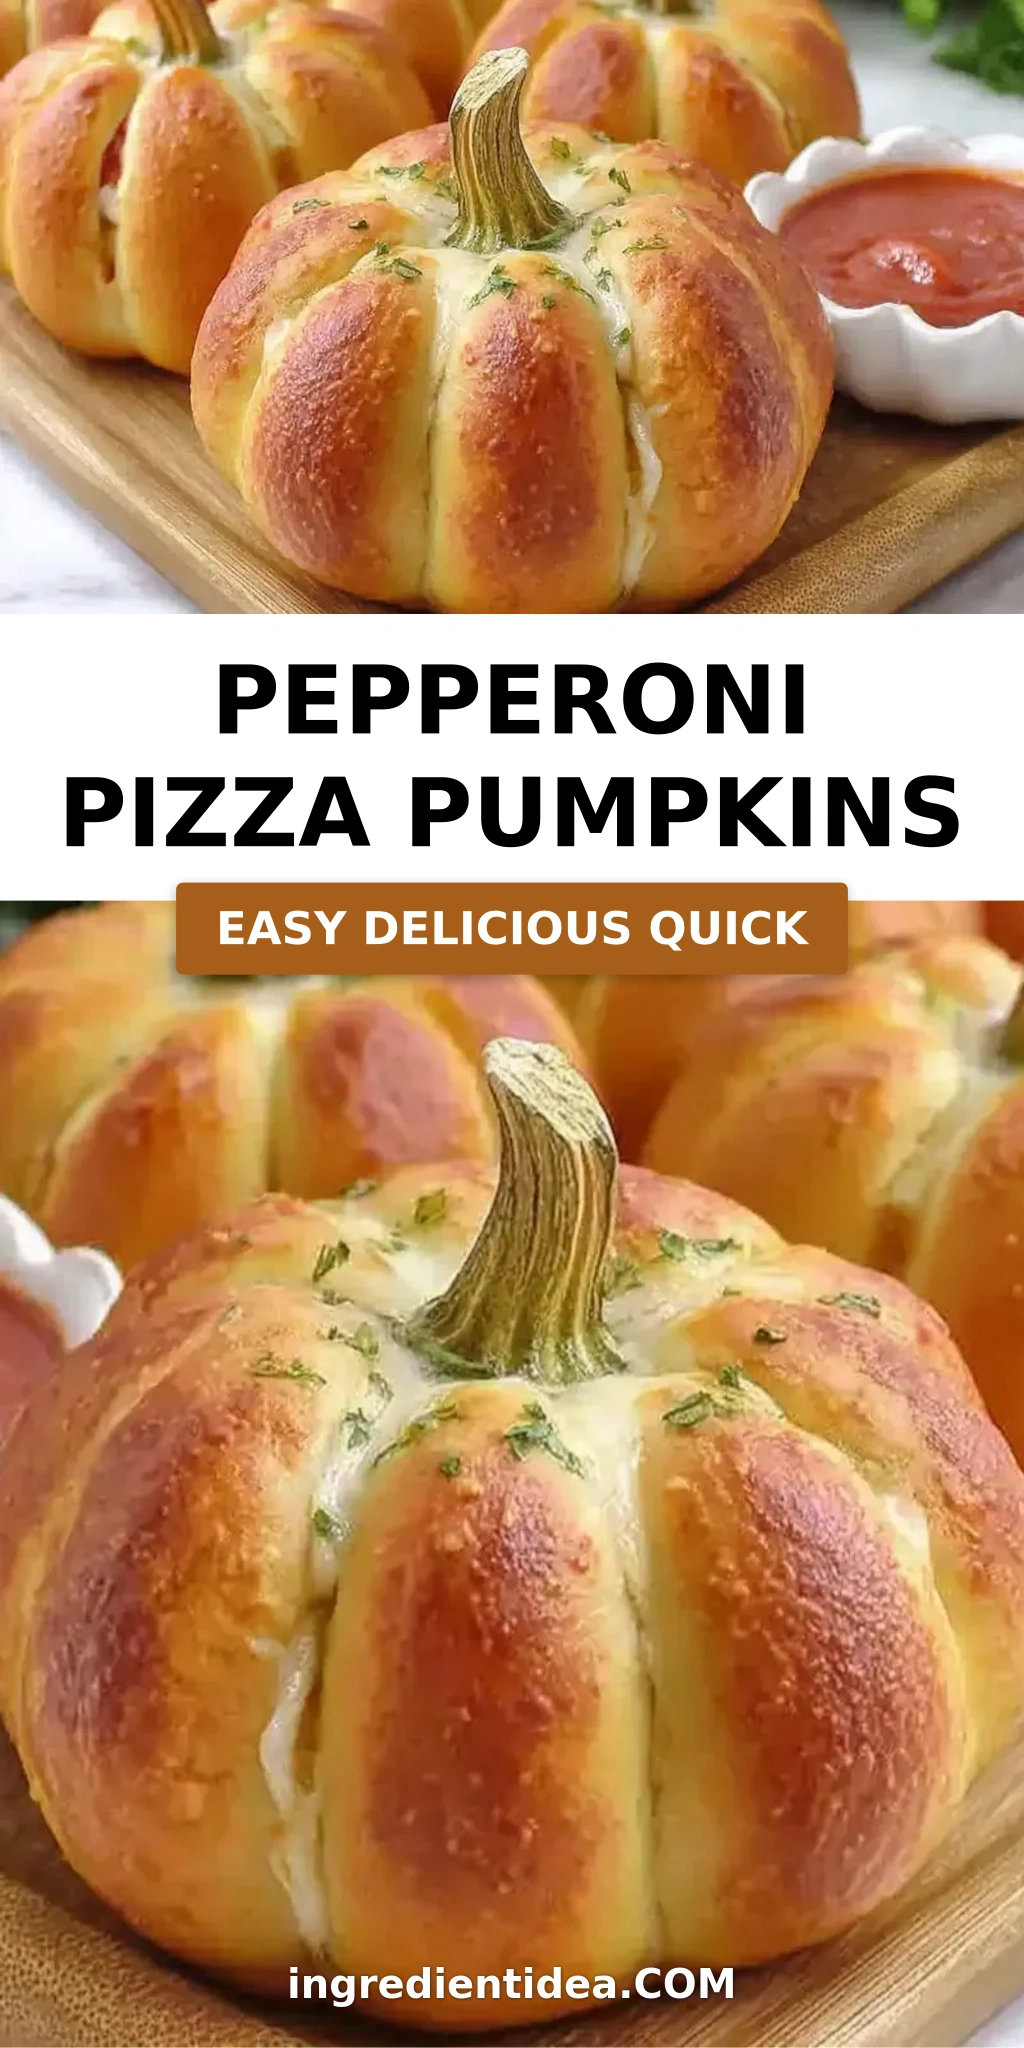
Step 5: Create the Pumpkin Ridges
Take a piece of kitchen twine and gently tie it around each dough ball to create pumpkin segments. Wrap the twine 3 to 4 loops around the ball — think of how pumpkin ridges naturally curve from top to bottom. Cross the twine at the top and bottom, then tie a gentle knot. Don’t tie too tight, or the twine will cut into the dough as it rises.
💡 Lora’s Pro Tip: Use unwaxed, unflavored kitchen twine. Soak it briefly in water before tying so it doesn’t burn in the oven. And leave a little extra length for easy removal after baking.
Step 6: Egg Wash and Bake
Brush each dough ball generously with the egg wash (1 egg beaten with 2 tsp water). The egg wash gives that gorgeous golden-brown shine. Place the pumpkins on the prepared baking sheet, spacing them about 2 inches apart. Bake for 15–20 minutes, until golden brown and puffy.
⚠️ Common Mistake to Avoid: Don’t skip the egg wash! It’s not just for color — it also helps the dough develop a crisp crust. Without it, the pumpkins will look pale and matte.
Step 7: Cool and Serve
Let them cool for 5 minutes on the baking sheet — this allows the cheese to set slightly so it doesn’t burn your mouth. Carefully remove the twine using kitchen scissors or by gently pulling one end. The twine should slide off easily. Serve warm with extra marinara sauce for dipping.
💡 Lora’s Pro Tip: For an extra touch, brush the hot pumpkins with a little garlic butter as soon as they come out of the oven. It adds incredible flavor and makes them even more irresistible.
| Step | Action | Duration | Key Visual Cue |
|---|---|---|---|
| Preheat & Prep | Oven to 400°F, line sheet | 10–15 min | Oven fully heated, parchment ready |
| Cut Dough | Roll, cut 8 circles | 3 min | Uniform rounds, no tearing |
| Fill & Seal | Add sauce, pepperoni, cheese | 5 min | Sealed balls, no filling visible |
| Tie Twine | Wrap 3–4 loops, knot gently | 4 min | Visible pumpkin ridges, not too tight |
| Egg Wash & Bake | Brush, bake at 400°F | 15–20 min | Golden brown, puffed up |
| Cool & Serve | Rest 5 min, remove twine | 5 min | Twine slides off easily |
Serving & Presentation
These Pepperoni Pizza Pumpkins are practically made for entertaining. I love arranging them on a large wooden board or a white platter with a bowl of warm marinara sauce in the center for dipping. The contrast between the golden pumpkins and the red sauce is stunning. For a garnish, sprinkle a little fresh parsley or a pinch of Italian seasoning over the top — it adds a pop of green that makes the pumpkins pop even more.
When I serve these at my fall gatherings in NYC, I like to set them out on a rustic platter with some roasted pumpkin seeds scattered around for texture. They’re perfect alongside a crisp fall salad with apple slices and candied pecans, or with a bowl of creamy tomato soup for dipping. The pumpkin-shaped pizza bites are also fantastic on a Halloween party table — kids and adults alike go crazy for them.
One of my favorite memories is bringing a tray of these Pepperoni Pizza Pumpkins to a Friendsgiving dinner in Brooklyn. Everyone thought I’d spent hours shaping each one, but the truth is they come together in under 30 minutes. The secret? Refrigerated dough and a little kitchen twine. That’s it. They disappeared faster than the turkey.
| Pairing Type | Suggestions | Why It Works |
|---|---|---|
| Side Dish | Fall salad, roasted vegetables, tomato soup | Balances richness with freshness |
| Sauce / Dip | Marinara, garlic butter, ranch, pesto | Adds moisture and extra flavor layer |
| Beverage | Red wine (Chianti), apple cider, IPA beer | Acidity cuts richness; cider complements fall theme |
| Garnish | Parsley, basil, Italian seasoning, grated Parmesan | Adds color, freshness, and aroma |
Make-Ahead, Storage & Reheating
As a busy NYC food blogger, I’m all about recipes that work with my schedule. These Pepperoni Pizza Pumpkins are perfect for make-ahead entertaining. I often assemble them the night before a party and bake them fresh just before guests arrive. Here’s exactly how to store and reheat them for the best results.
| Method | Container | Duration | Reheating Tip |
|---|---|---|---|
| Refrigerator | Airtight container in single layer | Up to 3 days | Reheat at 350°F for 8–10 min on baking sheet |
| Freezer | Freezer-safe bag or container, parchment between layers | Up to 2 months | Bake from frozen at 375°F for 15–18 min |
| Make-Ahead | Covered baking sheet in fridge | Up to 24 hours before baking | Bake directly from fridge, add 2–3 min to time |
To reheat, I always use the oven rather than the microwave. The microwave makes the dough soggy and the cheese rubbery. Pop them on a baking sheet at 350°F for about 8–10 minutes, and they’ll come out almost as good as fresh. If you’re reheating from frozen, add 5–7 minutes and check for doneness. The internal temperature should reach 165°F for food safety.
For make-ahead prep, I assemble the Pepperoni Pizza Pumpkins completely — including tying the twine and applying the egg wash — then cover and refrigerate. The egg wash actually helps protect the dough from drying out overnight. When you’re ready to bake, just pop them straight into the preheated oven. It’s the ultimate party hack.
Variations & Easy Swaps
One of the things I love most about these Pepperoni Pizza Pumpkins is how endlessly customizable they are. I’ve tested dozens of variations over the years, and here are my absolute favorites. Whether you’re feeding picky eaters, accommodating dietary needs, or just want to try something new, there’s a version here for you.
| Variation | Key Change | Best For | Difficulty Impact |
|---|---|---|---|
| Harvest Veggie | Replace pepperoni with roasted mushrooms & bell peppers | Vegetarians, lighter option | Same — just swap the filling |
| Spicy Sausage | Use cooked spicy Italian sausage instead of pepperoni | Meat lovers, heat seekers | Same — cook sausage ahead |
| Gluten-Free | Use gluten-free pizza dough blend | Gluten-sensitive guests | Slightly trickier — GF dough is more delicate |
Harvest Veggie Pumpkins
For a vegetarian version, skip the pepperoni and fill the dough with finely chopped roasted mushrooms, bell peppers, and a sprinkle of smoked mozzarella. The mushrooms add an earthy, almost meaty texture. I love using cremini mushrooms from the Union Square market — they’re more flavorful than white button mushrooms. A pinch of smoked paprika brings that same warmth pepperoni provides. This variation is a hit at my fall parties and appeals to both vegetarians and meat-eaters alike.
Spicy Sausage Pumpkins
If you want to kick up the heat, swap the pepperoni for crumbled spicy Italian sausage that’s been browned and drained. The sausage adds a bold, fennel-forward flavor that pairs beautifully with the marinara and mozzarella. I like to add a pinch of red pepper flakes to the sauce for extra heat. This version reminds me of the sausage rolls I used to get from a little bakery in Brooklyn’s Carroll Gardens — flaky, spicy, and completely satisfying.
Gluten-Free Pumpkins
For a gluten-free version, use a high-quality gluten-free pizza dough mix. I’ve tested several brands and find that the ones containing xanthan gum work best for shaping — they’re more pliable and less likely to crack. The key is to work the dough slightly wetter than usual and flour your hands generously. The gluten-free Pepperoni Pizza Pumpkins won’t puff up as much, but they’re still delicious and satisfying. Pro tip: brush them with extra egg wash to help them brown since GF dough tends to be paler.
Frequently Asked Questions
What are pepperoni pizza pumpkins?
Pepperoni Pizza Pumpkins are adorable, bite-sized appetizers made from pizza dough that’s stuffed with marinara sauce, pepperoni, and mozzarella cheese, then shaped and baked to look like miniature pumpkins. The pumpkin shape is created by tying kitchen twine around each stuffed dough ball in a crisscross pattern, which forms ridges as the dough bakes and puffs up. They’re a popular fall appetizer for Halloween parties, Thanksgiving gatherings, and autumn game-day events. The best part is that they combine the cozy, familiar flavors of pepperoni pizza with a festive seasonal presentation that delights both kids and adults. You can serve them as a snack, appetizer, or even as a fun party activity where guests assemble their own.
How do you make pizza pumpkins?
Making pizza pumpkins is surprisingly simple and takes about 28 minutes total. Start by preheating your oven to 400°F and lining a baking sheet with parchment. Roll out refrigerated pizza dough and cut it into 8 circles using a 3½ to 4-inch cutter. Place a spoonful of marinara, 2 pepperoni slices, and a mini mozzarella ball in the center of each circle. Bring the edges up around the filling and pinch tightly to seal into a round ball. Take a piece of kitchen twine and wrap it around each ball 3 to 4 times to create pumpkin ridges — tie gently without cutting into the dough. Brush with egg wash and bake for 15–20 minutes until golden brown. Let cool slightly, remove the twine, and serve warm with marinara dipping sauce. The full step-by-step guide is in the recipe card above.
Can you use pre-made pizza dough for pizza pumpkins?
Absolutely — pre-made pizza dough is actually the recommended base for this recipe. Refrigerated pizza crust from the grocery store (like Pillsbury or the store brand) works perfectly because it’s soft, pliable, and bakes up tender and golden. It also saves you from having to make and proof dough from scratch, which is the whole point of this quick and easy recipe. You can also use pre-made dough from your local pizzeria or bakery — just let it come to room temperature first so it’s easier to roll and shape. If you’re feeling ambitious, any soft enriched pizza dough recipe will work, but refrigerated dough gives the most consistent, foolproof results for beginners and busy cooks alike.
What dipping sauce goes with pizza pumpkins?
Marinara sauce is the classic and most popular dipping sauce for Pepperoni Pizza Pumpkins, and I always serve a warm bowl of it on the side. The bright, tangy tomato flavor complements the rich cheese and savory pepperoni beautifully. Beyond marinara, there are plenty of other delicious options. Garlic butter sauce (melted butter with minced garlic and parsley) is incredible for dipping, as is creamy ranch dressing or a cool cucumber yogurt dip for contrast. Pesto adds a fresh herbaceous note, while balsamic glaze brings a touch of sweetness that’s surprisingly good with pepperoni. For a spicy kick, try sriracha mayo or arrabbiata sauce. You can even serve a dipping flight with several options for a party — it always gets rave reviews.
How long do you bake pepperoni pizza pumpkins?
Pepperoni Pizza Pumpkins should be baked at 400°F for 15 to 20 minutes, or until they are golden brown and puffy. The exact time depends on your oven and the size of your dough circles. I recommend checking at the 15-minute mark — look for a deep golden color on the exterior and the dough should feel firm to the touch but still slightly soft when pressed. If they’re not quite there, give them 2–3 more minutes. Overbaking can make the dough dry, so watch carefully. The internal temperature should reach at least 165°F to ensure the cheese is fully melted and the dough is cooked through. After baking, let them rest for 5 minutes before removing the twine — this allows the cheese to set slightly so everything stays intact when you serve them.
Can I make pepperoni pizza pumpkins ahead of time?
Yes, you can definitely make Pepperoni Pizza Pumpkins ahead of time, and they store beautifully. The best make-ahead method is to assemble the pumpkins completely — including tying the twine and brushing with egg wash — then cover and refrigerate for up to 24 hours before baking. The egg wash actually helps protect the dough from drying out overnight. When you’re ready to serve, simply bake them straight from the refrigerator, adding 2–3 minutes to the baking time. You can also bake them fully, let cool, and store in an airtight container in the refrigerator for up to 3 days. Reheat at 350°F for 8–10 minutes on a baking sheet. For longer storage, freeze them after baking for up to 2 months — reheat from frozen at 375°F for 15–18 minutes.
Can I freeze pepperoni pizza pumpkins?
Absolutely — Pepperoni Pizza Pumpkins freeze exceptionally well, making them a fantastic make-ahead party food. To freeze, first bake the pumpkins completely and let them cool to room temperature. Arrange them in a single layer on a baking sheet and freeze for 1 hour, then transfer to a freezer-safe bag or container with parchment paper between layers to prevent sticking. They’ll keep for up to 2 months. To reheat, place the frozen pumpkins on a baking sheet and bake at 375°F for 15–18 minutes, or until heated through and the exterior is crispy again. I don’t recommend microwaving frozen pumpkins as the dough becomes soggy and the cheese can turn rubbery. This frozen stash has saved me countless times when unexpected guests showed up.
What other fillings can I use for pizza pumpkins?
The filling possibilities for pizza pumpkins are nearly endless. Beyond the classic pepperoni and mozzarella, try cooked spicy Italian sausage with provolone for a heartier bite, or roasted mushrooms and bell peppers with smoked mozzarella for a vegetarian version. For a white pizza twist, use ricotta, garlic, and spinach. If you love Hawaiian pizza, add ham and pineapple chunks with mozzarella. For a Mexican-inspired version, try seasoned ground beef with pepper jack cheese and a spoonful of salsa. You can even go sweet by filling them with Nutella and marshmallow for a dessert version — just skip the twine and shape them into rounds. Each filling creates a completely different experience while keeping the same adorable pumpkin presentation that makes these so special.
How do I prevent the twine from burning in the oven?
To prevent kitchen twine from burning while your Pepperoni Pizza Pumpkins bake, use 100% cotton kitchen twine and soak it in water for a few minutes before tying. The moisture in the soaked twine creates steam as the pumpkins bake, which keeps the twine from scorching or charring. Make sure to use unflavored, unwaxed twine — avoid synthetic materials or any twine that’s been treated with chemicals. Also, don’t tie the twine too tightly around the dough balls; a gentle knot that allows for some expansion is ideal. After baking, let the pumpkins cool for 5 minutes, then use kitchen scissors to snip the twine and gently pull it off. The twine should slide off easily without sticking if you’ve soaked it beforehand. This simple step ensures perfect, clean pumpkin ridges every time.
Are pepperoni pizza pumpkins suitable for kids to make?
Yes — Pepperoni Pizza Pumpkins are a fantastic recipe to make with kids, and they’re always a hit with little ones. Children can easily help with rolling the dough circles, placing the fillings, and brushing the egg wash. The twine-tying step is best done by an adult, but kids 8 and up with good fine motor skills can often manage it with supervision. I love making these with my friend’s kids — they get so excited to see the pumpkins puff up in the oven. The recipe is also very forgiving, so even if the pumpkins aren’t perfectly shaped, they’ll still taste amazing. Just make sure the fillings have cooled slightly if you’re using pre-cooked ingredients, and always supervise oven use. This is the kind of recipe that creates wonderful kitchen memories and gets kids excited about cooking.
Share Your Version!
I absolutely love hearing how these Pepperoni Pizza Pumpkins turn out in your kitchen! Did you try a fun filling variation? Did the kids help you tie the twine? Leave a star rating and a comment below — it helps other readers know what to expect and gives me so much joy reading your stories.
Snap a photo of your Pepperoni Pizza Pumpkins and tag me on Instagram or Pinterest @ingredientidea. I love seeing your creative twists — everything from spicy sausage versions to gluten-free adaptations. Your photo might even get featured on my page! And if you have a question about the recipe, drop it in the comments and I’ll get back to you personally.
From my NYC kitchen to yours — I hope this recipe brings as much warmth to your table as it does to mine. — Lora 🧡
Love This Recipe? Save It to Pinterest!
If you enjoyed this Pepperoni Pizza Pumpkins recipe, don’t let it get lost in your browser tabs! 😄 Pin it now so you can find it again anytime — and explore hundreds more tried-and-tested recipes waiting for you on my Pinterest boards.
👉 Follow Lora on Pinterest @ingredientidea📌 Pin this recipe · 🔁 Re-pin your favorites · 💬 Tag me when you make it — I love seeing your creations!
Pepperoni Pizza Pumpkins
These adorable Pepperoni Pizza Pumpkins are everything you love about pizzawrapped in golden dough and shaped like little pumpkins! They’re stuffed with melty mozzarella, zesty marinara, and savory pepperoni, making them a crowd-pleasing appetizer or festive fall snack.
Ingredients
- 1 can refrigerated pizza pie crust
- 2 tablespoons marinara sauce (plus more for serving)
- 16 slices of pepperoni
- 8 mini mozzarella balls (or 8 cubes of mozzarella)
- 1 egg, slightly beaten with 2 tsp water
- Long kitchen twine
- Optional: parsley or Italian seasoning for garnish
Instructions
- Preheat your oven to 400°F. Line a baking sheet with parchment paper and set aside.
- Roll out the pizza dough and cut out 8 circles using a 3½ to 4-inch cutter.
- In the center of each circle, add a small spoonful of marinara sauce, 2 pepperoni slices, and 1 mozzarella ball or cube.
- Bring the edges up and around the filling, pinching tightly to seal. Form a round dough ball.
- Take a piece of kitchen twine and gently tie it around each dough ball to create pumpkin segmentswrap 34 loops to mimic pumpkin ridges (dont tie too tight).
- Brush each dough ball with egg wash.
- Bake for 1520 minutes, until golden brown and puffy.
- Let them cool slightly, remove twine, and serve warm with marinara sauce for dipping.
Nutrition
- Calories: 190 kcal
- Sugar: 1 g
- Fat: 10 g
- Carbohydrates: 18 g
- Protein: 7 g
Tried This Recipe? Leave a Comment!
Did you make this recipe? I’d love to hear how it turned out! Please leave a comment and a rating below. Your feedback helps other home cooks and supports cheerychop.com!
For more delicious inspiration, follow me on Pinterest!