Table of Contents
Best Homemade Red Velvet Brownies with Cream Cheese Frosting – A Valentine’s Day Showstopper
When I first landed in New York City after my culinary training in Paris, I missed the vibrant food markets of my childhood in Morocco. But NYC has a way of inspiring its own culinary magic. That’s where these best homemade red velvet brownies were born – a fusion of my love for rich, decadent desserts and the festive spirit of the city. These aren’t just any brownies; they’re a visual and gustatory delight, boasting a deep crimson hue and a tender, fudgy center, all crowned with a luscious cream cheese frosting. Perfect for Valentine’s Day or any day you crave a showstopper!
Imagine biting into a treat that’s equal parts chewy brownie and delicate cake, with the subtle tang of cream cheese frosting cutting through the sweetness. The mesmerizing deep red color, achieved with a touch of food coloring, hints at the red velvet flavor beneath, which is a delightful twist on the classic chocolate brownie. The aroma alone, a blend of rich cocoa, sweet vanilla, and a hint of tangy cream cheese, is enough to transport you. This recipe balances classic chocolate richness with the iconic red velvet profile, creating a symphony of textures and flavors that will leave everyone asking for the recipe.
I’ve spent years perfecting this red velvet brownie recipe, drawing on my French pastry techniques to ensure an unbeatable texture. My goal was to create an easy red velvet brownie that tastes like it came from a high-end bakery, yet is simple enough for any home cook. I’ll share a secret ingredient that elevates the flavor and a crucial step that prevents a common pitfall, ensuring your brownies are consistently moist and delicious. Get ready to impress yourself and your loved ones with the best homemade red velvet brownies they’ve ever tasted!
Why This Best Homemade Red Velvet Brownies Recipe Is the Best
What makes these red velvet brownies truly stand out is the careful layering of flavors and textures. My background in North African cooking instilled in me a deep appreciation for ingredients that offer complexity, while my French training taught me precision. For this recipe, I lean into that heritage by ensuring the balance of sweet, slightly tangy, and rich chocolate notes is just right. The unique red velvet twist isn’t just for show; it adds a subtle depth that complements the Ghirardelli chocolate beautifully, creating a flavor profile that’s both familiar and excitingly new. It’s this thoughtful approach to flavor building that elevates these brownies from ordinary to extraordinary.
The texture is where a professional cook’s touch truly shines. Many brownies can be cakey or dry, but this recipe focuses on achieving that perfect fudgy, chewy center. We achieve this by using a combination of melted chocolate and butter, the right ratio of sugars, and importantly, room temperature eggs which emulsify better, creating that signature dense yet tender crumb. The key is not to overmix the batter once the flour is added, and to bake just until a toothpick comes out with a few moist crumbs attached. This attention to detail ensures each bite is pure brownie bliss, a testament to time-honored baking techniques.
Beyond the exquisite taste and texture, these homemade red velvet brownies are surprisingly straightforward to make. I’ve designed this recipe to be foolproof, even for those new to baking. The instructions are clear, and I’ve highlighted common mistakes to help you avoid them. The batter comes together quickly, and the baking time is standard for brownies. Even the cream cheese frosting, often seen as a delicate element, uses simple ingredients and a straightforward mixing method. This recipe proves that creating a show-stopping dessert doesn’t require hours in the kitchen or advanced skills; it just requires a good recipe and a touch of love.
Red Velvet Brownies Ingredients
Living in New York City means I have access to some of the best ingredients, from my favorite spice shops in the West Village to the incredible chocolate counters. For these red velvet brownies, I always opt for Ghirardelli chocolate chips for their superior flavor and melting quality. You can find fantastic produce and specialty items at the Union Square Greenmarket (when in season, of course!), but for everyday staples, a good quality supermarket or even a local bodega will have what you need. This recipe is designed to use accessible ingredients, so don’t worry if you don’t have a specialty store nearby.
Ingredients List
- 2 1/4 sticks unsalted butter (cut into chunks)
- 3 1/2 cups Ghirardelli Milk Chocolate Chips
- 5 large eggs (room temp)
- 1/2 cup granulated sugar
- 1 1/4 cups packed brown sugar
- 1 teaspoon salt
- 1 1/4 teaspoons vanilla extract
- 2 tablespoons red food coloring
- 2 cups all purpose flour
- 1 teaspoon baking powder
- 3 tablespoons Ghirardelli unsweetened cocoa powder
- 4 ounces cream cheese (softened)
- 5 tablespoons unsalted butter (room temperature)
- 1/8 teaspoon salt
- 1 teaspoon vanilla extract
- 2 or 3 cups confectioners sugar
- 1-2 tablespoons heavy cream or milk of choice
Ingredient Spotlight
Ghirardelli Milk Chocolate Chips: These are my go-to for their rich, creamy flavor and excellent melting properties. They form the decadent base of our brownies and ensure a smooth, glossy finish. In any US supermarket, you’ll find them in the baking aisle. If you can’t find Ghirardelli milk chocolate, a good quality dark chocolate will also work, but it will result in a less sweet, more intense chocolate brownie.
Red Food Coloring: This is crucial for achieving the signature vibrant hue of red velvet. Gel coloring is often more potent and provides a richer color without adding excess liquid. You can find it in most grocery stores in the baking section. For a less intense color or if you prefer to avoid artificial coloring, you can use beet powder, though the flavor might be slightly affected, and the color won’t be as vibrantly red.
Cream Cheese: The star of our frosting, cream cheese adds a delightful tangy counterpoint to the sweetness of the brownies. Ensure it’s softened to room temperature for a smooth, lump-free frosting. Full-fat block cream cheese works best for frosting consistency. If you only have spreadable cream cheese in a tub, you might need to reduce the liquid slightly to achieve the right thickness, as it can be softer.
| Original Ingredient | Best Substitution | Flavor / Texture Impact |
|---|---|---|
| Ghirardelli Milk Chocolate Chips | Good quality semi-sweet or dark chocolate chips | Richer, less sweet chocolate flavor. May require slightly more sugar in the brownie batter. |
| Red Food Coloring (Gel) | Beet powder (approx. 1-2 tsp) | Less vibrant red color, potentially a slight earthy undertone. |
| Cream Cheese | Mascarpone cheese | Slightly sweeter and richer frosting, less tangy. |
How to Make Best Homemade Red Velvet Brownies – Step-by-Step
Follow these simple steps to create your own batch of irresistible homemade red velvet brownies. I’ve broken down exactly what you need to do for a perfect result every time.
Step 1: Preheat and Prepare
Preheat your oven to 350 degrees Fahrenheit (175 degrees Celsius). Line a 9×13 inch baking pan with foil or parchment paper, leaving an overhang on the sides. Lightly grease the paper or foil; this easy cleanup trick is a lifesaver after baking.
⚠️ Common Mistake to Avoid: Don’t skip lining the pan! It makes removing the brownies so much easier and prevents them from sticking, ensuring beautiful edges.
Step 2: Melt Chocolate and Butter
Melt the 2 1/4 sticks of unsalted butter and the Ghirardelli milk chocolate chips together in a microwave-safe bowl in 30-second intervals, stirring in between, until smooth. Alternatively, you can use a small saucepan, melting the butter over low heat and then stirring in the chocolate chips until fully melted and smooth. Set aside to cool slightly.
Step 3: Combine Wet Ingredients
In a large mixing bowl, whisk together the 5 large eggs, 1/4 teaspoon salt, and 1 1/4 teaspoons vanilla extract until well combined. Add the granulated sugar and packed brown sugar, whisking until smooth. Gradually whisk in the 2 tablespoons of red food coloring until you achieve a uniform, vibrant red hue.
💡 mia’s Pro Tip: Using room temperature eggs is key here. They emulsify better with the sugar and fats, creating a richer, smoother batter and a more tender brownie crumb.
Step 4: Add Chocolate Mixture
Slowly whisk the slightly cooled melted chocolate and butter mixture into the egg and sugar mixture until everything is thoroughly combined and smooth. Ensure the chocolate mixture is not hot, as this could scramble the eggs.
Step 5: Incorporate Dry Ingredients
In a separate medium bowl, stir together the 2 cups of all-purpose flour, 1 teaspoon baking powder, 3 tablespoons unsweetened cocoa powder, and 1 teaspoon salt. Gradually add these dry ingredients to the wet ingredients, stirring with a silicone spatula until just combined. Be careful not to overmix; stop as soon as there are no visible streaks of flour.
⚠️ Common Mistake to Avoid: Overmixing the batter after adding flour can develop the gluten too much, resulting in tough, cakey brownies instead of fudgy ones.
Step 6: Bake the Brownies
Pour the batter into the prepared 9×13 inch pan, spreading it evenly. Bake for 35-40 minutes, or until a toothpick inserted into the center comes out with a few moist crumbs attached (not wet batter). Transfer the pan to a wire cooling rack and let the brownies cool for at least 15 minutes before frosting.
Step 7: Prepare the Frosting
While the brownies cool, make the cream cheese frosting. In a medium bowl, beat together the 4 ounces of softened cream cheese and 5 tablespoons of room temperature unsalted butter until smooth. Beat in the 1/8 teaspoon salt and 1 teaspoon vanilla extract. Gradually add 2 to 3 cups of confectioners’ sugar, alternating with 1-2 tablespoons of heavy cream or milk, until the frosting is smooth, creamy, and spreadable.
Step 8: Frost and Chill
Once the brownies have cooled for at least 15 minutes in the pan, you can either frost them while slightly warm or refrigerate them, covered, until completely cooled and firm. Apply the cream cheese frosting evenly over the top of the brownies using an offset spatula or the back of a spoon. For best results and clean cuts, chill the frosted brownies in the refrigerator for at least 30 minutes before cutting.
| Step | Action | Duration | Key Visual Cue |
|---|---|---|---|
| 1 | Preheat & Prepare Pan | 10 mins | Oven Preheated, Pan Lined |
| 2 | Melt Chocolate & Butter | 5 mins | Smooth, melted mixture |
| 3 | Combine Wet Ingredients | 5 mins | Thick, light red mixture |
| 4 | Add Chocolate Mixture | 2 mins | Smooth, combined batter |
| 5 | Incorporate Dry Ingredients | 3 mins | Just combined, no flour streaks |
| 6 | Bake Brownies | 35-40 mins | Toothpick with moist crumbs |
| 7 | Prepare Frosting | 5 mins | Smooth, creamy frosting |
| 8 | Frost & Chill | 5 mins active, 30 mins chill | Evenly frosted, firm brownies |
Serving & Presentation
These decadent red velvet brownies are a feast for the eyes before they even touch your lips. For a classic presentation, I like to cut them into perfect squares and arrange them on a simple, elegant platter. A light dusting of cocoa powder or a few fresh raspberries can add a touch of sophistication, reminiscent of how we’d plate desserts in Paris. In my Moroccan heritage, we often adorn sweets with finely chopped pistachios or a drizzle of fragrant orange blossom water, adding another layer of aroma and texture.
For special occasions like Valentine’s Day, consider adding a small heart-shaped cookie cutter imprint on top or a sprinkle of red or pink edible glitter. The beauty of these brownies is their versatility; they’re equally at home at a casual get-together as they are at a more formal dessert setting. They hold up well, making them perfect for transporting to potlucks or gatherings across the city, just as I’d prepare treats for friends visiting my NYC apartment.
| Pairing Type | Suggestions | Why It Works |
|---|---|---|
| Side Dish | A scoop of vanilla bean ice cream | The cool, creamy vanilla contrasts beautifully with the rich, warm brownie. |
| Sauce / Dip | Raspberry coulis | The tartness of the raspberry cuts through the richness and complements the red velvet flavor. |
| Beverage | Espresso or strong coffee, cold milk | The bitterness of coffee enhances chocolate flavors. Milk provides a classic, comforting pairing. |
| Garnish | Fresh raspberries, chocolate shavings, edible flowers | Adds visual appeal, freshness, and textural contrast. |
Make-Ahead, Storage & Reheating
As a busy New Yorker, I appreciate recipes that can be prepared ahead of time. These red velvet brownies are perfect for that! You can bake them a day or two in advance and store them, unfrosted, at room temperature in an airtight container. This makes holiday baking or preparing for a party much less stressful. When you’re ready, whip up the frosting and ice them.
| Method | Container | Duration | Reheating Tip |
|---|---|---|---|
| Refrigerator | Airtight container | 3-4 days (frosted) | Let sit at room temperature for 30 minutes before serving. |
| Freezer | Airtight container or wrapped well | 2-3 months (frosted or unfrosted) | Thaw overnight in the refrigerator, then let sit at room temperature for 30 minutes. |
| Make-Ahead | Airtight container (unfrosted) | 2 days in advance | Frost just before serving for the freshest taste and appearance. |
If your brownies become a bit too firm after refrigeration, a quick 10-15 second zap in the microwave can revive their fudgy texture. For those preparing them completely ahead of time for a party, I recommend frosting them the morning of the event. This ensures the cream cheese frosting is at its best, not too hard or too soft. Just be sure to keep them covered to prevent them from drying out.
Variations & Easy Swaps
| Variation | Key Change | Best For | Difficulty Impact |
|---|---|---|---|
| Decadent Double Chocolate Red Velvet | Add 1/2 cup dark chocolate chips to batter, use dark chocolate in melting step. | Serious chocolate lovers. | Minimal (just adding chips) |
| Gluten-Free Red Velvet Brownies | Replace all-purpose flour with a 1:1 gluten-free baking flour blend. | Those with gluten sensitivities. | Easy swap, watch for slight texture change. |
| White Chocolate Raspberry Red Velvet | Replace milk chocolate chips with white chocolate chips; swirl in raspberry jam. | A lighter, fruitier flavor profile. | Easy – just swap chips and swirl. |
Decadent Double Chocolate Red Velvet
For the ultimate chocolate lover, why not make these brownies even more chocolatey? I love adding ½ cup of dark chocolate chips directly into the brownie batter. You could even use dark chocolate chips for melting instead of milk chocolate. This intensifies the overall chocolate flavor profile, making each bite an intensely rich experience. This variation is particularly good when you’re craving something truly indulgent, like during the colder months in NYC.
Gluten-Free Red Velvet Brownies
Adapting this recipe for gluten-free needs is simple. I’ve found that a good quality 1:1 gluten-free baking flour blend (often containing xanthan gum) works beautifully here. Simply substitute it cup-for-cup for the all-purpose flour. The texture might be slightly different—sometimes a bit more tender or cake-like depending on the blend—but the flavor remains wonderfully red velvet. Make sure your GF blend is suited for baking and hasn’t been previously tested in a recipe that yielded poor results.
White Chocolate Raspberry Red Velvet
This variation offers a lighter, fruitier take on red velvet. Swap the milk chocolate chips for white chocolate chips in the brownie batter. Then, before baking, gently swirl about ½ cup of good quality raspberry jam into the batter. The sweet creaminess of the white chocolate pairs wonderfully with the tartness of the raspberry, creating a delightful contrast that’s almost like a raspberry-chocolate cheesecake brownie.
What makes red velvet brownies different from regular brownies?
The primary difference lies in their flavor profile and appearance. Red velvet brownies incorporate red food coloring for their signature vibrant hue and often have a subtle tang and cocoa flavor that is characteristic of red velvet cake. Regular brownies are typically just chocolate-focused, without the added color or slight tang. This recipe adds that unique red velvet twist while maintaining the rich, fudgy texture expected of a great brownie.
Can I use cream cheese frosting instead of a glaze on red velvet brownies?
Absolutely! Cream cheese frosting is a fantastic choice for red velvet brownies and is often preferred because it complements the red velvet flavor profile so well. A glaze can be delicious but might be thinner and less decadent. This recipe includes a rich cream cheese frosting because I find it elevates the red velvet brownies to another level, adding a creamy, tangy element that balances the chocolate beautifully.
How do I keep red velvet brownies moist and not dry?
Moisture in brownies comes from several factors. First, use the right ratio of wet to dry ingredients, and don’t overmeasure your flour. Second, avoid overbaking! This is crucial. Brownies should be removed when a toothpick comes out with a few moist crumbs attached, not completely clean. Overbaked brownies will continue to cook as they cool. Finally, using melted butter and chocolate, rather than just softened butter, contributes to a fudgier, moister texture.
What can I substitute for buttermilk in red velvet brownies?
While this specific recipe doesn’t call for buttermilk, if you encounter other red velvet brownie recipes that do, you can easily substitute it. For every cup of buttermilk needed, use one cup of regular milk mixed with one tablespoon of lemon juice or white vinegar. Let it sit for 5-10 minutes until it slightly curdles. This homemade substitute will act just like buttermilk, providing the necessary acidity to activate leavening agents and tenderize the dough.
Are red velvet brownies different from red velvet cake?
Yes, while they share the signature red velvet flavor and color, their textures are distinct. Red velvet cake is typically light, fluffy, and has a fine crumb, often paired with a cream cheese frosting. Red velvet brownies, on the other hand, aim for a denser, fudgier, and chewier texture, more akin to a traditional brownie, but with the added red velvet flavor notes and visual appeal. The baking method and ingredient ratios are adjusted to achieve these specific textural differences.
Can I make red velvet brownies without food coloring?
You can, but they won’t have the characteristic vibrant red color. Traditionally, red velvet gets its color from a chemical reaction between cocoa powder and acidic ingredients like vinegar and buttermilk, which turns the batter a reddish-brown. In modern recipes, food coloring is used to guarantee a bright red hue. If you omit it, you’ll still have a delicious chocolate brownie with hints of red velvet flavor, but visually it will be more brown. For a natural alternative, some bakers use beet powder, though it may impart a slight earthy flavor.
How much confectioners’ sugar should I use for the frosting?
The amount of confectioners’ sugar can be adjusted to your preference for sweetness and frosting consistency. The recipe calls for 2 to 3 cups. Start with 2 cups and beat it into the cream cheese and butter mixture. If you want a sweeter frosting or a thicker consistency that’s easier to spread, gradually add more sugar, a tablespoon at a time, until you reach your desired outcome. Be mindful not to add too much, or the frosting can become stiff.
What kind of cocoa powder is best for red velvet brownies?
For red velvet brownies, unsweetened natural cocoa powder is typically recommended. This type of cocoa powder reacts with leavening agents like baking soda (which would be used if buttermilk were present, though this recipe uses baking powder as a leavener) to help create the characteristic texture. While Dutch-processed cocoa can be used for a darker, richer chocolate flavor, it has a more neutral pH and might slightly alter the expected red velvet flavor nuances. Ghirardelli unsweetened cocoa powder provides a good balance.
Share Your Version!
I poured my heart into creating this best homemade red velvet brownies recipe, blending techniques from my Moroccan roots and French training right here in my New York City kitchen. I can’t wait to see how yours turn out! If you make them, please leave a star rating and a comment below – your feedback truly helps me improve. I also love seeing your creations on social media!
Tag me on Instagram or Pinterest with your photos – seeing your delicious bakes makes my day! And I’m always curious to know how you personalize recipes. Did you try any unique variations or pairings? Let me know in the comments below what your favorite part of these easy red velvet brownies was!
From my NYC kitchen to yours — I hope this recipe brings as much warmth to your table as it does to mine. — mia 🧡
Love This Recipe? Save It to Pinterest!
If you enjoyed this Best Homemade Red Velvet Brownies recipe, don’t let it get lost in your browser tabs! 😄 Pin it now so you can find it again anytime — and explore hundreds more tried-and-tested recipes waiting for you on my Pinterest boards.
👉 Follow mia on Pinterest @chefrecipes2
📌 Pin this recipe · 🔁 Re-pin your favorites · 💬 Tag me when you make it — I love seeing your creations!

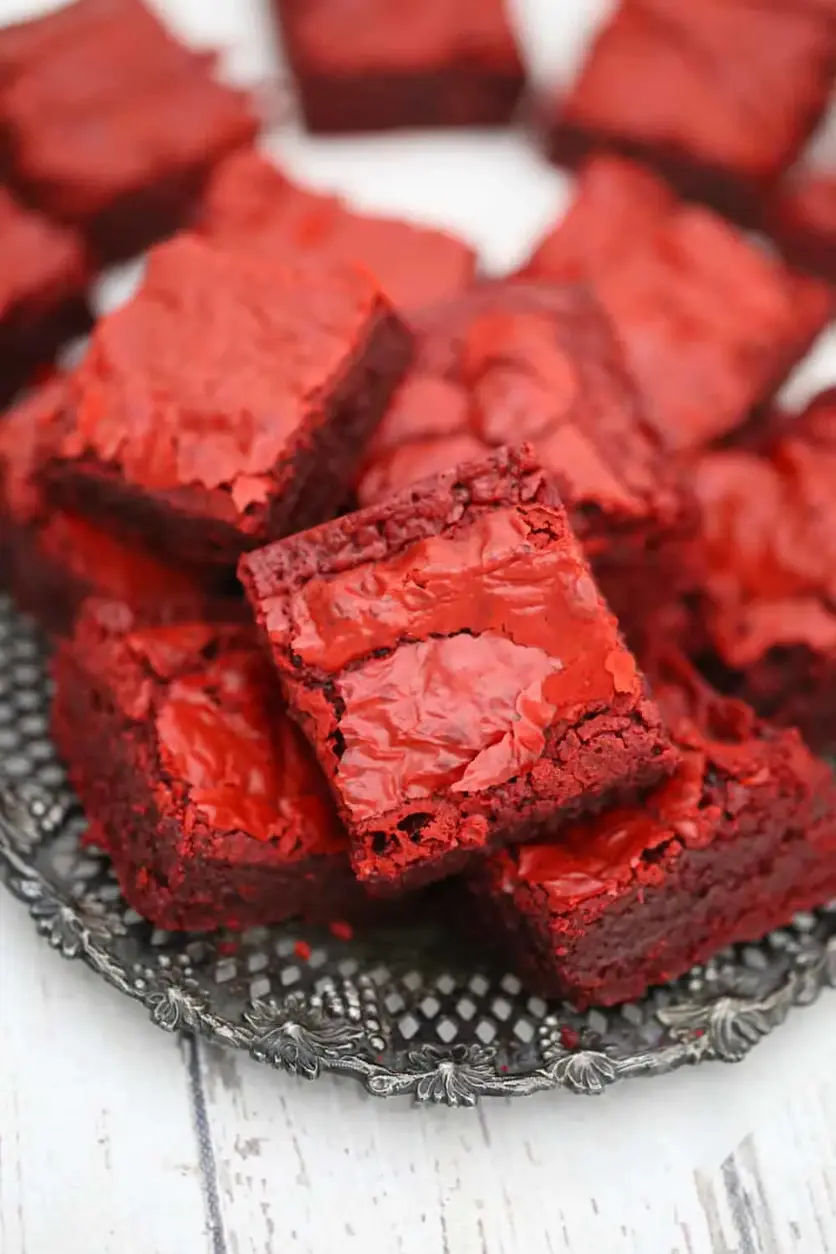
Best Homemade Red Velvet Brownies
Rich, cream cheese frosted decadent, homemade red velvet brownie! These are a Valentine’s Day sweet treat sure to get some attention!
Ingredients
- 2 1/4 sticks unsalted butter (cut into chunks)
- 3 1/2 cups Ghirardelli Milk Chocolate Chips
- 5 large eggs (room temp)
- 1/2 cup granulated sugar
- 1 1/4 cups packed brown sugar
- 1 teaspoon salt
- 1 1/4 teaspoons vanilla extract
- 2 tablespoons red food coloring
- 2 cups all purpose flour
- 1 teaspoon baking powder
- 3 tablespoons Ghirardelli unsweetened cocoa powder
- 4 ounces cream cheese (softened)
- 5 tablespoons unsalted butter (room temperature)
- 1/8 teaspoon salt
- 1 teaspoon vanilla extract
- 2 or 3 cups confectioners sugar
- 1–2 tablespoons heavy cream or milk of choice
Instructions
- Preheat oven to 350 degrees.
- Line a 9×13 baking pan with foil or parchment paper and very lightly grease.
- Melt milk chocolate and butter in microwave until melted or use a small saucepan, melt the butter over your lowest setting, then add the milk chocolate chips stirring constantly with a small whisk until melted and smooth. Turn off heat and let set to cool.
- In a large mixing bowl, add the eggs, vanilla and sugars together and whisk together. Then whisk in the red food coloring.
- Whisk in the cooled down melted chocolate mixture into the egg/sugar mixture until combined and smooth. Make sure the melted butter isn't hot, so it doesn't curdle the eggs when you add it.
- Add flour, baking powder, salt and cocoa powder together and stir together with a silicone spatula until mixture is completely combined.
- Bake 35-40 minutes, until toothpick comes out clean and transfer pan to cooling rack and let cool for 15 minutes.
- Refrigerate, covered until cooled to frost or let brownies come to room temperature before frosting.
- Place cream cheese, butter, vanilla, salt, confectioner's sugar and cream/milk in mixing bowl. Using a mixer, beat on medium high until well combined. Mix until smooth and creamy.
Tried This Recipe? Leave a Comment!
Did you make this recipe? I’d love to hear how it turned out! Please leave a comment and a rating below. Your feedback helps other home cooks and supports cheerychop.com!
For more delicious inspiration, follow me on Pinterest!